 Brittany's Pantry
Honey Cinnamon Slow-Cooker Peach Crisp
Brittany wrote this on 21 September 2014![]() gluten-free, honey, oatmeal, peaches
gluten-free, honey, oatmeal, peaches
 Recently, my husband and I purchased a large parcel of land in the middle of the South Carolina midlands. We have been busy getting ready to build, filling out paperwork, marking trees for removal, pouring over the floor plans, and all the other tasks that accompany a project the size of ours. A few weeks ago, that access road was built to our property.
 Picturesque, don’t you think? The clearing for construction has begun and we are starting to actually see a location for the homestead. Since it is solid forest as far as we can see, any type of clearing goes a long way toward visualizing everything!
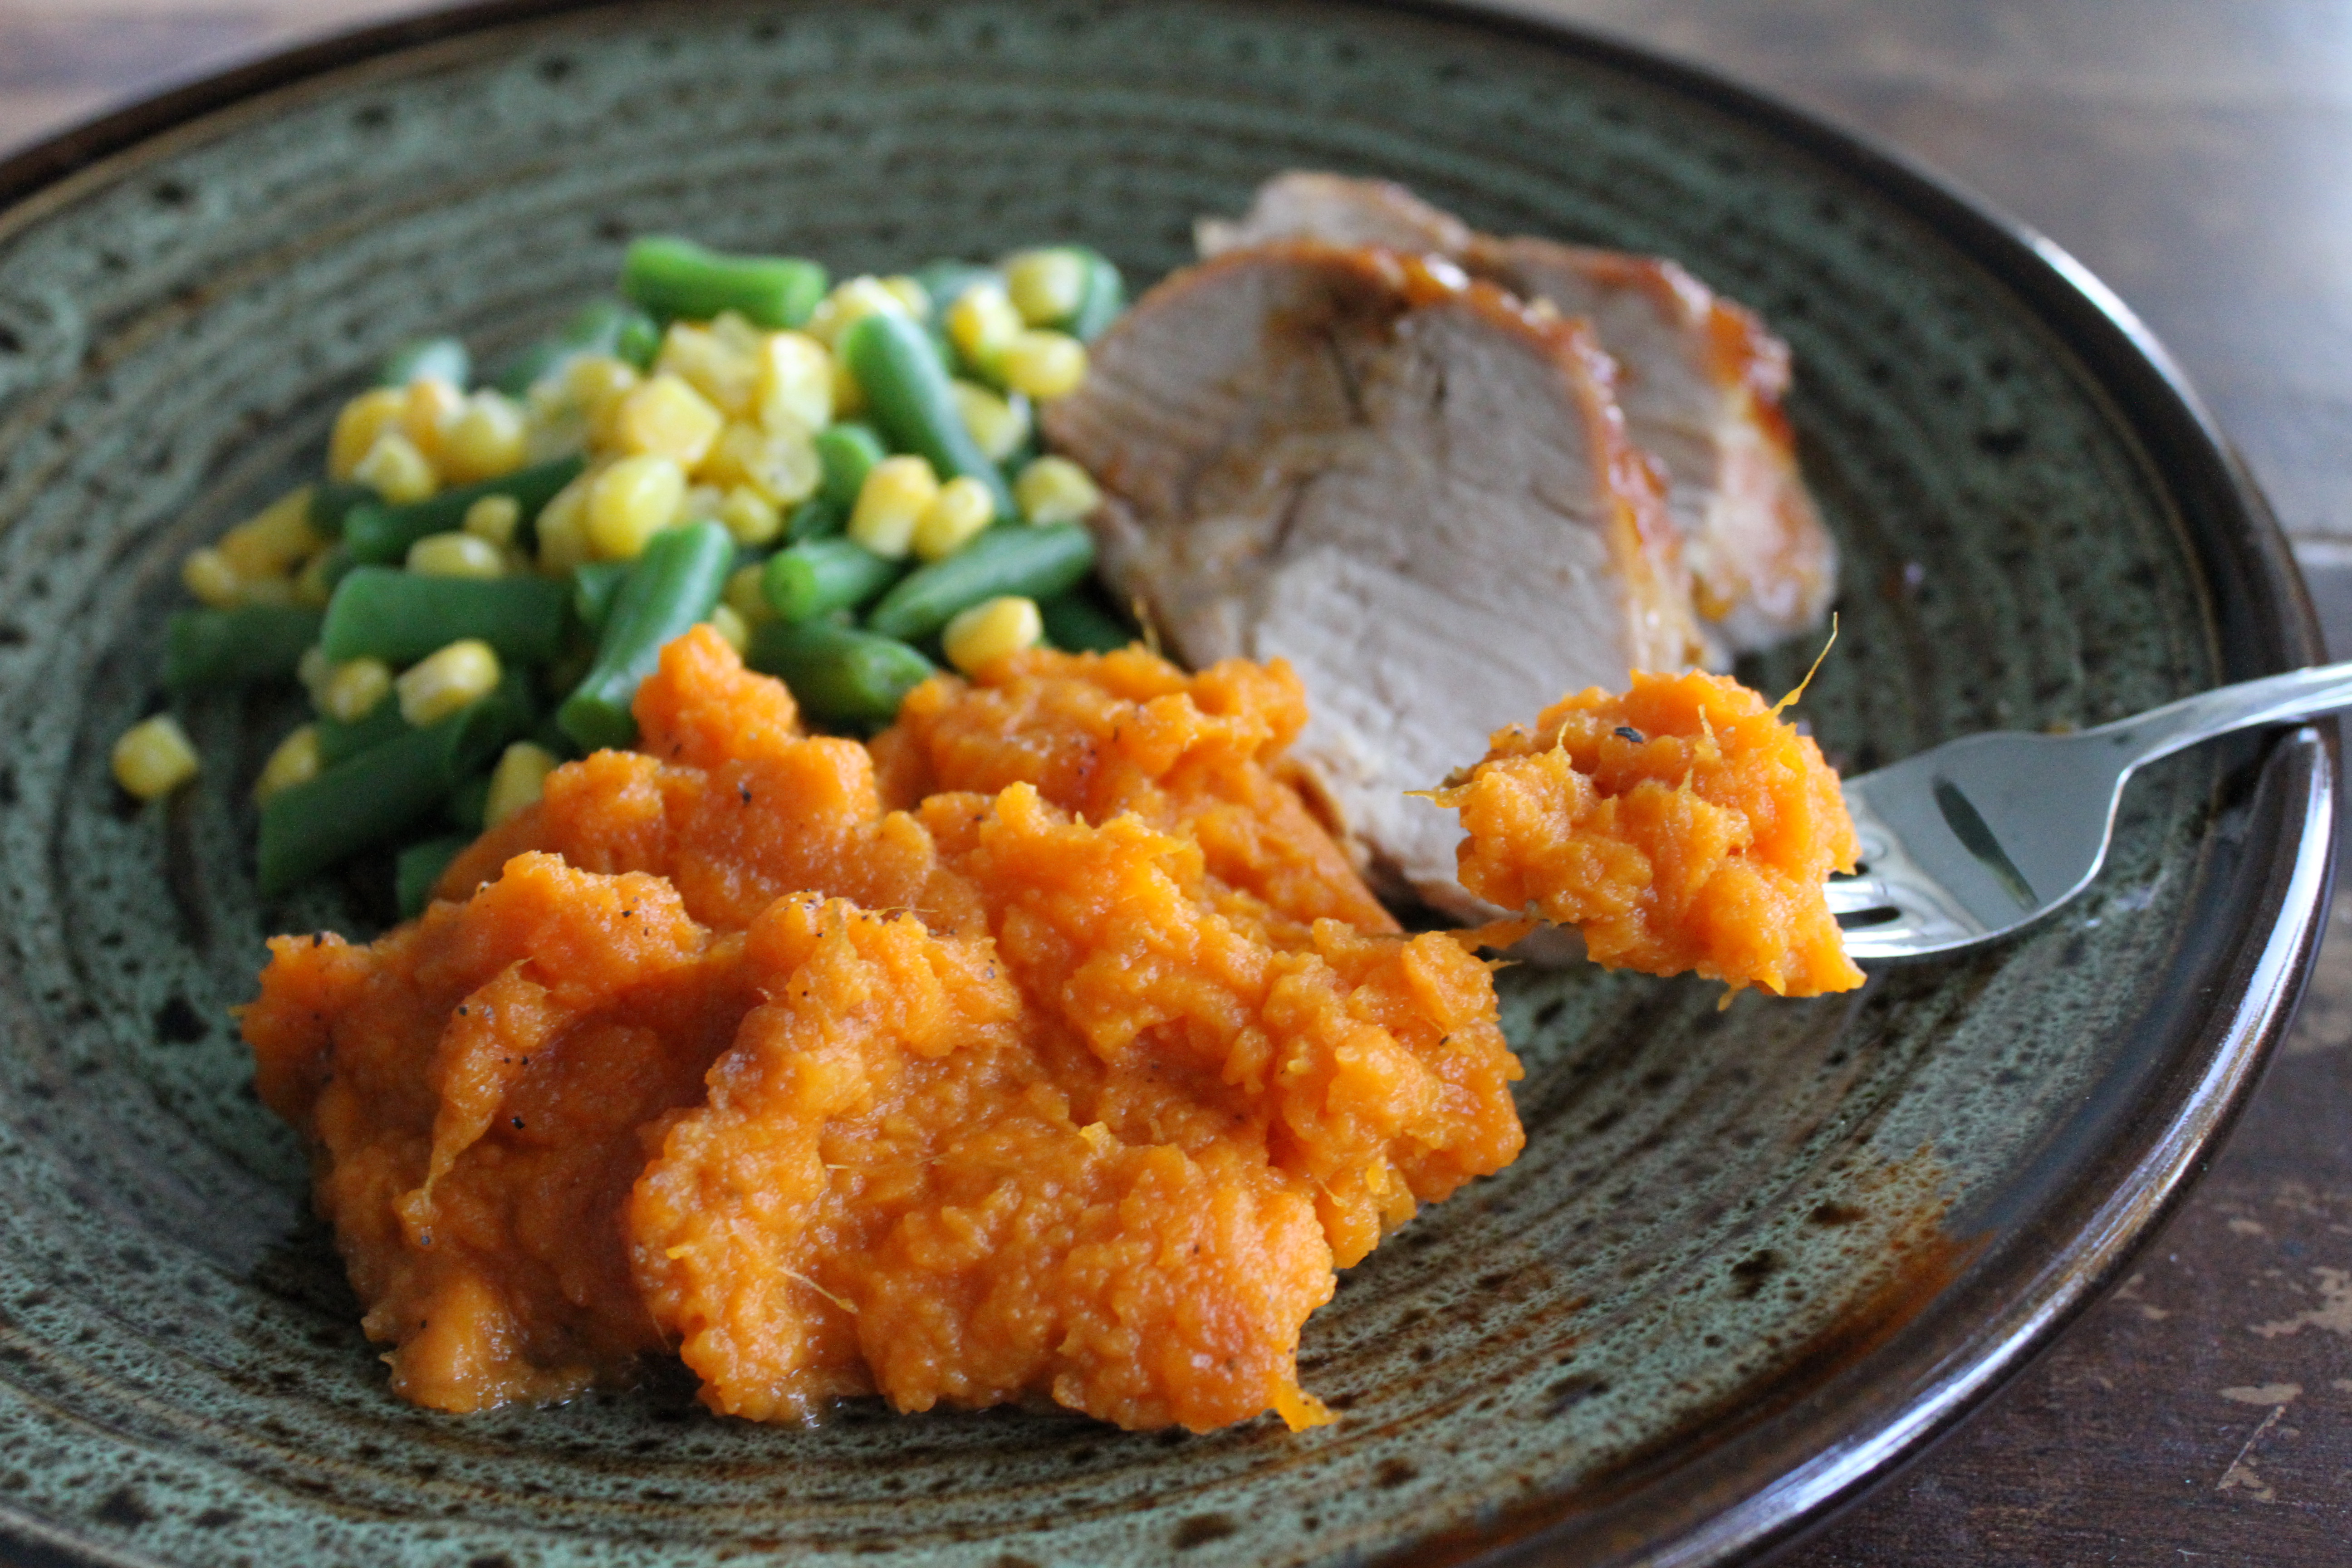
So, after playing out on the land all day, this crisp was pretty great to come home to. It took hardly any time to throw it in the slow cooker and I didn’t have to worry about having the oven on when I was out of the house. Of course, the smell when we opened our front door was mouthwatering. You can smell the cinnamon from down the road! When I decided to create this recipe I messed around with different spices, but ultimately, returned to just plain cinnamon. There is just something about peaches and cinnamon that works just as good (or better) than apples and cinnamon. It all seems warmer somehow. Err go, it is quite possibly the most comforting thing to make this time of year. The honey brings out the peachy-y ness of the fruit without making it too sweet. If you top it with vanilla ice cream, it kinda melts and mixes with the honey-peach juices and creates this sauce that makes you drool and when you scoop it up, its all warm and melty and oat-y and…*sigh* Truly fantastic. It smells and tastes just like home. No matter where that may be or what stage of construction its in. 🙂


 Honey Cinnamon Peach Crisp for the Slow Cooker
Depending on the flour you use, this recipe can be gluten-free or not. I created it using an all-purpose gluten-free flour mix that can be exchanged for regular wheat flour cup for cup. A few of my testers thought that the different flours made the filling too thick, but others didn’t mind. The flavor is slightly different if you make it GF, but still great. Either way you make it is scrumptious!
Fruit:
5 or 6 large peaches, pitted and sliced into 12ths
2 level T, gluten-free or all-purpose flour
1 tsp cinnamon
2-3 T honey, preferably raw
Topping:
3/4 c gluten-free or all-purpose flour
3/4 c rolled oats, gluten-free or regular
3/4 c brown sugar
1 tsp baking powder
pinch of salt
1/2 c (1 stick) room temperature butter, divided
Pinch off 2 T of the butter and evenly smear it on the inside of a regular sized slow cooker crock. Gently combine all the fruit filling ingredients until evenly coated and pour into slow cooker. Be sure to use a spatula to scrape out all the cinnamon honey juice in the bowl! Combine all the dry ingredients of the topping and then add the remaining 6 T of soft butter. Using a fork or your fingers, combine all ingredients until evenly distributed and mixture is wonderfully clumpy! Evenly spread over the fruit in the crock and cover. Cook crisp on low for 4 hours or until fruit is bubbly. Cool slightly and serve with a big ‘ol scoop of vanilla ice cream!

Garlic Toast
Brittany wrote this on 13 September 2014![]() garlic
garlic
 A few days ago I posted a quick, weeknight worthy recipe for a simple Pasta Puttanesca. It is essentially foolproof, is made with all things from your pantry, and if you make it with whole wheat pasta, is actually quite healthy. Like the main dish, the garlic toast that accompanied it was easy and fuss free. My secret?
The freezer.
An earth shattering revelation, I know. You see, my freezer and I have a special, mutually beneficial relationship. I keep it organized (usually) and clean, and in turn, it provides me with quick meals and the occasional pint of Ben & Jerry’s Chocolate Fudge Brownie. When I am pressed for time or simply lack the energy and drive to make dinner, pulling something out of the freezer that requires little or no action is the best feeling in the world. Am I right? It is like winning the lottery. Its 5:30 pm on a Tuesday and you are digging through bags of frozen edamame and blocks of ground beef when suddenly you find a quart container of Chicken & Barley Soup, ready to be microwaved. I can’t be the only person out there who would hold it up in victory and shout Eureka!! And it is equally gratifying if you are pulling out dinner for one or two people at eight o’clock at night after a long day of work, or if you are a stay at home mom without the time to whip something up between laundry, grocery shopping, homework checks, piano lessons, PTO meetings, and ballet rehearsal. It is for these exact moments in life that I keep certain items in my freezer.
In this case, it is pre-sliced french bread. Every once in awhile, I rifle through the day old section of baked goods in the bakery of my local supermarket. When I find the big loaves of thinly sliced french bread for 1.99, I buy two! I bring them home and toss them right in the freezer. They aren’t perfectly wrapped to store long term, but it is enough to let them slowly dry out over the next few weeks. Then, when I need a quick dinner, I have stale, frozen bread that I can use to make french toast, panini, bread crumbs, bread pudding, croutons, and in this case, garlic toast. The smaller, chewier baguettes are better for crostini or bruschetta and can be a bit tough for just toast. So for this, you want the softer, country type loaves that aren’t so crusty on the outside. Perfect to slather with garlic butter.
Garlic Toast
thinly sliced french bread, preferably slightly stale
1/2 stick (4 T) of soft, salted butter
1 large garlic clove, minced finely
Preheat the oven to 350. Combine the butter and garlic in a small bowl and set aside. Arrange your bread in a single layer on a dry sheet pan and oh so very thinly spread with garlic butter. You want this toast to get crunchy and crispy, so be sure to spread the butter to the very edges and use it sparingly. Just a VERY thin layer. Be sure the bread is butter side up on the pan and toast in the oven for 10 minutes. Check the toast. If it is firm and overall golden brown, then it is done. If not, rotate the pan 180 degrees and let it go for a few more minutes. Watch it closely! Toast can go from nothing to burnt in a short amount of time. Essentially, toast until your preference and enjoy! This is fantastic served with chili too! Leftover garlic butter can be stored in an airtight container in the fridge to be used for more garlic toast but is also good spread on the outside of panini, stirred into mashed potatoes, rubbed on chicken before roasting, or anything else you can think of!
Inside-Out Carrot Cake Cookies
Brittany wrote this on 20 August 2014![]() carrots, cream cheese, honey, raisins, walnuts
carrots, cream cheese, honey, raisins, walnuts
 I can’t help but smile when I think of this recipe.
When my husband was in the Navy, I often volunteered to cook for our unmarried or otherwise unattached friends. I have mentioned this before; that I used to use them as guinea pigs in the early days of my cooking career, completely taking advantage of their willingness to eat just about anything while I tested my way through experimental dishes and recipes. During deployment, food on a nuclear submarine is very….well…I could tell you but then I’d have to kill you. Know that it is less than perfect. Any home cooking was much appreciated and the guys actually made a very diverse test group, since those young men came from every walk of life and from every part of the country. Sailors from the big city, the south, midwestern farms, tropical islands-everywhere. I cooked food from the north and a good friend and fellow Navy wife contributed southern expertise. And we fed them. My favorite way to show that I love and care. Food.
That is why these sweet little cookies make me grin. Not because they are wicked good (they are) or because the thought of eating one right now makes me want to weep with joy (it does) or the fact that anything filled with some type of cream is on my ‘for sure’ list (it is). But because the very first time I ever made them was for a bunch of sailors off the USS-Topeka. I had ripped the recipe out of an issue of Bon Appetit and taped it into a notebook filled with other recipes that I had saved, scribbled down from friends, or pilfered from the magazines in the dentist office waiting room. My San Diego kitchen was rather minuscule, but that didn’t deter me from trying new recipes, no matter how complicated or advanced they seemed. I assumed this recipe was a bit of both and was pleasantly surprised when I discovered it was just cookies and frosting. Easy peasy.
The recipe has since moved to my computer, but I clearly remember adding a special note in the margin of that old notebook. **Sailor Approved** That first time I made them we all oohed and aahed over how good they were. But again, that isn’t what makes them special. It was the fact that when we were all thousands of miles from home, missing our families and aching for something familiar, these cookies made the house smell like home. It smelled like a crisp fall day in the north woods even though it was actually 85 and sunny on the coast of the south Pacific. These sweet little treats were part of the conversations, laughter, teasing, and warm hugs of that day. The memories of those men are very dear and while we are all now scattered to the far corners of the world, I hope just like for me, certain things trigger fond memories of our times together.
And who knows? Maybe carrot cake will forever make them think of a tiny apartment in San Diego filled with good friends and good food, too.
 Inside-Out Carrot Cake Cookies
Recipe adapted from Bon Appetit
I have two favorite things about this recipe. One: That the filling is just cream cheese and honey. Genius. And totally something I would do. And two: They are freezable. Make them once and enjoy repeatedly. Hello time saver!
1 1/8 c flour
1 tsp cinnamon
1/2 tsp baking soda
pinch of salt
1 stick (1/2 c) butter, softened
1/3 c brown sugar
1/3 c sugar
1 egg
1/2 tsp vanilla
1 c grated carrot, about one large or two medium
3/4 c walnuts, chopped
1/2 c raisins
1-8 oz pkg cream cheese
1/4 cup honey
Preheat the oven to 375.
In small bowl, mix the first four dry ingredients and set aside. Using a stand mixer or hand mixer, beat the butter and sugars until smooth and fluffy. Add the egg and vanilla and beat until smooth. By hand, gently mix in the carrots, raisins, and walnuts. Fold in the dry ingredients until just combined. Scoop rounded tablespoonfuls onto a sprayed or parchment lined sheet pan. Give them a bit of room to spread a bit between cookies. Use two sheet pans or bake cookies in two batches. Bake 12-14 minutes until just springy to the touch. The cinnamon makes it hard to see if they are browned enough but if you can tell, they should be lightly browned. Let the cookies cool on the pan until firmed up enough to move with a spatula to a rack to cool completely. My kitchen always seems to be warm so for me this took a good 3 or 4 minutes for them to set up enough without destroying them when moved! While cookies are baking, blend the cream cheese and honey together. Once cookies have completely cooled, spread a heavy tablespoon on half the cookies and top with a second cookie. Enjoy, or wrap individually in cellophane and freeze in a gallon zip top bag. These make excellent after school snacks!!
Pistachio Granola
Brittany wrote this on 16 August 2014![]() gluten-free, honey, oatmeal, pistachios
gluten-free, honey, oatmeal, pistachios
 With the exception of that strange, green instant pudding from my childhood, my experience with pistachios was rather limited until I married my husband, Mike. My Aunt Mary used to make this awesome dessert called Watergate Cake and it was a lovely shade of pistachio green and it contained that same pudding. Recipe coming soon!! But thats not what today is about! Granola. Today is about granola.
So. My husband loves pistachios and has always preferred to buy the ones roasted, salted and cracked in the shell. He snacks on them regularly and he has passed that nutty love of lime green nuts onto our children. They eat them whenever they can get their hands on them and when I came across a recipe that made them the star player in granola, I couldn’t pass it up. I always add them to my favorite granola bar recipe for color and flavor, but this recipe takes the obsession one step further. One tasty, crunchy, healthy, and addictive step further. So good in fact, I passed some of this along to my neighbor when I was testing and tweaking this recipe, and even though I sent it with yogurt to eat as well, she skipped the dairy and just inhaled the granola by itself. Then she pestered me for more! Good indication of a winner, don’t you think?
 In general, I prefer to save a buck or two and crack them myself. Or rather, I give them to Mike and he cracks them for me. (Some of those suckers are tough!) Pistachios are on the expensive side so when they are on sale, I buy what I can and enjoy them. I always plan to buy ahead and freeze them, but we eat them too fast! Like most nuts, pistachios are incredibly good for you and contain a wealth of nutrients. Just a handful can give you your daily allowance of more than a half dozen vitamins and minerals, in addition to healthy fats and antioxidants. I would love to mention all of the benefits of these fantastic nuts, but I think that we should really just stick to the most important factor: They are GREEN!!! You faithful readers know about my obsession with all things green, afore mentioned here and here. How do you pass up such a cheerful color? Pistachio green paint is so popular, the 60’s and 70’s had people painting their entire kitchens with it. Those people knew something groovy when they saw it, huh?
 If you are not familiar with the taste of them, this granola is the perfect segue into discovering your love of happy, green, pistachios. Healthy, nutty, crunchy, and incredibly toasty, we love it sprinkled over yogurt or poured in a bowl with some milk and eaten like a cereal. Absolutely fantastic. And much less of a commitment than painting your cabinets green.
 Mixed and ready to toast in the oven!
 All done! Perfectly toasty and delicious!
*Todays recipe is the second part of a healthy eating series I am doing over on J Rose Fitness, a healthy living Facebook page! Jessica McKenzie is an online Beach body coach and you can check out her page here. Be sure to like her on Facebook to get regular healthy living tips and inspiration! Click on the links below to see the other recipes in the series.
Pistachio Granola
Recipe adapted from Mountain Momma Cooks
I do double this recipe, but most of the time I like enjoying this small batch. I make this often, but it isn’t my regular go-to formula for granola so we treat it as something special.
1 1/2 c rolled oats
1/2 c shelled pistachio nuts, roughly chopped if desired
1/3 c sliced almonds
3 T grape seed or canola oil
3 T honey, preferably raw
1 tsp vanilla
small pinch of salt (if your nuts come salted, omit this ingredient)
Preheat the oven to 300 degrees. In a medium bowl, combine nuts and oats. In a large measuring cup, microwave the remaining ingredients until just warm enough to soften the honey and stir the mixture smooth. Pour over the oats and pistachios, mix thoroughly, and spread on a parchment lined sheet pan. Be sure the mixture is in a nice, thin, single layer so that the heat can circulate well and toast your granola evenly! Bake for 10 minutes, then gently stir the mixture well, spreading it evenly out on the sheet pan again. Toast for another 5 minutes, stir again, then toast for a final three minutes. Granola should be golden brown and don’t worry-it will crisp up as it cools. Remove and let cool completely. Store in an airtight container or freeze.
Buttermilk Bread
Brittany wrote this on 10 August 2014![]() buttermilk
buttermilk
 Inevitably, when I leave for vacation, I seem to have a container of buttermilk left. You would think I get hip to this fact over time and take the necessary measures, using it up in waffles and pancakes the week before we go, but I never do.
Now, if this were ice cream, I would be all over it. I would gladly sacrifice my healthy lunch to finish off that lonely quart of mint and chip. The fact that ice cream would easily last until I returned in a week or so is irrelevant.
But buttermilk? You obviously can’t just drink it down to use it up. I always keep it in my fridge because I use it to bake with so much, but when I am packing 5 people for a trip (one of them who is still in diapers) time is of the essence. Yes, I could freeze it, and occasionally I do. Unfortunately, my freezer real-estate is limited and much sought after (the blueberries usually win) so that isn’t always an option. Especially now in our little rental house. My solution? This bread. Aptly named, Buttermilk Bread. You may have already deduced the main ingredient…
This earns a spot on this blog because it is just so darn versatile. I am all about multitasking so anything that serves more than one purpose is on my ‘I like you’ list. Believe it or not this isn’t a sweet bread, but it can certainly be served that way. Baked ahead and tucked in the freezer, this bread is great to pull out and slice up to put out for breakfast or brunch; slathered with butter and jam of course. The mild, neutral flavor also lends itself to savory applications. Added to the dinner table in lieu of dinner rolls, no butter needed, is a great way to change up your menu without a lot of effort. Think of it alongside soups, stews, main dish salads, and even Thanksgiving!
I’ll post the recipe below. You know…just in case you are going on a trip soon.

 Buttermilk Bread
Adapted from Cooking Light
This quick bread comes together with minimal ingredients and even less steps, making this a great recipe to use when you are short on time!
Preheat your oven to 350. In a large mixing bowl, add:
2 c all purpose flour
1 tsp baking soda
pinch of salt
Whisk dry ingredients together to combine. In a large measuring cup, whisk together:
2 egg whites
1 1/2 c low fat buttermilk
2 T honey
1/4 c canola or grape seed oil, or melted butter
When wet ingredients are whisked until smooth, add to dry ingredients and stir and fold both together until just combined. No need to whisk or beat this. Pour batter into a sprayed, standard sized loaf pan (about 8X4 or 9X5) and bake for 45 minutes. It will be nicely browned on top and a toothpick or skewer should come out clean when inserted near the center. Cool slightly in the pan for 10 minutes or so until the bread has a chance to set a bit, then turn out onto a cooling rack. Cool completely!! Slightly warm is ok, but slice it too hot and it isn’t as good. Great bread to freeze ahead and just thaw on the counter before you serve it. Enjoy!
Pioneer Bread
Brittany wrote this on 6 May 2014![]() buttermilk, dates, honey, raisins, walnuts, whole wheat flour
buttermilk, dates, honey, raisins, walnuts, whole wheat flour
 Can I just, say something…crazy?
In my head, that request was stated like Princess Anna in Frozen.
Ok. Here is the crazy thing. Are you ready?
This bread tastes like history. Like the Old West. Like The Oregon Trail.
I TOLD you it was crazy, and although I am not a woman prone to exaggeration (*cough cough* ahem), I promise you this is true. It makes you think of covered wagons, sod houses, and Little House On The Prairie. I take a bite, close my eyes, and I no longer hear the beep of the microwave timer, but instead, the clang of the iron cookstove door as my husbands adds more logs to the fire. I can almost smell the waist high grasses blowing outside of the open kitchen window. My calloused hands bring the still warm slice of bread to my lips for another taste and a sudden bellow from Mazy in barn reminds me that its almost time for evening milking.
Don’t you love it when food does that to you? Transports you to another time and place or evokes a thought or feeling with just a taste? I do. That is one of my favorite things about food. Perhaps a little of it is the name, but I feel stronger, more independent, and more adventurous just mixing up a batch.
The recipe-or a version of it-has been handed down through families for generations. It relies on the acid of sour milk to do its leavening and contains no refined sugars and no butter or oil. Certain items have been changed over time, such as the use of wheat flour, but I think it still stays true to its name. It is hearty and a bit heavy, due to the denseness of the ingredients, but it isn’t TOO heavy. The dried fruit helps sweeten the bread but the honey flavor comes through and results in a bread that nearly tastes like sunshine itself. We like to eat it sliced thick, plain, right out of the hand. When you get to the end of the loaf after a day or two, toasted with butter is down right excellent. Milk cow and covered wagon optional.

 One Year Ago: Pomegranate Sorbet W/Mini Chocolate Chips & White Sangria,
Two Years Ago: Classic Buttermilk Biscuits, The BEST Strawberry Rhubarb Jam,
Three Years Ago: Lemon Chiffon Pie & Outrageous Grilled Pork Chops
Pioneer Bread
Adapted from Americas Test Kitchen
The little boost of sugar is not necessary, but I found that it makes the honey flavor a bit stronger in the finished bread.
3 c white whole wheat flour, or regular whole wheat flour
1 c all purpose flour
1/4 c sugar (optional)
1 tsp baking soda
1 tsp baking powder
1 tsp salt
1 egg
2 c buttermilk
1/2 c honey
1 c chopped walnuts
1/2 c chopped dates
1/2 c raisins
Preheat oven to 300 degrees. Combine dry ingredients in a bowl. In a large glass measuring cup, whisk together the buttermilk, egg, and honey until combined. Gently stir into dry ingredients, folding together until not quite mixed. Add the nuts and dried fruit and gently fold together until completely combined. Pour the batter into two, well greased or sprayed 9X5 inch loaf pans. Bake for 50-60 minutes or until golden brown and toothpick inserted in the center comes out clean. Cool in pan for 10 minutes, then turn out onto a rack and let cool the rest of the way. Store well wrapped on the counter for a day or two, or freeze.
Granny’s Buttermilk Pound Cake
Brittany wrote this on 26 April 2014![]() buttermilk, strawberries
buttermilk, strawberries
 Sometimes things come along in life that you just know are special.
The first time I tasted this pound cake was one of those times. Not special like the birth of my children or my wedding day, but something that you know is different. Lovely. My best friend makes this pound cake and yes, as you may have guessed, it is her Granny’s recipe. The same Granny, I might add, that is also responsible for this wonderful casserole of deliciousness. The Granny who’s granddaughter introduced me to some of my most favorite southern foods; this classic pound cake among them. Once I tried this, I have never really cared to try anyone else’s. It is just simply-the best.
 That specialness I was speaking of, is love. Yeah yeah. I know. *eye roll* Sappy right? What I mean is love, as an ingredient. There is something about this cake that makes people stop and smile. It is velvety and moist and perfect and…well…special. Just like chicken noodle soup can taste like home and comfort, so can this cake remind you of something familiar and warm and loving. Which, as I experienced the handful of times I personally got to spend with Granny, is exactly the kind of woman she was. I may make different kinds of pound cakes over the years, but nothing beats this traditional, classic version that has been through the hands of generations of southern women and made (literally) hundreds of times.
With this move to South Carolina coming closer and closer, I know I will be able to hold my own at the church pot-luck dinners and any school bake sale that comes my way. I may still throw a Tator-Tot Casserole or Wild Rice Soup at them once in awhile, just to remind them that Yankees can cook too. But you just can’t argue with tradition.
Granny would approve.

 Two Years Ago: Strawberry Shortcake Cake
Three Years Ago: Lemon & Herb Deviled Eggs
Granny’s Buttermilk Pound Cake
Adapted, ever so slightly, from Jewel Amason (Granny)
This recipe originally called for Crisco but I rarely ever keep it in my house. For the sake of convenience, I use butter. If we are being totally honest here, I actually prefer the taste of this cake with shortening (gasp!) but butter works well too. It is the ONLY thing I have changed from the original recipe as given to me by the family so I hope they can overlook it! 🙂 This cake is not fussy or temperamental which makes it very reliable. It freezes WONDERFULLY and that is one of my most favorite things about it! Because it makes a full bundt pan, I usually serve half the cake and then wrap the second half well and store it in the freezer. Give it a bit to thaw on the counter and it is just as good-even a bit better!-than freshly baked. Being a simple pound cake, it is fantastic with just a dusting of powdered sugar and eaten out of hand. I am sharing it with you now because it is also the perfect vehicle for spring berries! The pic above is smothered in a strawberry/rhubarb sauce and that is hands down our favorite way to eat it. Whipped cream or vanilla ice cream isn’t too bad either!
The recipe format is a bit different because I am going to write it exactly how it was given to me. I have never deviated from the directions for fear of it turning out different!
Add ¼ tsp baking soda to 1 c buttermilk and stir. Set aside.
Cream:
1 c Crisco (or softened butter)
2 ½ c sugar
Add 5 eggs one at a time.
Alternate adding 3 c flour and buttermilk mixture until blended.
Add 2 T boiling water and 1 tsp vanilla.
Blend well.
Pour into greased and floured bundt pan and bake at 350 for 1 hour.
Let cool in pan for 5 minutes then turn out to cool completely.
Slice and enjoy!
Super Quick Peanut Butter Cookies-GF & DF
Brittany wrote this on 19 April 2014![]() gluten-free, peanut butter
gluten-free, peanut butter
 Peanut butter is a funny thing.
You can turn it into a savory sauce for noodles, no-bake confections for the holidays, or the ever classic favorite, straight up peanut butter cookies. Speaking of cookies, peanut butter needs little in the way of help to bake up as such. The following recipe is a kind of classic formula that has recently become popular again due to the demand of gluten-free, dairy free, and grain free recipes.
But this isn’t some fancy schmancy new development. I remember making something like this when I was a kid and maybe rolling them in sugar before baking? Not sure. But throwing together treats with few ingredients is old hat in the foodie world and these cookies are a prime example. They just happen to be naturally gluten and dairy free. Which, in turn, makes them great for the masses, just in case you need something that covers all your bases with guests.
In the end, what is really important here is that they taste good. They taste awesome, actually, and may just replace your classic peanut butter cookie. They are just so much more….peanut-ty…than other cookies. Like, the essence of peanut butter in cookie form. I still kind of marvel that you can put so few things together and have them bake up so perfectly cookie-like. Because they are so wonderfully simple, they are the perfect platform to use in other applications. For example, I highly recommend putting a scoop of chocolate and vanilla swirled ice cream between two of these. I mean, its just…*sigh*…outrageously good. Crumbled up and added to a bowl of vanilla frozen yogurt? Also not a terrible idea. Neither is using them as a scooper for applesauce.
Do YOU do anything special with your peanut butter cookies?
 One Year Ago: How To: Basic Quinoa
Two Years Ago: Freezer Fajitas
Three Years Ago: Banana Chocolate Chip Muffins & Mexican Rice W/Black Beans & Pasta W/Zesty Bolognese
Gluten-Free Peanut Butter Cookies
I have never tried making this with almond butter, but I have no doubt it would be fantastic.
1 c creamy peanut butter
1 c sugar
1 large egg
3/4 tsp baking soda
Combine all ingredients in a medium bowl. Drop by rounded teaspoonfuls onto a sprayed or parchment covered sheet pan and bake at 350 for 9 minutes. The cookies should be just barely golden around the edges. Let cool on the pan until set enough to remove with a spatula.
Honey Cardamom Snack Cake
Brittany wrote this on 5 April 2014![]() honey, sour cream, whole wheat flour
honey, sour cream, whole wheat flour
 A year or so ago, my friend Thea and her family stopped by to visit on the way through town. Aside from the fact that I have know her more than 20 years and she remembers what I looked like in the mid 90’s, she is a professional baker. She has been mostly special occasion cakes for the last 8 years, but recently opened up a store front, giving the general public a chance to enjoy her creations on a day to day basis. Needless to say, we talk flour, butter, sugar, and eggs whenever we are together.
On this particular visit, I was baking something. For the life of me I canNOT remember what it was, but I assure you, it wasn’t cake. Of all the things to feed a professional baker, I avoid baked confections as much as possible. Usually I lean toward things like creme brûlée, fruit bars, and puddings. Whatever it was I was making, Thea walked into the kitchen, sniffed, and her eyes lit up. “Are you using cardamom?” was her immediate question. Yes, I told her. Why? “It is one of my favorite spices,” she declared. “But it is so under-used!’
I agreed. Even though it is a warm flavor with an almost herb-y quality to it, and is often mixed with Christmas spices, you don’t often see it used completely on its own. I happen to love it. I add it to my plain banana bread, shortbread cookies, and most recently, as the feature flavor in snack cakes!

 As you can see, my two year old wasn’t willing to wait until I was done photographing. The honey is the only sweetener in this recipe so please please PLEASE use local, raw honey if you have the chance. The flavor is incomparable to the stuff from the grocery store. It also gives it the perfect level of sweetness. Paired with a simple, sour cream snack cake base and the warmth of the cardamom, it is just homey. If you want to use it as a dessert, fresh strawberries and sweet whipped cream are outstanding with this cake. But generally, I just like to pick it up and take a bite.
Thea would approve.


 One Year Ago: Loaded Black Bean Quesadillas
Two Years Ago: Cream Cheese Banana Bread
Three Years Ago: Honey Carrots & Non-Traditional Shepherd’s Pie & One Bowl Chocolate Cake
Honey Cardamom Snack Cake
This tastes great on day two so whip it up when you have time and enjoy as an after school snack!
1/2 c (1 stick) butter, room temp
1 c honey
2 eggs
1 tsp vanilla
1 c white whole wheat or whole wheat flour
1 c all purpose flour
1 1/2 tsp ground cardamom
1 1/2 tsp baking powder
1/2 tsp baking soda
large pinch of salt
3/4 c sour cream
Preheat the oven to 325.
Using a hand or stand mixer, combine the butter and honey until creamy. Add the eggs and vanilla and beat until smooth. In a separate bowl, combine the dry ingredients and add half of the mixture to the honey mixture. Mix slowly until starting to combine, and add half the sour cream. Still mixing slowly, add the last of the dry ingredients and the last of the sour cream. Mix until just barely combined, finishing by hand and scraping down the bowl at the end. Pour batter into a greased and floured 9 inch cake pan and bake for 40-45 minutes or until a toothpick inserted in the center comes out clean. Let cool on the counter for 10 minutes or so, and then turn out onto a rack and let cool the rest of the way. Slice into wedges and serve!
 I think Irish Soda Bread is one of those things that people always think is really complicated, when really, it couldn’t be simpler. I make soda bread year round because it is just so darn good, but given the impending Irish holiday-a heritage that my husband and I both share-I thought posting it now was apropos.
I know this sounds a little crazy, but I like making things like this bread because it makes me feel like I have stepped back in time. Everything about the way it looks, smells, and even the way it feels in your hands when you break it apart calls up images of green fields, rock walls, a heavy knitted sweater or two, and cloudy skies. You get a feeling that you are doing something, that at the root of it, is worthwhile. Meaningful. Rustic. Do you ever feel that way when you get your hands dirty? Wether it is digging in the garden or mixing a hearty bread with your fingers, you just feel like you have survival skills. Like you know you would make it in a post apocalyptic world. Assuming you survived the zombies, of course…
The basics of this bread, traditionally, consist of whole grain flour, baking soda, some sort of acid to activate the soda and make the bread rise, and water. It was plain and eaten with meals or on its own as a quick lunch. Different regions of Ireland have different variations on shape, cooking, and flavorings, but there are a few things that seem universal. Most include some sort of dried fruit, such as raisins or currants, and often have the shape of a cross carved in the top of the loaf to ward off the devil. Who am I to break tradition??

 I really have nothing more to say about this fantastic recipe other than it is just fabulous. I have made a LOT of Irish Soda Breads in the last few years and all of them are good. I may even share a different one some other day. But as for a great, straight up, fairly traditional and classic recipe-this is it! I actually tossed out and deleted several of my other versions because they just don’t compare. And now I am one step closer to surviving the end of the world.


 One Year Ago: Smokey Smoothie & Quick Peanut Noodles
Two Years Ago: Pineapple Upside-Down Cake, Peanut Butter Chocolate Chip Cookies, Strawberry Orange Pineapple Smoothie, & Chicken Tetrazzini
Three Years Ago: Two Kinds of Cranberry Sauce & Crock Pot Chocolate Mess
Irish Soda Bread
Recipe inspired by numerous places.
This bread is not sweet by any means. It is rustic and thick and heavy and lovely. It seems to have the best flavor and texture the day it is made, but toasted on day two is wonderful as well. Serve this with plenty of cold, salty butter.
3 c flour, plus more as needed
2 tsp salt
1 tsp baking powder
1 tsp baking soda
4 T (1/2 stick) cold butter, cut into pieces
1 c wheat bran
1/4 c caraway seeds
1 c raisins
1 2/3 c buttermilk or 1 1/3 c whole milk + 1/3 c apple cider vinegar
Preheat oven to 350. If you are using whole milk and vinegar in place of the buttermilk, combine them now and set aside.
In the bowl of a food processor, pulse the first four ingredients together until combined. Add the butter and pulse until mixture resembled course crumbs. Alternatively, cut the butter into the flour mixture using a pastry blender, to knives, or by rubbing the butter between your fingers. Dump into a large bowl and add the caraway, raisins, and bran. Mix gently to combine. Pour in the buttermilk and stir with a large fork until the mixture starts to come together and is just combined. Dough will be very sticky. Flour your hands and gently pat the dough into an 8 inch domed round on a large baking sheet covered with parchment paper or a Silpat. Score the top of the round with a large cross and sprinkle with a dusting of flour if desired. Bake for 1 hour, or until golden brown and toothpick inserted in the center comes out clean. Let cool on a wire rack. Slice, or break into four chunks along the grooves and then slice. Serve with lotsa buttah!
Whole Wheat Banana Bread
Brittany wrote this on 23 February 2014![]() bananas, honey, walnuts, whole wheat flour
bananas, honey, walnuts, whole wheat flour
 One look through my recipe archives and you know how much I love things made with banana.
It is not so much that it is my favorite flavor, but that it is just so dang easy to make. Banana type baked goods are virtually guaranteed to come out naturally sweet, moist, and popular with everyone. I always have bananas in the house and on the frequent occasion that I end up with some that are too ripe, it is a no brainer that having an arsenal of quick bread and muffin recipes is handy.
A few weeks ago, I decided to use up my rather large amount of soon to be mush bananas and make a quadruple batch of this Double Chocolate Banana Bread. However after the first loaf, I realized that someone (not me) had used up all the cocoa powder (I didn’t do it) making hot chocolate (not I) and never added it to the grocery list (fine, it was me). So I decided to do one of my favorite things: pull random cookbooks off my shelf and start rifling through them to find a new recipe. I do this pretty often when I need a little extra inspiration, or when I just get bored with what I have been cooking. With over 100 cookbooks in my possession (not including the 5000+ recipes on my computer) it could keep me busy for years.
Fortunately, the first cookbook I picked up was my Whole Grain Baking cookbook by King Arthur Flour and I had no need to go any further. I found this recipe and immediately whipped it up. A plain, straightforward, whole wheat banana bread was exactly what I was looking for.
 I made a few adjustments to accommodate what I had on hand. And then I made it again. And then again. At one point in time, I even shmeared a few slices with cold, salty butter-OH my stars-which is something I rarely do with bread but may now have to do on a regular basis. Butter. Goooooood.
So just in case you were planning on searching high and low for a great whole wheat banana bread recipe, look no further. I got ya covered. And you don’t have to sift through 100 cookbooks to find it!

 One Year Ago: Upside Down Sausage & Mushroom Pizza Casserole & Lemon and Garlic Shrimp Linguini
Two Years Ago: Lemon Potatoes & Buttermilk Brownies
Whole Wheat Banana Bread
Adapted from King Arthur Flour
As with all quick breads made with bananas, be sure to use over ripe fruit-as in past the point that you would eat it out of the hand. The skin will have dark spots on it and they will be VERY fragrant. This makes for a moist, sweet, banana-y flavored bread. If you use fruit that is not over ripe, the flavor and texture will suffer.
3 very ripe bananas, peeled and mashed
1/4 c honey
2 eggs
1/3 c canola or grape seed oil
1 tsp vanilla
1/2 c brown sugar
2 c whole wheat or white whole wheat flour
3/4 tsp baking soda
1/2 tsp salt
1/2 tsp cinnamon
1/4 tsp nutmeg
3/4 c chopped walnuts
Preheat the oven to 350 degrees.
In the bowl of a stand mixer or other large mixing bowl, combine the first six ingredients until well incorporated. Add the dry ingredients and combine until barely mixed. Scrape the sides of the bowl and mix the last few turns by hand. Fold in the walnuts. Pour into a greased, standard loaf pan-about 9X5- and bake for 50 minutes, or until a toothpick inserted in the center comes out clean. If your bread is getting too brown near the end of baking time, tent a piece of foil over the top. Remove from the oven and let the bread cool in the pan for 10 minutes or so, until it has a chance to set a bit, then turn it out onto a cooling rack and let it cool completely. This freezes great and is quite fantastic for breakfast.
 I had no idea that this recipe was going to be such a pain in my tush.
 I was making guacamole and margaritas for a meeting this past week and was going to test a few of my spicy mexican cookie recipes so that we would have something sweet to nosh on after the salty stuff. Mexican cookies, much like Mexican hot chocolate, are basically a cinnamon spiced chocolate cookie. If you frequent Caribou Coffee, you saw the Spicy Mocha make an appearance this year. It has a spice mix added that has cinnamon and chili in it and will clear your stuffy nose right up!! Yowza. Zippy! It is quite fantastic and when I can make it to a Caribou, I treat myself. When I make cookies though, I prefer to give it a bit of a kick with some heat so that you really know you are eating something other than a standard chocolate cookie. I narrowed it down to two recipes, but neither was exactly what I was looking for. Eventually, in an effort to avoid the 13 tries it took me to get the oatmeal raisin cookies just right, I started from scratch and crossed my fingers.
The result? I ate so much chocolate and ingested so much cayenne and cinnamon that I gave myself a headache and took to driving around town and harassing my friends so that they would eat them instead because my tastebuds were fried and I could no longer tell the difference between one cookie and another. Major antioxidant overload. Thankfully I hang out with opinionated and honest people so I knew just what to do to finish off this recipe. Now you can make them too and share in the spicy triple chocolate experience. Add a cup of coffee (or tea if that is your poison) and you will be oh so cozy and warm. Never mind the snow falling outside the window.
 One Year Ago: Pomegranate Glazed Carrots
Two Years Ago: How To: Poach Chicken & Weeknight Apple Pie
Three Years Ago: Oatmeal Pancakes & Giada’s Chocolate Chip Cookies & Chicken Salad
Triple Chocolate Mexican Cookies
These are wonderfully chewy without being cake-y. Kind of like a sturdy, round brownie. Obviously you can adjust the spice level to your liking as everyone prefers different levels of heat. Doubling the amount of cayenne tastes awesome, but makes it hard to eat more than one.
5 oz unsweetened chocolate, chopped
1/2 c (1 stick) of butter
1 c brown sugar
1/2 c sugar
1 tsp vanilla
2 eggs
1/2 c all purpose flour
1/2 c white whole wheat flour-or another 1/2 c of all purpose
1/2 c cocoa powder
1/2 tsp baking soda
1 T of cinnamon
1/2 tsp of chili powder
1/4 tsp cayenne
1/4 tsp of black pepper
1 c mini chocolate chips
Preheat the oven to 325 degrees. Put the chopped chocolate and butter into a medium glass bowl and microwave in 30 second intervals, stirring between each time until just barely melted. Set aside.
In the bowl of an electric mixer, combine the sugars, vanilla and eggs until smooth. With the mixer on low, slowly add the melted chocolate and combine. Scrape the bowl until the chocolate is all incorporated. Add the dry ingredients and mix just until combined. Add the chocolate chips. Scoop by rounded teaspoonfuls onto a lined or greased sheet pan and bake for 11 minutes. Cool slightly before removing to a cooling rack. This recipe makes exactly 3 dozen and these freeze wonderfully. Otherwise keep sealed in a container at room temp for up to three days.
Cherry Pistachio Butter Cookies
Brittany wrote this on 15 December 2013![]() cherries, pistachios
cherries, pistachios
 Aren’t these festive? So pretty on a white plate! Let me tell you about them….
Essentially, someone made a cross between a russian tea cake, shortbread, and holiday fruit cake-minus the booze. The result? A pale green (yet mint free, for all of you who have mint aversions, and therefore avoid green confections) crumbly kind of butter cookie that taste delightfully nostalgic. I don’t really know why, but the green pistachio pudding mix in the cookies are probably the reason.
For the record, my Mom never ever ever made instant pistachio pudding for us when we were kids, but something about it tastes like coming home. Add in bright red maraschinos and you have a down right merry little cookie. They are quite sweet looking (pun intended) on a dessert tray at a party and kids seem to gravitate toward them especially. I mean these are green cookies, people! How can that NOT put you in the Christmas spirit?!

 One Year Ago: Creamy Penne W/Shrimp
Two Years Ago: BBQ Chicken Sandwiches & Quick Coleslaw, Fillet of Beef, The Best Carrot Cake Ever
Three Years Ago: Puppy Chow, Chewy Ginger Cookies, Blueberry Sour Cream Coffee Cake Muffins
Cherry Pistachio Butter Cookies
Adapted from iheartnaptime.com
This dough is pretty tolerant so be brave and let your kids help roll these.
1 c (2 sticks) butter, softened
1 box (3 oz) instant pistachio pudding
1 2/3 c flour
1/2 c maraschini cherries, finely chopped
After you finely chop the cherries, fold them into a double layer of paper towels and press the excess liquid off of them. They need to be pretty dry when you mix them in. Using a hand mixer or stand mixer, combine the first three ingredients until smooth and combined. Gently mix in the cherries JUST until evenly distributed. Scoop the dough into small teaspoon sized portions, roll between your hands to make a smooth ball, and gently press to make a slightly flat hockey puck shape on a sprayed or lined sheet pan. Bake at 350 for about 10 minutes, or until the edges are just lightly browned. Cool and sprinkle with additional powdered sugar if desired.
Ruby Bars & Thanksgiving Inspiration
Brittany wrote this on 24 November 2013![]() apple butter, cranberries, oatmeal
apple butter, cranberries, oatmeal
 I call these bars Ruby Bars because if their color (obviously) and I will tell you that they are filled with a cranberry and apple butter sauce. Intrigued? I was too. I am so excited to share this recipe with you, but before I do that, I have a quick little round-up of Thanksgiving ideas! Just in case the influx of holiday magazines, Pinterest boards, recipe flip books at the grocery store registers, and family traditions have completely robbed you of inspiration!
Appetizers
 Lemon & Herb Deviled Eggs– You won’t believe how lovely these are. Just different enough to be interesting, but not weird enough to scare off your relatives.
 Caramelized Onion Dip– There are certain places I am not allowed to show my face without this dip in my hands. Its that good. Make it the day before you need it to save yourself some time.
 Instant Hummus– Guilt free snacking while you try to keep the kids fingers out of the jello salad.
 White Sangria–Mmmm. Light, fruity, and the perfect pre-drink to a turkey dinner.
 Hot Apple Cider– Classic for a reason.
Main Menu
 Pomegranate Glazed Carrots– So good, they should have been at the first Thanksgiving.
 Mashed Sweet Potatoes– Because you need them in your life.
 Baked Garlic Brown Rice– A spectacular alternative to potatoes when you want to add a starch.
 Classic Buttermilk Biscuits– The name says it all.
 Maple Orange Cranberry Sauce– Make this today. It will last for a good week in the fridge!
 Roast Broccoli– A healthy side that adds gorgeous color to your plate with minimal effort.
Dessert
 Plum Crunch– Just say yes.
 Cranberry Maple Pudding Cake– You and your guests will be talking about this until next summer.
 Rum Pumpkin Pie– Its pumpkin pie with rum, people. Need I say more?
 The Best Carrot Cake EVER– Not a fan of pumpkin pie? You won’t miss it with this on your plate!
And now onto our feature recipe!!
 This is such an amazing recipe, I don’t know why it took me so long to share it here. If you are someone who loves to make seasonal recipes but the thought of making a pie-wether from scratch or not-nearly causes you to swoon, this dessert is for you. In fact, when you bring it down to science, 98% of those who have eaten this in my presence actually prefer this to pie. To PIE, people!! Better than pie!
It follows your basic layer bar kind of format. You make an oatmeal butter cookie type of dough, put some of it in the bottom of the pan, pour in a filling, and sprinkle the last of the dough on top, making a crunchy, bar sort of deal. These go together just like the Oatmeal Caramel Bars that I can never stop eating. So naturally, I was drawn to this recipe. Add in the fact that it contains one of my favorite ingredients, i.e. apple butter, and I was pretty much helpless to resist.
What I wasn’t prepared for was the way the apple butter changes the flavor of the cranberries. They lose the ‘in your face’ sourness and mellow out to just taste like good, tangy, cranberries. It is quite lovely. A small hint of the spices but not enough sweetness to be too rich. Which is nice because there is plenty of that in the crust. Butter + oats + sugar = chewy and crunchy heaven. All together it is a stellar match. So not only are they a beautiful ruby color, but they are a great at Thanksgiving, Christmas, and on into the New Year.
 Two Years Ago: Sun Dried Tomato Dip
Three Years Ago: Corn Casserole
Ruby Bars
Adapted from Pillsbury
My test subjects spanned more than a dozen people over the course of several years and no matter what I did or suggested, they were split 50/50 on wether or not they liked these bars with whipped cream. Serve some on the side and let your guests be the judge! I find that the store bought apple butter works best in this recipe because it tends to be a bit more spicy, but anything that you like would be great.
Filling:
1-12 oz-bag fresh or frozen cranberries
1 c sugar
zest of 1 orange
1/4 c of OJ
1/2 c apple butter
2 T butter (optional)
1 tsp vanilla
In a medium sauce pan, combine the cranberries, sugar, orange zest and orange juice and heat over medium low heat. Once the sugar starts to melt, turn the heat up to medium and simmer, stirring occasionally, until the fruit pops and it starts to thicken. You can use the back of a spoon to help break up the fruit if you need to. Remove the sauce from the heat and stir in the apple butter, vanilla, and the butter, if using. Set aside to cool slightly.
Crust:
3/4 c butter, softened
1 c brown sugar
1 1/2 c all purpose flour
1/2 tsp baking soda
1 1/4 c quick cooking oats
Preheat the oven to 400 degrees. While the filling cools a bit, combine all crust ingredients with a mixer, hand mixer, or wooden spoon. Press 2/3 of the mixture into a sprayed 9X13 pan. Pour the filling over the crust and spread evenly. Sprinkle the remaining crust over the filling and pat slightly. Bake for 25 to 30 minutes, or until golden brown. Cool completely in the pan before cutting into bars or they will fall apart when you try to serve them. Serve with or without whipped cream.
Maple Nut Cookies
Brittany wrote this on 20 November 2013![]() pecans
pecans
 I love it when I find a recipe that I have made several times before and then kind of forgot about. And a Christmas cookie to boot!!!
Its like…well…Christmas! Discovering a little surprise package. Oh look at this! A great cookie recipe! Tucked away in the catacombs of my cookbook collection, it was just sitting there. Quietly waiting for me to bring it back after years of neglect. I’ve been searching out a lot of those recipes that were-um, pre-blog, if you will. Tasty recipes I made, tweaked, served, and loved, and then just took a break from them for a bit. Then some smell or thought or different dish triggers my memory and I suddenly think, “Hmmm. Whatever happened to that one cookie/bar/bread/chicken dish I used to make?” Much like my closets, I feel my archives are always in the need of weeding. I don’t like holding onto something that I am never going to use. Either it is a good recipe, or its out. It is also why I like to go back through my personal boards on Pinterest and clean them out. But everyone does that, right? Don’t all of YOU scan your pins and think to yourself, ‘Self? What in the flagnog* was I thinking pinning a recipe for a dish that contained browned butter?’ DELETE. That is totally common. Right? RIGHT??
What I am particularly fond of regarding these cookies is that they mirror a buttery, crunchy shortbread but are not as fussy. This recipe for Maple Pecan Shortbread is spectacular and classic with a mild maple flavor. But today’s cookie recipe has fewer steps, a very pronounced maple flavor, but with that same satisfyingly crispy and crumbly texture that shortbread has. It is also a great recipe for kiddos to help with. Smashing cookie dough with a fork dipped in sugar or letting glaze randomly drip all over dessert are both tasks that are right up their alley. The visual texture and color contrast makes them perfect for a dessert buffet, cookie tray, and a leading candidate for a pretty Christmas gift box for a neighbor.
Just so darn pretty, dontcha think?
*Flagnong will make sense to anyone who saw the movie Monsters vs Aliens.


 One Year Ago: Classic Mashed Potatoes (Oooooooh baby!)
Two Years Ago: Sweet Potato Casserole & Maple Orange Cranberry Sauce
Three Years Ago: Spiced Tea
Maple Nut Cookies
Adapted from Pillsbury
These can be baked and sealed and stored in the freezer if you want to get ahead with your Christmas baking, but don’t glaze them until you are ready to serve them! They last about 48 hours in a sealed container on the counter before they start to lose their crunchiness. But the taste is still great!
Cookies:
1 c pecan halves, toasted *see note*
2 sticks (1 c) butter, softened-preferably unsalted
1/2 c brown sugar
1/2 tsp maple flavoring
1 egg
2 c all-purpose flour
sugar for pressing
Icing:
3/4 c powdered sugar
1 T milk
1 tsp maple flavoring
Preheat the oven to 350 degrees. If you haven’t yet, toast the nuts now. Cool slightly and chop finely.
In the bowl of an electric mixer or a large mixing bowl if using a hand mixer, beat the butter and brown sugar together until fluffy. Add the egg and maple flavoring and scrape the sides of the bowl, combining the ingredients well. On low, add the flour and chopped pecans until just combined. Using a teaspoon or small scoop, portion the dough into 1-inch balls and roll between your hands until smooth. Place balls on a greased or parchment/silpat lined sheet pan. Dip a large dinner fork into plain white sugar, and press the dough balls flat in a criss-cross pattern, as you would traditional peanut butter cookies! Bake for 11-12 minutes, or until just barely golden brown at the edges. Cool slightly on the pan, then remove to a cooking rack to cool completely. Meanwhile, combine the icing ingredients, being very careful not to over pour the milk! Whisk together until smooth and just able to drizzle. If the icing is a bit stiff, add the milk by a few drops at a time until drizzle-able. Glaze the cookies sparingly by sweeping a spoon back and forth over the top. If your kids are helping, well, then, just stand by with a damp rag. Enjoy!
*Note: To toast the pecans, or any nuts you need toasted for a recipe, spread on a sheet pan in a single layer and bake in a 350 degree oven for 5 minutes. Toss the nuts and toast for another 5 minutes, being careful not to let them burn! WATCH CLOSELY! If you can smell the toasted nuts, THEY ARE DONE!!! Alternatively, you can put them in a dry pan on the stove over low heat, tossing occasionally until fragrant.
Love a Good Recipe?

Then you’ve come to the right place! I’m Brittany, and I share tested, trusted recipes you’ll love. I prepare & photograph food, obsess over the perfect recipe, and enjoy grins of delight when I serve up something awesome. Enjoy!


