 Brittany's Pantry
This shop has been compensated by Collective Bias, Inc. and its advertiser, MARS Incorporated. All opinions are mine alone. #BakeInTheFun #CollectiveBias
 I have a slight obsession with those little tins you get at Christmas time filled with treats.
When I was a kid, my Mom used to have a stockpile of them because giving out homemade goodies was something we did every single year. We spent days baking and making candy and then packaged everything up to give to family and friends. I still use many of the same recipes that my Mom received from my Grandmother. Now, as an adult with a family of my own, I find myself collecting containers of all sizes and designs. We follow tradition and prepare edible gifts for teachers, bosses, volunteers, and everyone we want to show a little extra love. We make it together and we deliver it together. And that is what it is all about, right? Time with family and making sure that those who are most important in your life really know it. 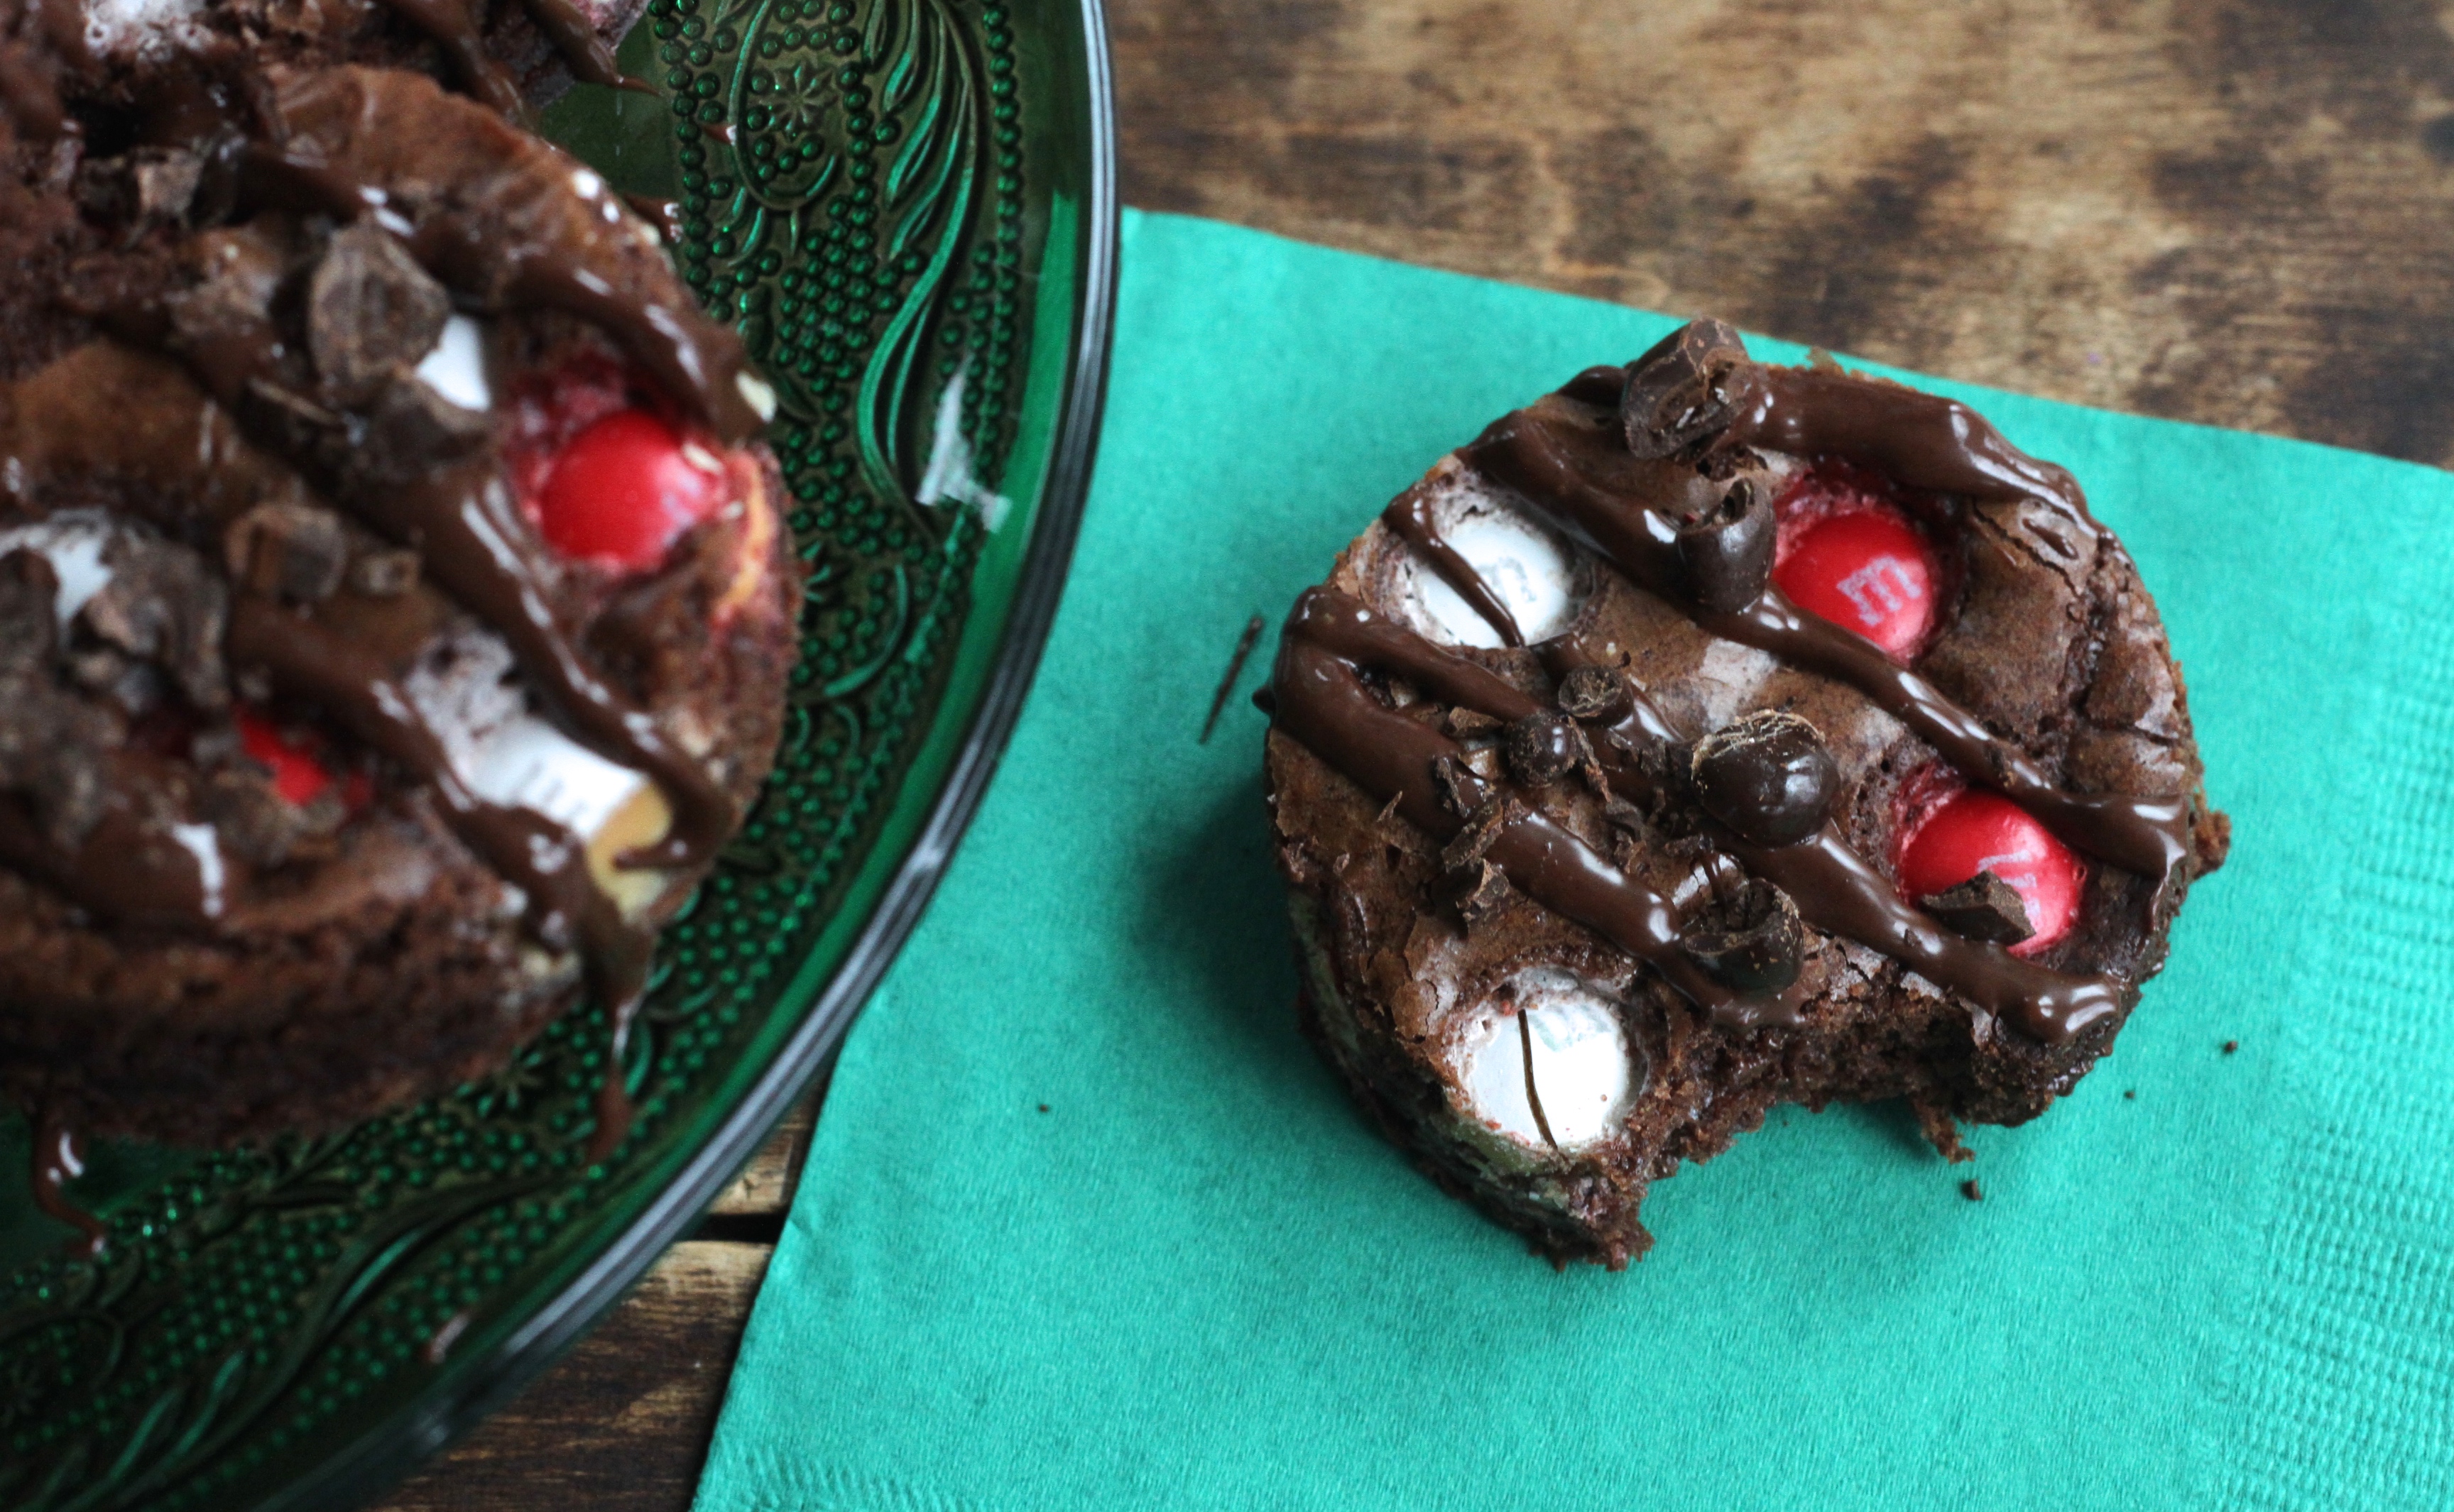 When making my list of treats this year, I found myself gravitating toward my favorite flavors: coffee, chocolate, and peppermint. I am guilty of drinking peppermint mochas year round (I never seem to get sick of them) and I love the fact that the holidays showcase them even more! When I saw these White Peppermint M&M’S® (available for a limited time!) I immediately thought of chocolate and coffee and these bars were born! With an M&M’S® in almost every bite, they are irresistibly minty! And can we just say, gorgeous? So festive! Be prepared to hear the shrieks of delight when you hand a Christmas tin of these babies to your boss/babysitter/piano teacher/ballet instructor.


 I picked up my ingredients at Walmart and stocked up on all kinds of goodies for snacking and baking! You can find the candies in the holiday isle! Such an easy thing to do with such a loving impact on those we care about. You know what else has an impact? Every time you buy M&M’S® candies at Walmart, milk is donated to local food shelfs through Feeding America*! Its true! Want to learn more about the Great American Milk Drive and how it is helping families this holiday season? Head to milklife.com/give to get details and donate. So each batch of goodies is the gift of quality time spent with family, the tangible gift of sweet treats, and even the gift of donation.


 Want to see what else is happening with the MARS company this season? Click here to follow along so you won’t miss a thing!
Peppermint Mocha Bars
These travel great!
1 box brownie mix for a 9X13 pan
1 T instant espresso powder or instant coffee
1 bag (9 oz) M&M’S® Brand White Peppermint (Limited Edition) Candies
1 c good quality semi-sweet chocolate chips or chopped chocolate
1 tsp canola oil
1/3 c chocolate covered coffee beans, chopped
Mix the brownies according to package directions. Stir in the instant coffee powder. Pour into prepared 9X13 pan and evenly sprinkle the bag of candy over the top. Bake as directed. Cool. Cut the bars into squares or use a cookie cutter to punch out shapes. Combine the chocolate and the oil in a microwave bowl and heat in 30 second intervals until JUST MELTED! Do not overheat! Drizzle the melted chocolate over the bars and sprinkle with chopped coffee beans. Let chocolate set and store in an airtight container for up to 4 days.
*For every purchase of M&M’S® Brand Chocolate Candies product purchased at Walmart between 11/7/16 and 12/25/16, Mars Chocolate, Inc.® will contribute $5.00 to Feeding America® on behalf of its national network of food banks to secure and deliver one (1) half-gallon of milk or more based on local markets. Maximum contribution is $100,000.

Harvest Fruit Spread – 12 Days Of Christmas Blog Tour Day #2
Brittany wrote this on 16 October 2016![]() apples, butternut squash, figs, ginger, gluten-free, honey, pears, pumpkin, raisins
apples, butternut squash, figs, ginger, gluten-free, honey, pears, pumpkin, raisins
 Hello friends! You may not know it, but you have stumbled upon DAY #2 of the 12 Days of Christmas Blog Tour! Traci, the fabulousness behind the blog Traci & Co., has organized a special blog tour of recipes, crafts, and gift tutorials to get us all ready for the holidays! There is a different blogger each day so don’t forget to click here to see all the amazing stuff we have for you!
And it gets better! There is a HUGE giveaway after the tour wraps up so be sure to head over to see what is happening each day and to enter the GIVEAWAY! There will be several winners and, among other outstanding prizes, one lucky friend will win a copy of my holiday eCookbook, Cooking Through The Holidays, releasing November 1! It has been quite the project and I am thrilled to be able to announce its debut here on the 12 Days Of Christmas Blog Tour!
So what do I have for you today?
 The gift of food!
I am all about passing along a plate of cookies or a fruit cake to the neighbors (or RECEIVING a plate of cookies or fruit cake…) but occasionally I try and shake things up. A little jar of this Harvest Fruit Spread will definitely bring a smile to whoever enjoys it! Tuck it into a gift bag and pass it on as a hostess gift at an upcoming holiday party or top it with big bow and leave it for a teacher! This spread would be perfect as a secret santa gift. Make a gift for under the tree and fill a pretty mixing bowl biscuit mix, a fun mixing spoon, a seasonal kitchen towel, and a little jar of this! Boom! Better than Santa! Just don’t forget to save some for yourself!
The ingredient list may be a bit different, but cooked down, it becomes a smooth, spiced spread that has been know to make a fellow swoon. The flavor is a bit sweet, a bit tart, and perfectly spiced! 


 If you plan to make a batch or two and want to share the love with family and friends, I made a handy dandy printable to make that a bit easier! Although a ribbon and a holiday tag work just as well!
harvest-fruit-spread-printable
Harvest Fruit Spread
This will make you house smell divine! The mix of flavors is comforting and just a little addicting! Be sure to cut the squash extra small; it will take the longest to cook. Any variety of apple and pear will do!
2 c small cubes fresh butternut squash or fresh pumpkin
1 large apple, peeled, cored and cubed
1 large pear, peeled, cored, and cubed
1 c raisins
7 ounces dried figs, snipped into small pieces
1 scant T freshly grated ginger or 1 tsp ground ginger
1/2 tsp cinnamon-or 1 whole tsp if you like things nice and spiced
1/4 tsp ground cloves
1/2 c apple cider
2 cinnamon sticks
1 c water
Combine all ingredients in a large saucepan and place over medium heat. Simmer gently until fruit and squash is VERY tender and falling apart. If the pan starts to go dry before everything is soft, add more water. This will vary depending on the ripeness of your fruit and how big the chunks are! When everything is soft and most of the moisture has evaporated, let the mixture cool a bit. When ready, remove the cinnamon sticks and pulse in a food processor until desired consistency. I like it uniformly smooth, but not to the point of baby food. You decide! Alternatively, you can use an immersion blender to puree the spread. Mix well and be sure to give it a taste! If your fruit is extra tart and the mixture makes you pucker a bit, now is the time to stir in some honey. This spread is not supposed to be like candy, but feel free to adjust it to your liking. I won’t tell! Store it sealed, in the fridge for up to two weeks or freeze for later for several months. Enjoy!
Note~These are all the ways we devour this fruit spread:
- smeared on a panini with turkey, cheese and mustard
- spooned over pancakes and waffles
- as a dip for graham crackers
- spread on a tortilla with cream cheese and rolled up for a snack
- on a peanut butter sandwich
- paired with salty butter on these Sweet Potato Biscuits (Good LORD its good!)
- on cinnamon raisin toast
- smeared on crostini, topped with crumbled goat cheese, and served as an appetizer
- tucked onto a cheese plate and served with crackers and brie
- directly out of the jar with a spoon 🙂

Don’t miss out on all the fun! Click here to go to ALL of the handmade tutorials for The 12 Days Of Christmas Blog Tour and to enter the GIVEAWAY!!
No-Churn Ice Cream
Brittany wrote this on 2 July 2016![]() chocolate, cream, gluten-free, milk
chocolate, cream, gluten-free, milk
 My parents were among the other great individuals out there that used to make ice cream the old fashioned way, at least once a summer, when we were kids.
You know what I mean. The wooden bucket with the crank and all the ice and salt you had to pack in around it? It was glorious and totally worth the water that leaked everywhere and the aching muscles that would result. There are few things as magical as watching the custard turn to ice cream. And on a hot summer day, there are few things as welcome!
As an adult with a family of my own, I enjoy continuing the tradition. Admittedly, I make use of the modern kitchen equipment available and no longer have to worry about frozen fingers or sore shoulders. I have several recipes in my blog archives and perhaps you have already tried this stellar vanilla ice cream or this dreamy and creamy strawberry ice cream. They truly are the best versions I have ever had.
 However, I don’t always have time to make my way through all the steps. Don’t get me wrong! It is absolutely worth it to cook the custard, mix, chill, churn, and freeze a standard ice cream recipe. It is’t complicated, but it can be a bit time consuming.
When I am hankering for homemade ice cream and am limited on time, this no-churn version is what I make. Plain vanilla has three ingredients-THREE-and can be mixed up and freezing in a matter of minutes.
How is this possible, you ask? One, special, scrumptious, ingredient.
Sweetened. Condensed. Milk. Boom!
It adds sweetness, richness, texture, all in one step. It is the key to making a creamy, rich ice cream without the egg custard and without the hassle. Mix in whatever you like and you have yourself a pretty darn awesome treat with very little effort.
 This weekend, I am using this recipe to throw a little neighborhood ice cream social. Stir in patriotic themed fruits or sprinkles, or just go for it and pile on the candy bits. But whatever you choose, enjoy it. Summer days fly by fast, much like they did when we were kids. Don’t forget to add a little magic to them.


Want the recipe for Easy No-Churn Ice Cream?! Click here to see it posted over on the Columbia City Moms Blog!
Strawberry Milk
Brittany wrote this on 27 May 2016![]() gluten-free, milk, strawberries
gluten-free, milk, strawberries
 Strawberries and summer just seem to go together, yes? Yes. That was a rhetorical question…we all know they do.
Strawberries are a universal favorite for kids and adults alike and early this spring, I found myself with 30 pounds of them. Yes 30 pounds. There was this farm and they were doing this sale and the fruit was so good and yada yada yada. You get the picture. For several days, my family washed, hulled, and froze a LOT of berries. We also ate a lot. As many as we could stand. Because when life gives you a ridiculous amount of strawberries, you eat them like popcorn until your fingers are stained red.
And that is exactly what we did.
Like most families, we love fruit and there are no shortage of strawberry recipes in the Brittany’s Pantry archives. You can check them out all at once by clicking here! Sweet and savory are both included so whatever kind of strawberry fix you need, I have you covered! When I wanted to try something new, I decided to try this craziness called ‘strawberry milk’.
Wow! is it delightful!
Kids think this drink is just about the coolest thing since sliced bread. My own children had a blast helping make it and if you have never tried it, Memorial weekend would be the perfect time. Breakfast, lunch or dinner, this can be festive or perfectly plain. It is fresh and clean and wonderfully simple. As most delightful things in life seem to be.


Lets make Strawberry Milk! Click here to head over to the Columbia City Moms Blog and get the recipe!
Easy Mini Easter Tarts
Brittany wrote this on 7 March 2016![]() chocolate, marshmallow creme
chocolate, marshmallow creme
This shop has been compensated by Collective Bias, Inc. and its advertiser. All opinions are mine alone. #EasterSweets #CollectiveBias Sometimes, you just can’t help but try something new.
This has been the case for me lately when I see anything in an M&M’s bag. Trying the new seasonal flavors has been a secret joy of mine and this spring, as expected, they didn’t dissapoint! Exclusively at Target and only for a limited time, you can find M&M’s White Strawberry Shortcake candies. Just when you thought Easter candy couldn’t get any better, MARS takes it to the next level!
Pssst! Click here for a special coupon to save on the MARS Easter Collection and a variety of Wrigley products!
 Lately, my family has been mildly obsessed with anything having to do with the flavors of s’mores. If there are marshmallows and graham crackers involved, then we are IN! When I began to plan our Easter baskets for this spring, I wanted to incorporate those same flavors into a homemade treat to make the day extra special.
Everything I needed was at Target! I picked up several bags of jellybeans, making sure to include the Starburst Sweet and Sour Jellybeans and Starburst Tropical Jellybeans, as well as the original flavor. Starburst Eggs were perfect to tuck in the baskets too. I couldn’t forget chocolate! The gorgeous display of DOVE chocolate made it a breeze to grab the favorites of my friends and family. DOVE Milk Chocolate Bunnies are an Easter standard for me, but when I saw the DOVE Milk Chocolate Peanut Butter Eggs, I was pretty stoked. All of these and SO many other varieties of M&M’s, DOVE, Starburst, and Skittles were easy to find on end caps in the seasonal section of my local Target. Perfect for one stop shopping!
 So. These s’more treats. Anything peanut butter is a hit with our family and we have even been using chocolate peanut butter cups in our classic campfire s’mores instead of the traditional chocolate bar. That, my friends, is how this recipe was born. Marshmallow? Check. Graham crackers? Double check. Favorite M&M’s and DOVE Chocolates? Ready to go! Add all this together in an Easter basket and we have a pretty spectacular treat!
One more scrumptious detail! Be sure to mark your calendars for March 20th! Super Targets will be hosting a sampling even that day, making it the perfect time to hop to it and stock up on all you need to play the Easter bunny for your family! You can follow along on social media by clicking here, making sure you won’t miss a single thing!


 Easy Mini Easter Tarts
The amount of ingredients you need solely depends on how may of these adorable treats you are going to make! Just be sure to store them on a flat surface in an airtight container.
homemade or purchased mini graham cracker pie crusts/tartlette shells
marshmallow creme/fluff
M&M’s White Strawberry Shortcake candies
DOVE Milk Chocolate & Peanut Butter Eggs
food coloring, optional
If desired, in a medium bowl, combine marshmallow creme with green (or other Easter color of your choice) food coloring to achieve the color you want. These look just as adorable if you leave the marshmallow creme white! Using a large spoon, add a scoop of marshmallow to as many tarts as you plan to make. Creme will level and flatten out on its own so don’t mess with it! 🙂 Place M&M’s on the tarts in desired designs, getting creative and trying different patterns! In addition, unwrap the DOVE Eggs and nestle a few in the ‘nest’ of graham and marshmallow! These look great just displayed on a platter, but they look extra special if you slide them gently into a cellophane snack bag, tie it off with a spring ribbon, and snuggle them into the Easter basket of someone you love! Enjoy!
Repost: Saucepan Brownies
Brittany wrote this on 10 February 2016![]() chocolate
chocolate
 So, I have recently been taking stock of several things on this blog. One of them is the fact that there are several posts/recipes that are incredibly underrated. You may have deduced by the ‘repost’ in the title that this is one of them. The second thing is that I realized just how much I over use exclamation points. But that is neither here nor there…
It is true that as a food blogger, you won’t be able to guarantee that every single recipe you post is going to be a stunner. Some are underwhelming, some are rather ordinary, or some just don’t translate well through pictures and print. I have come to accept this as part of the gig. However, in some cases, as with these brownies, it is just a blatant injustice that this recipe is not more popular.
You can find the original post here. It hasn’t been pinned much and the only comment is from a family member. It is practically invisible amongst all the other recipes on my blog and close to impossible to find out in the world wide web unless you knew exactly where to look.
And I have no idea why.
This recipe can be made in just a few minutes (I know because I timed myself), turns out exactly the same every time (I know because I have made about a bazillion batches), and they are really really good (I know because I have eaten said bazillion batches, at least in part). These are easily one of the most fudgy brownies I have ever had and paired with that crinkle on the top, they are as classic as they can be.
Speaking of classic, my favorite part is that this recipe is adapted from an old Better Homes & Gardens recipe that was originally published in the 30’s. There is a reason we are still baking them today, people! Trust me when I say these just may become your new go-to for a quick chocolate fix. Hopefully, together, we can keep this recipe around for another 80+ years.
Saucepan Brownies
Adapted from BHG
Place a medium sized saucepan over medium low heat and add:
1/2 c (1 stick) of butter
2 oz unsweetened chocolate
Stir gently until completely melted and smooth. Keep the temp low so that the chocolate doesn’t scorch.
Add 1 c sugar
Stir just until the sugar starts to melt, about one minute or so. This makes for a fudgey brownie! Turn off the heat and add:
1/2 tsp vanilla
2 eggs, beaten
3/4 c flour
pinch of salt
Stir until smooth and incorporated. Pour into a sprayed 9X9 pan and bake at 350 for 25 minutes. Be careful! Don’t over bake! A toothpick should come out with a just a crumb or two attached! I usually cut them into 16 pieces.
Traditional Snowballs (Russian Tea Cakes)
Brittany wrote this on 22 December 2015![]() pecans
pecans
 These cookies will no doubt bring back a flood of memories for many of you. Christmas baking sessions of yesteryear, cookie exchanges of your youth, or church parties in the basement. Few trays of holiday delights would be complete without these little bites of shortbread.
Snowballs are often called Mexican wedding cookies, Russian tea cakes, or jumbles. All are correct and all refer to the same kind of cookie. Originally from Europe and dating back to the middle ages, these all contain butter, flour, and a bit of sugar. The nuts and flavorings mixed in vary by region and, well, century. These days almond flavoring is often added, but I prefer to let the flavor of the pecans come through. Sometimes these can be hard and dense, but this recipe is light and tender and absolutely melt in your mouth. The pecans inside are like toasted little bits of crunchy goodness. Festive and wonderfully delightful.
 Years ago, I was at a family Christmas celebration that was being hosted by my sister-in-law. She had a huge rubbermaid container of these cookies sitting on the counter and while the family tucked into them, I held back. The last I remembered, those cookies were tasteless and dry. Definitely not good eats. But I had one anyway (it WAS Christmas after all…) and it was fantastic. The best little snowball cookie ever. When I started experimenting to get the most perfect version to post here, I compared all recipes to the cookies from that one special Christmas. Turns out, the recipe from Land O’Lakes was the front runner and I never changed it. Classic and simple, these come together super fast. They look festive and absolutely lovely on a platter during the holidays and are a great recipe to make with your kids. Tasty and fantastic, they are great-no matter what you call them!


 Snowballs (Russian Tea Cakes)
Recipe from Land O’Lakes
2 c flour
2 c finely chopped pecans
1/4 c sugar
1 c (2 sticks) softened butter
1 tsp vanilla
powdered sugar
Preheat the oven to 325.
In the large bowl of a mixer, combine all ingredients except powdered sugar, just until blended well. Scoop by heaping teaspoonfuls and roll between your hands to form a smooth ball. Place on a lined sheet pan. These cookies won’t spread so I place them 4 by 5 on the pan. Bake for 18-20 minutes, or until the tops are just BARELY starting to brown. Remove, let cool for a few minutes, and then gently toss in powdered sugar. Set on a rack and let cool completely. If desired, roll again in powdered sugar to achieve a full on white ‘snowball’ look. Store at room temperature, tightly sealed, for up to 5 days, or freeze for several months. Enjoy!
Christmas Cracker Toffee
Brittany wrote this on 29 November 2015![]() chocolate
chocolate
 I have no fancy words or clever lead in to this post. So I’m just going to lay it out straight for you.
This stuff is awesome. End of story.
Lots of you probably grew up with these treats during the holidays, and too, probably have your own recipe to make it. However, for those of you who, like me, missed out on a childhood with cracker toffee, I will save your holiday season by giving you this. It has the unfortunate nickname of being called ‘Christmas Crack’ but I have to say, its rather fitting.
There are less than 5 ingredients, if you skip the sprinkles. Cheap to make and easy to do, it makes a huge pan so you can serve it at a party AND give some away to your piano teacher or favorite neighbor. It is so darn festive it is re-DONK-ulous. My kids help make them too, although I keep them away from the hot toffee portion of the recipe. They help lay out crackers, sprinkle chocolate chips, and sprinkle…well…sprinkles.
 These are forever a part of my holiday traditions now and if you spend ANY amount of time with me this Christmas season, there is a 100% chance that I will serve these to you at some point. If I spend time with you and YOU serve me some? Even better. Merry Christmas everyone!
Christmas Cracker Toffee Treats
1 1/2 sleeves of soda crackers, such as Saltines
1 c (2 sticks) butter
1 c packed brown sugar
1 (10 oz) bag of semi-sweet or dark chocolate chips
holiday sprinkles, optional
Preheat the oven to 350.
Line a half sheet pan (jelly roll pan, cookie sheet) with parchment paper, letting it extend over all the edges. In a pinch, you can use foil too, but be sure to spray the foil very well with cooking spray. Line the pan with crackers, taking care to set them edge to edge and cover the pan well with no gaps. In a small saucepan, combine the butter and sugar over medium heat. Melt the butter, then bring to a slow boil. Let bubble for 2 minutes, then immediately pour over the crackers. Carefully spread the toffee evenly over the crackers, working quickly so the toffee doesn’t harden. Pop the pan in the oven and bake for 5 minutes. The toffee will spread, bubble a LOT, and get slightly darker. Watch it so it doesn’t start to burn! Remove from the oven, let the crazy bubbling stop 🙂 and then sprinkle the entire bag of chocolate chips evenly over the toffee. Let the chocolate sit for a few minutes and melt, then carefully just spread the melted chocolate over the pan. Let sit at room temperature for several minutes to cool, then set the whole pan in your fridge (if you live where its cold, set it on your porch, in your garage, etc) to cool completely. When it is good and cold, simply lift the parchment paper off the pan and set the whole thing in a cutting board. With a large knife, cut the treats into desired shapes-I like them irregular like broken shards-and serve! Store in the fridge so they stay firm. Enjoy!
Soft Batch Cream Cheese Chocolate Chip Cookies
Brittany wrote this on 11 November 2015![]() chocolate, cream cheese
chocolate, cream cheese
 These cookies sound incredible, don’t they? Well, it is true. They are incredible. Was it the cream cheese in the title that tipped you off…?
Some recipes taste just like they sound and this is one of those recipes. You expect them to be soft, pillowy cookies that are moist and rich, but chocolatey too. And they are. All of that. Exactly that. *sigh* So cozy. I tend to prefer my cookies chewy and crispy, but there is always room to branch out. I have been wanting to add a soft batch chocolate chip cookie to my recipe library, and these have been perfect every time. Plus, THERE IS CREAM CHEESE IN THEM! A detail that speaks for itself, obviously, but I thought I would write it in all caps anyway.
Speaking of cozy, we are in the middle of a giveaway right now! Enter to win snuggly, handmade items by Pine Tree Goods, and if you are one of the two winners, these cookies will just complete the whole scene. Cozy cowl or mittens + warm cookies = a good good day. Heck! If you don’t win, these cookies will make you feel better! So its all good. They have to be chilled before they bake so you can mix them up now, and then bake them when you get home from work/school/errands tomorrow!
A few things to remember about these: Don’t skip the ‘chill in the fridge’ step, and don’t add more cream cheese than it calls for. I may or may not have done both of these things at various times, and both ended in an unfixable disaster. More cream cheese creates soup, not cookies. And not chilling the dough makes soup, not cookies. Follow the recipe and all will be well. Go figure! Soft Batch, Cream Cheese Chocolate Chip Cookies
Recipe adapted from here.
1 stick (1/2 c) softened butter
1/4 c cream cheese, not fat free or spreadable
3/4 c brown sugar
1/4 c sugar
1 tsp vanilla
1 egg
2 1/4 c flour
1 tsp baking soda
2 tsp cornstarch
pinch of salt
2 c dark or semi-sweet chocolate chips
In a large mixing bowl, or in the bowl of a stand mixer, combine butter and cream cheese until creamy and mixed VERY well. Add the sugars, vanilla, and egg, mixing well after each addition and scraping down the bowl between. When thoroughly combined, add the dry ingredients and mix well. Gently stir in the chocolate chips. Refrigerated dough until very cold or scoop dough into a sprayed or lined cookie sheet and THEN chill. The key here is to bake the dough COLD. Bake at 350 for 9 minutes, or until the edges are brown and the centers are still soft. Let cool on the pan until just warm, then remove to a cooling rack. Cookies keep sealed at room temp for 3 days or frozen for several months. The dough can also be portioned into cookies and then frozen to be baked later. Just let the frozen dough balls defrost in the fridge for a bit before baking. Enjoy!
 Zombies are not my jam.
When it comes to holidays, Halloween and all things spooky and ghoulish are my least favorite to celebrate. I have never really been into the decorations and the costumes and mannequins with fake blood. Its entertaining, but you won’t find me hosting a costume party or visiting a haunted house anytime soon. Go ahead and call me a party pooper, but you know those people you see that are really into Halloween? Well I am just…not. Please tell me I am not alone in this…
That said, if it involves food, you can count me in as an avid supporter! 🙂 My kids are obvious fans of any event that gets them closer to candy and like most households at this time of year, we have a huge glass pumpkin filled with festive colored, individually wrapped sweet treats on our entry table. We live in the middle of nowhere and thus, will receive no trick or treaters, but the bowl of candy sits like a sugared little sentry, hospitable and ready for visitors.
 This year, as part of a never-ending effort to be just a smidgen healthier than we were the day before, I decided to make family treats that were a bit less junkfood laden, yet festive enough to satisfy the most ardent of Halloween enthusiasts. I was going for a green and orange theme, so pistachios would be an awesome substitute for the pepitas (pumpkin seeds) in this recipe. The dried fruit and nuts can be found at Nuts.com and the site even has a special page for healthy snacks! You can find that by clicking here, and while you are browsing, jot down ideas for your own family!
As for my own kids, they were thrilled to see the candied eyeballs staring up at them from their chocolate. One piece is a nice little treat and SO much better for them than, say, a fun-sized candy bar. This plate is also fun to set out for guests this time of year. It screams Halloween! No fake blood required. 🙂


 Fruit & Nut Halloween Bark
This keeps for a week, in the fridge, in an airtight container. That is, if you can keep your hands off! I even tucked one piece each in my kids lunches as a special treat!
1 bag, good quality dark or bittersweet chocolate chips, such as Ghirardelli
pepitas (pumpkin seeds) or chopped pistachios
whole almonds, roughly chopped
dried apricots, chopped
dried mango, chopped
candy eyes
In a medium bowl, melt the chocolate in the microwave at 30 second intervals, stirring between each, until JUST MELTED! Don’t overheat! Meanwhile, place a sheet of parchment paper on a sheet pan. When chocolate is melted, pour in the middle of the sheet pan and spread gently and slowly to a rectangle about the size of an 8X11 sheet of paper. This makes the chocolate thin enough that it won’t be too sweet, but thick enough not to fall apart! Sprinkle with however much of the dried fruit and nuts you prefer. Its totally a matter of taste. Place a few candied eyes around the chocolate! Chill, uncovered in the fridge until firm. Because the chocolate is good, and without the stabilizers that cheaper chocolate can have in them, it will melt if handled too much! Cut with a sharp knife into irregular shapes and keep it stored in the fridge to prevent meltdown disasters! Enjoy!
Super Gooey Peanut Butter Brownies
Brittany wrote this on 31 August 2015![]() chocolate, marshmallow creme, peanut butter
chocolate, marshmallow creme, peanut butter
 Sometimes, there just aren’t adequate words to describe something.
I could tell you that these brownies are the chewiest, gooiest brownies you will ever eat, but that wouldn’t do them justice. I could tell you that people gasp when they see them (they are that decadent) and that they will be devoured faster than any other treat, but you need to see that for yourself. I could tell you that while they look a bit complicated, they really are fairly easy with only an extra step or two, but you should just make them.
Well, hey! Look at that! I guess I did have adequate words to tell you all of that! 🙂
But gosh darn it, its true. I have been making these brownies for over a decade and they have come along with me to many a pot luck and game day party. I have tucked them in lunches and sent whole batches with my husband to share at work. I have served them at Christmas parties and barbecues. Always the same. Always good. Always scrumptious. I don’t cook with mixes all that often (Actually, I just realized I have another recipe coming up that uses a mix… 🙂 ), but sometimes I need the time saver and convenience the most at that moment. Ere go, one of the reasons I have been making these for so long.
I figured it was time that you got to make them too! Yes?

 Ooey Gooey Peanut Butter Marshmallow Swirl Brownies
Inspired by Cooking Light
3/4 c sweetened condensed milk, divided
1/4 c canola or grape seed oil
1/4 c milk
1 box devils food cake mix
1 egg
1 jar (7 oz) marshmallow fluff
3/4 c peanut butter chips
Preheat the oven to 350 degrees. Lightly spray a 9X13 inch baking pan and set aside.
In a large bowl, using a hand mixer or stand mixer, combine 1/4 c of the sweetened condensed milk and the next 4 ingredients. The batter will be VERY sticky! Spread 2/3 of the batter in the bottom of the prepared pan. The layer will be thin, but keep at it! 🙂 Bake for 10 minutes, until just set. Meanwhile, combine the remaining 1/2 c of condensed milk and the marshmallow fluff until smooth. Fold in the peanut butter chips. When the crust comes out of the oven, pour on the marshmallow mixture and carefully smooth and spread to the edges. Drop the remaining chocolate batter evenly over the marshmallow stuff. Gently swirl with a toothpick, if desired. Its all pretty thick, so you just want to make sure everything is even. It will all bake together anyway. Return the pan to the oven and bake for an additional 25-30 minutes, or until dry and set in the middle. Let brownies cool almost completely and cut into SMALL squares. These are UBER rich so resist the urge to make them giant and ere on the smaller side. Besides….you know you are going to eat two anyway….
My Favorite Peach Cobbler
Brittany wrote this on 3 August 2015![]() peaches
peaches
 Confession.
I am having a major case of writers block right now.
I keep staring at this picture of sweet, warm, peach cobbler and all witty and inspiring thoughts are replaced with the desire to lick the screen. So far, I have resisted. Generally, cobblers have a biscuit or scone like topping on them, but many versions, including those seen here in the South, are topped with more of a batter. My recipe is kind of a cross between the two. I don’t like my topping to be hard like a biscuit, but I don’t want it cake-like either. This is a good balance that ends up wonderfully thick and crisp, but not heavy. It is also fantastically easy to make and doesn’t require anything more complicated than just mixing. SCORE!
But greatness (or great recipes) are not without their complications! My biggest issue with this treat was getting the underside of the topping completely cooked. It kept turning out gooey and doughy and the edges would be too dark. NOT good eats. But after dozens and dozens of cobblers over years and years of baking, I fixed it. Now, easily one of my favorite desserts to make, this cobbler is perfectly delightful. The fact that peaches are in season right now just happens to make this even better. Take advantage of it, people!
Yes, you can make this with pears or plums, but anything firmer-say, apples- wouldn’t quite work. The fruit wouldn’t be cooked in the time the topping was baked. Stick to juicy stone fruits, but feel free to stir in a bit of berries to give it some variation. As for me, I like it classic. Classic and peachy. Peachy and juicy. Juicy and sweet.

 The BEST Peach Cobbler
I have no idea if cinnamon is a classic cobbler ingredient, but my Mom taught me to ALWAYS put a bit of cinnamon with peaches. And so I do! Because she was right. The warm spice isn’t overpowering or even really noticeable. It just pairs so well here you won’t want to leave it out!
Filling:
8 large ripe peaches, cored and cut into 8ths
1/4 c flour
1/4 c sugar
1 tsp cinnamon
Topping:
1 c flour
2 T cornmeal
1 c sugar
1 1/2 tsp baking powder
large pinch of salt
4 T (1/2 of a stick or 1/4 c) of room temp butter
2 eggs
Preheat the oven to 375. Spray or butter a large, 9X13 glass baking dish. In a large bowl, gently mix the filling ingredients, tossing until mixed and evenly coated. The juices of the fruit will help it all coat. Dump into prepared baking dish and snuggle all the fruit down until its even. In the same bowl, mix the dry ingredients of the topping together. Add the butter and eggs and mix with a spoon until smooth and it forms a stiff batter. Drop by large dollops all over the top of the fruit, spreading a bit to cover as much area as you can. The batter will spread and cover wonderfully as it bakes! If desired, sprinkle a tablespoon of granulated sugar over the top, just to give it a bit of sparkle!
Place in the preheated oven and bake for 30 minutes, or until evenly golden brown and bubbly in the center. Remove and let cook for at least a half an hour so that the filling sets a bit. Too hot makes for a messy cobbler on your plate (not a bad thing, just not as easy to serve). Serve warm, room temp, or even cold. Vanilla ice cream on the side is always a good thing.
 This recipe will make your house smell amazing.
Yes, I am choosing to open this post with that statement because that is what immediately comes to mind as I write this. It practically wraps your house in a hug. As cheesy as that sounds, its absolutely true. Make no mistake that it will totally lift your mood to have this baking in your oven.
Due to the fact that our household goes through a LOT of bananas, it stands to reason that we will occasionally have overripe fruit on our hands. I never count this as a burden… 🙂 All you have to do is type ‘banana’ in the ingredient search option on the right side of this screen to find out how much I like to bake with them. Like, really enjoy baking with bananas. A few months ago, when trying to decide what to throw together with my extras, I decided to just start paging through my cookbooks to find something new. My kids got into the hunt and they unanimously agreed that these chocolate chip banana bars were the obvious choice.
The flavor of these bars, though similar to a banana bread, have the added bonus of butter (mmmmm…..buttaaaaaaah…) They are moist and rich and deserve a plate and fork. I’ve made them several times in the last few months and they are reliable and delightful and wonderful. A fantastic treat to bring to a game night, pot luck, or to just bake on a rainy weekend! Enjoy friends!
What is YOUR favorite banana baked good??
 Chocolate Chip Banana Bars
Recipe adapted from BHG
These bars are so moist, they only last a day or two at room temperature. Store them in the fridge to get an extra day out of them, or better yet, wrap each bar individually in plastic and freeze for later. Usually, I make them for a crowd and make them the day of the event for best results. Or I bake them for no reason and just eat them all….
3/4 c (1 1/2 sticks) room temperature butter
1/2 sugar
1/2 c brown sugar
3 small bananas
1 egg
1 tsp vanilla
2 c flour
2 tsp baking powder
pinch of salt
1 c chocolate chips
Preheat oven to 350 degrees. Lightly spray an 11X14 glass pyrex dish.
Cream the butter and sugars together in the bowl of an electric mixer until smooth. Add the bananas, egg, and vanilla, and beat until fruit is mashed and mixture is combined. Add the flour, baking powder and salt and mix until just combined, scraping the sides of the bowl if necessary. Fold in chocolate chips by hand. Spread the thick batter evenly into the prepared pan, and bake at 350 degrees for 30 minutes, or until golden brown. Remove from the oven and let cool. These are great when they are just slightly warm, but room temp is good too!
Chocolate Fluffernutter Sandwich Treats
Brittany wrote this on 2 July 2015![]() chocolate, marshmallow creme, peanut butter
chocolate, marshmallow creme, peanut butter
 As the summer progresses, I find myself wishing my kids were a bit more self sufficient.
I may be doing too much for them and I have decided to try and incorporate more age appropriate chores into their routine. As you can probably imagine, they are thrilled. Is anyone else struggling with responsibility and their kids? Laundry folding, simple food prep, emptying the dishwasher; that kind of thing. They are doing great so far, but they really really want to be more help in the kitchen. My nine year old, Evelyn, has graduated to making pancakes all on her own and is getting more and more comfortable with the gas stove. Eli, who is 6, is a master at making peanut butter and jelly sandwiches and making sure everyone has milk poured into their cereal. Lane, our three year old bundle of spiciness, just wants to be where everyone else is and make a giant mess. Pretty normal for a toddler.
But these treats, which will grace our Fourth of July BBQ buffet this year, is the perfect task for all three. Regardless of how neat or how messy they turn out, they will taste amazing. There is nothing to cook, and the most dangerous utensil is a butter spreader. What my kids find fascinating about it is that we can change up the sprinkles to suit any occasion. Birthday themes, Christmas, or even NO sprinkles (God forbid…) on just a Saturday night.
My point is, if you have a ridiculous amount of stuff to do this weekend, why not give this recipe to your kids and say “Go to it!” It can only end in fun. And who knows?! Maybe they will starting bringing you pancakes and peanut butter and jelly sandwiches in bed!


 Want the full recipe? Click on this link to head over to the Columbia Moms Blog to see my post there!
Happy Independence Day, friends!!
Sweet Treats & Summer Fun
Brittany wrote this on 15 May 2015![]() chocolate
chocolate
This shop has been compensated by Collective Bias, Inc. and its advertiser. All opinions are mine alone. #ShareFunshine #CollectiveBias  There are few things in this world as satisfying as ice cream on a hot day.
This seems to be a universal joy across all age groups and now that I live in South Carolina, I take my position as hostess on 100 degree days very seriously. At this point in time in my life, there are always kids at my house and that is often my focus when entertaining. When kids are happy, the parents are happy, and then everyone can relax. And isn’t that what we all want out of our get togethers? To have fun, laugh, chill, and really connect with our family and friends? That is how memories are made and where relationships flourish. If I can accomplish all of that and enjoy my time as well, I call that being a successful hostess.
I used to do everything from scratch and while it was exhausting, I really loved it. The older I get, the more I realize that it isn’t the food that is served, but the time spent with each other that is remembered. I have found an easy way to serve the ever popular ice cream in a fun and festive way! Not only is it something I can do ahead (score!) but it is incredibly easy with maximum impact.
That happens with these Snickers® Ice Cream Bars and right now they are starting of the summer with some fun!! Do YOU want to get in on the action? You can learn all about how to enter the sweepstakes to Share A Little Funshine by clicking here.
Share a Little Funshine Sweepstakes
Snickers® Ice Cream Bars are pretty incredible all on their own. I am actually pretty choosy with my ice cream and these are one of the lucky few that make their way into my freezer from time to time. Why? Because with chocolate, caramel, peanuts, and ice cream all combined in one bite, it is pretty hard to resist. I have always loved these treats and with kids, I wanted an easier way to serve them.
 Enter these frozen pops! This is so easy, its shameful! Unwrap a Snickers® Ice Cream Bar and OH so very carefully, insert a wooden popsicle stick into one end, going about halfway up the stick. Immediately place the ice cream back in the freezer (we want them to stay really frozen) and continue with as many as you would like to make.
  See the cute little ribbons in the pic above? So easy. Just knot on any kind of ribbon you like, although the 1/4 inch wide seems to work the best for this. Customize your colors to a birthday party, bbq theme, Memorial Day celebration, July 4th, or use whatever you have on hand. This is a great way to get kids involved with prepping for a get together and you can make as many or as few as you need. Since they are stored in the freezer, simply set them on a decorative plate and serve. No messy fingers, and even adults can walk and chat and munch on their ice cream. Even better if you have a bonfire going and you can simply toss the sticks into the flames. No clean up!
 Did you know that these come in a value box too? So much easier when feeding a crowd! I picked these up at Walmart and they couldn’t be easier to locate! Follow the ICE CREAM sign and voila!
 There are so many ways to enjoy time with friends and family this summer and it doesn’t stop with ice cream! Having a few extras on hand can be a great way to celebrate warmer days and enjoy that occasional treat! In addition you can download the Blippar app from your Apple or Android store to scan your package and receive exclusive content.
 Peanut M&M’s® are my go to treat when I want something chocolatey.
Which are your favorite to share with friends and family? Are you a Plain M&M® kind of person? Or a chewy Skittles® fan?
Love a Good Recipe?

Then you’ve come to the right place! I’m Brittany, and I share tested, trusted recipes you’ll love. I prepare & photograph food, obsess over the perfect recipe, and enjoy grins of delight when I serve up something awesome. Enjoy!


