 Brittany's Pantry
Cream Cheese Banana Bread
Brittany wrote this on 30 March 2012![]() bananas, cream cheese
bananas, cream cheese
 I am just going to jump right in here with the name of the above deliciousness: Cream Cheese Banana Bread. OK. Just absorb that for awhile…
How does that title not make you drool a bit?
You would think that a cream cheese banana bread would be a bit tangy maybe. Definitely a creaminess to it. And certainly it would be wonderfully moist. Well, a big tasty YES on all accounts! This is easily my new favorite quick bread. Seriously! Where has this been all my life?! And when you think about it, it makes all kinds of sense. We put cream cheese frosting on banana bars and banana cake so why not skip a step and throw them in the same mixer? Why not indeed! It is fan-ta-bu-lous-ly scrumptious! Not to be confused with the scrumptiousness of Double Chocolate Banana Bread, which I assume you all have already made. 🙂 Anyway, the bonus is that it doesn’t take any more effort than a regular banana bread. Of course, I froze most of the batch for a later time but this was in part because I am still off most carbs and sugar until after the baby is born so it was really for my own protection. I have NO will power when it comes to food. Like…non. No guilt either. Is it wrong to plan what kind of bread I will eat the very moment I get home from the hospital with my new bundle of joy?!
The first time I made this I was actually pleasantly surprised that it really wasn’t all that sweet. Baked in muffin tins (with cute little spring papers) (Did I just say that?) this would be fantastic for Easter brunch. Just bake ahead and freeze. UN-believable.
On second thought, maybe I should just pack some of this bread in my hospital bag…

 One year Ago: Honey Carrots
Cream Cheese Banana Bread
Source Unknown! Random Internet printout from years and years ago!
1-8 oz pkg cream cheese
1 c sugar
1/4 c butter, softened
3 bananas
2 eggs
Beat all ingredients with a stand mixer or handheld mixer. Add:
2 1/4 c flour
1 1/2 tsp baking powder
1/2 tsp baking soda
pinch of salt
Mix just until combined, scraping the bowl once to incorporate all the ingredients. Pour into a large greased loaf pan-or two medium sized, 4 mini loaf pans, or muffin tins- and bake at 350 until a toothpick comes out with only a few crumbs attached. As usual, a large loaf pan takes about an hour and so forth on down. No joke. Make this bread!!

Honey Cheesecake Bars
Brittany wrote this on 19 March 2012![]() cream cheese, honey
cream cheese, honey
 These little squares of deliciousness are nothing short of dreamy.
When my parents passed along the last bottle of honey I would get from them until the end of the summer next year, I horaded it. I wanted that last jar of wild honey to last forever and so my chances were higher if I didn’t open it, right? Unable to stand it anymore, I caved and busted into it this past week. In my house, an open jar of honey goes fast. As mentioned in a previous post, I use a lot of honey when I cook. I use it almost exclusively in yeast breads and try to swap it out when I can in savory recipes too: marinades, salad dressings, and sauces. But what I was really looking for was a recipe that highlighted the taste perfectly. Honey straight from the hive is so superior to honey from the store and there really is no way for me to describe the difference in taste. Just trust me on this one. The next time you pass up a stand at the farmer’s market, pick up a jar. You won’t be sorry!
My craving led me to these bars. This is a recipe I have made many times over the years, but finally decided to tweak it a bit to make it more…well…honey-ey. I wanted the flavor of the honey to not just be the sweetener, but the star. It took a few pans but I got it. Creamy, smooth, sweet, and perfectly simple.
 One Year Ago: Peanut Butter & Jelly Bars
Honey Cheesecake Bars
Kinda, sorta from Gourmet
6 whole graham crackers
3 T sugar
3 T melted butter
1-8 oz block cream cheese
1 egg
2 T milk
1/3 c honey
In a food processor, combine the graham crackers and the sugar and process to fine crumbs. Add the melted butter and pulse a few times to combine. Dump the crumbs into an ungreased 8×8 or 9×9 inch pan. Spread evenly and pat gently flat. Bake at 325 for 10 minutes and let cool a bit while you make the filling. Rinse out the food processor bowl and wipe clean. Process the remaining ingredients until smooth, scraping the sides and pulsing again to ensure a smooth, even, and incorporated filling. Pour over crust and bake for 25 minutes, or until filling is just set and does not wiggle in the center. Cool to room temp and chill completely. Cut into 16 squares. These bars are best eaten the day they are made, but will be OK on day two.
Peanut Butter Chocolate Chip Cookies: 4 Batches = Perfection
Brittany wrote this on 11 March 2012![]() chocolate, peanut butter, peanuts
chocolate, peanut butter, peanuts
 Mmm. This picture makes me so happy…
As I was looking down my list of food to freeze and have on hand after baby #3 arrives, I noticed that peanut butter chocolate chip cookies were not on my list. For shame! How could they have been overlooked?! So in the midst of the 101 other things I was doing yesterday, I decided to make some. Unfortunately, I remembered that the recipe I usually make now had about half a dozen other different versions that had been added to it over the years. Which one was the best one? I really didn’t feel like keeping all the different recipes for one cookie so I narrowed them down, eliminated all but four, and got to work. The results were unanimous! In a blind taste test (which means paper plates with numbers on them for the different cookies-very scientific and official) my own recipe was chosen. Take that Martha Stewart, who was represented in cookie #2.
I do want to take a moment and mention why we didn’t pick this recipe from Cooking Light. I have actually made them several times before but had never done a side by side comparison. In this case, even though the cookies had fantastic texture and the use of mini chocolate chips is kind if nice, the flavor could not compare. The Cooking Light version-made with canola oil-tasted great, but when you eat a cookie made with real butter at the same time, it kind of trumps the light version. If you are looking for a cookie that is just lower in fat, they are wonderful. But in the words of my husband, “If you are going to eat a healthy cookie, go all out and make it a really healthy cookie, like these. If not, then just eat the butter version.” I totally agree.
I have now deleted or tossed all other recipes for peanut butter chocolate chip cookies. This is the only one I will bake from now on. It is chewy and wonderful. More of a chocolate chip cookie with peanut butter in it than a peanut butter cookie with chocolate chips in it. Makes for a less crumbly texture. Now my only dilemma is whether or not to make a different cookie to put in the freezer. Right next to the 4 gallon bags I have left over from testing…
 Peanut Butter Chocolate Chip Cookies
This recipe is easily doubled.
1/2 c peanut butter, crunchy or creamy
3/4 c butter, softened
1/2 c brown sugar
1/2 c sugar
Cream all ingredients together. Add:
1 egg
1 1/2 tsp vanilla
Mix thoroughly and scrape down the sides of the bowl. Add:
1 1/3 c flour
1/2 tsp baking soda
pinch of salt
Mix just until combined. Stir in by hand:
1 c chocolate chips
1 c roughly chopped peanuts, optional
Bake at 350 degrees for 10-12 minutes or until just barely golden brown on top. Cool a few minutes on the pan and then remove to a cooling rack. These freeze great!
Pineapple Upside Down Cake-I Aim To Please
Brittany wrote this on 8 March 2012![]() pineapple
pineapple
 My family had dinner at our close friends’ house tonight and in the interest of using them as guinea pigs taste testers, I offered to bring dessert. My reasons for this were three fold: they aren’t picky and will eat just about anything I make as long as it does not contain olives, they have several hungry kids and between our two families we can polish off a dessert that would normally take our family days and days to eat, and my least favorite reason is that I have gestational diabetes and I can only have a bite or two of whatever I make. The last reason is keeping me from doing a lot of experimentation in the kitchen and any excuse to try something totally new is a welcome change.
So my husband looked at me with his big, blue, dreamy eyes and asked for pineapple upside-down cake. I was powerless to resist…*sigh*
I have made just about everything except pineapple upside down cake, but was eager to make some since my Dad has always loved it and he will be here in just a few short weeks to help watch our two munchkins while Mike and I are at the hospital welcoming the third munchkin. So trial run on the recipe tonight, and round two in a few weeks. And man, I can’t wait for round two!!
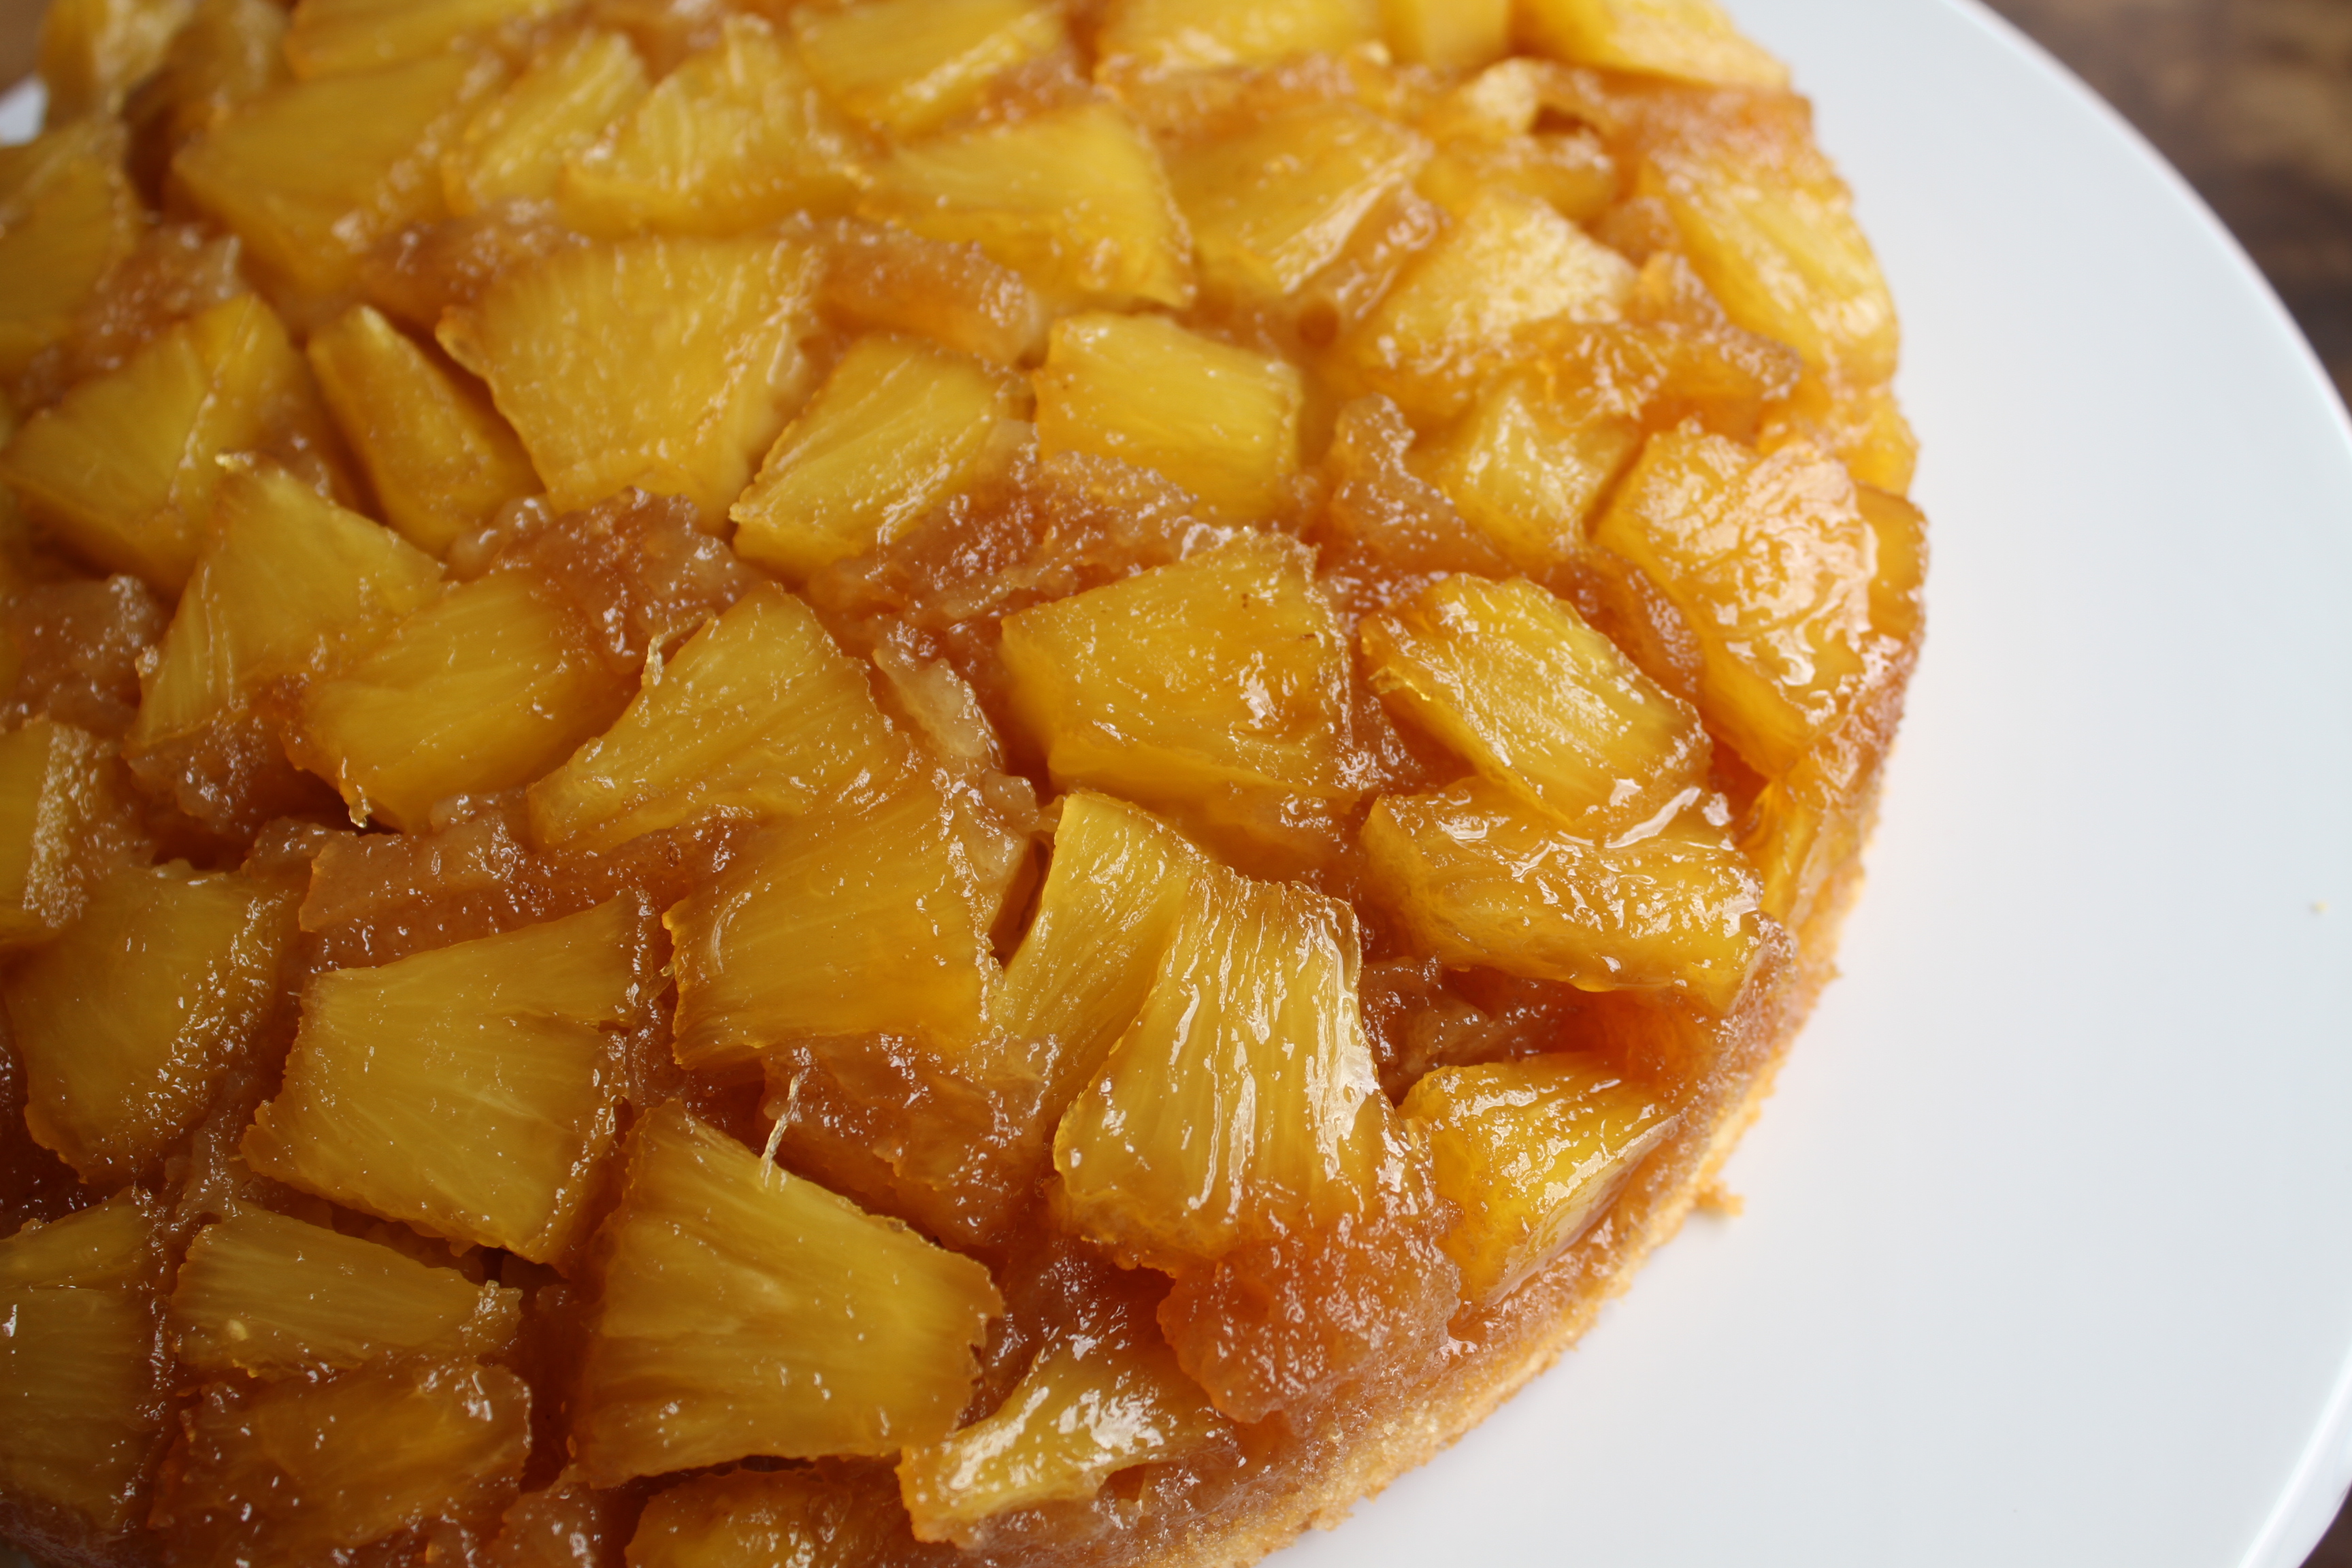
As you know, I usually make a recipe several times before I post it. Just to make sure. But in this case, the whole process was so simple, there is little room for error. I ended up picking the recipe from this book, figuring I could not go wrong. Bingo! I have now tossed every other recipe for pineapple upside-down cake that I have ever clipped, copied, or scribbled in the margin of a notebook. There is no more need for testing! This is exactly what I was looking for. Simple, easy, and totally classic. It mixed up quick and made the house smell…well…there aren’t really words. Kind of like warm, pineapple ice cream with carmel on top. Soft, moist, vanilla cake covered in sticky, gooey fruit. Surprisingly, it is not all that sweet, which is one of the things I love most about this. While I was a bit disappointed that this version didn’t have the tell tale rings of fruit with a maraschino cherry in the middle, it does make for more carmel soaked pineapple per bite. And that is a very good thing. Some freshly whipped cream on the side and this very good thing goes to fabulous. Mmmm. Can you feel the love?! 🙂

 Pineapple Upside-Down Cake
ATK includes a tip if you don’t like pineapple but still want to make this cake. Use peaches! About 4 peaches, peeled, pitted, and sliced in place of the pineapple. Scrumptious! Also, I like to buy the pineapple pre-cut from the deli department to save time and energy, but it is up to you!
1 1/2 sticks (12 T) of butter, softened
3/4 c brown sugar
1 1/2 lbs, peeled, cored, and cubed fresh pineapple (not canned) which is about 3-4 cups
1 1/2 c flour
1 1/2 tsp baking powder
pinch of salt
3/4 c sugar
2 eggs, room temperature *see note*
1 egg white, room temperature
1/3 c milk, room temperature
1 tsp vanilla
In an 8 or 9 inch round cake pan *see note* (with sides at least 2 inches high), place 4 T (1/2 stick) of butter. Put pan in a 350 degree oven until melted. Watch carefully so it doesn’t burn! Just melt! Add the brown sugar to the pan and mix with a spatula, spreading it out to cover the bottom of the pan evenly. Add your pineapple in one even layer. You may use a little less than called for. You just want to cover the pan evenly without any major holes. Set this aside. In a medium bowl mix the flour, baking powder and salt. Set aside. In a mixing bowl with a paddle attachment, beat the remaining 8 T of butter with the 3/4 c of sugar. Beat until light and fluffy, about 5 minutes, scraping the bowl at least once. Add the eggs and the egg white, one at a time, beating after each and scraping the bowl. Add vanilla. Add 1/3 of the flour and mix carefully, then half the milk, then another third of the flour, the last of the milk, and finally the last of the flour, mixing just until combined. Scrape down the sides of the bowl and mix by hand a few turns till smooth. Drop big globs (yes, that is a technical term…) of batter onto the pineapple and carefully smooth out until even. Bake for 40-45 minutes or until cake just starts to pull away from the sides of the pan and a toothpick comes out with just a few crumbs attached. Let cake cool 10 MINUTES in pan before inverting it onto a serving plate. Let cool for at least another hour. Serve plain or with cream. Or for breakfast. Or snack. Or brunch…
Note: If your eggs are not at room temp, simply place them in a small bowl filled with very warm tap water and let sit for a minute or two. You just want to take the chill off of them. Milk can be microwaved for just a few seconds. You don’t want them warm-just not cold. This helps ensure a nice, fluffy, light cake.
Note: You can also bake this in a 8×8 or 9×9 square baking dish.
Corn Cake Muffins
Brittany wrote this on 2 March 2012![]() cornmeal
cornmeal
 These muffins are part of my ‘cheater’ repertoire. This title refers to any recipe I make that includes some kind of convenience item, like a cake mix. As you know, I usually bake from scratch but sometimes, the ease of these cheater recipes is exactly what I need and am looking for. I mean, lets face it! No matter how much I may want to, spending several hours to make a meal is not always an option. Especially after baby number three is set to arrive in just a few short weeks! If the recipe happens to be particularly scrumptious I keep it around for another day. These muffins are one of those special gems.
Several years ago I ended up with a tiny little Jiffy pamphlet cookbook. I don’t remember if I ordered it free online or if it was sent as a promotional thing or how I even ended up with it. But my recipe for Corn Casserole that I had been making for forever had introduced me to the cute little boxes of cornbread mix and all its possibilities. Little did I know that the Jiffy company had a huge line of different kinds of mixes, all of them used in various ways in this little book. And while I never warmed up to using mixes on a regular basis, there is one recipe from them that I do love to make. I tried these muffins and kind of fell in love. They taste exactly like their name: Corn Cake. Half cake and half cornbread makes for the perfect balance between muffin and cupcake. I made a double batch of these once for a huge BBQ we were having and-Let. Me. Tell. You! They were inhaled! I think they kind of reminded people of the sweet corn muffins you get at a certain BBQ restaurant that serves its food on trash can lids. Now I am not saying these are exactly like those, but I will say that they go fantastic with anything grilled, covered in sauce, or just spicy. Mmmm. They also happen to be great for brunch. Add a little whipped honey butter and forgetaboutit! Drool worthy. Bake them in a mini-muffin tin and they will go even farther to feed a group (although this makes it easier to snitch). And since the ingredient list is short, as is the time it takes to throw them together, they truly are a valuable little recipe to have in your kitchen arsenal!
 Corn Cake Muffins
1 pkg Jiffy corn muffin mix
1 pkg Jiffy Yellow or White cake mix
2 eggs
1/3 c milk
1/2 c water
Combine all ingredients just until blended. Pour into greased or paper lined muffin cups. Bake at 350 degrees for 15-20 minutes or until just lightly browned.
Bite-Sized Cinnamon Rolls
Brittany wrote this on 26 February 2012![]()
 Every once in awhile, I find myself doing something really out of the ordinary. Culinarily speaking, of course. Take last week for instance. I had a tube of crescent rolls in my fridge. Now, this is not something I normally buy and I am unsure as to why I had purchased them in the first place. Also, they had been in my fridge for a long time and as I am trying to purge my freezer, fridge, and pantry in preperation of some make-ahead meals to have after the baby is born…they really had to go. I accidentally came across a recipe on tastespotting and decided to give these a try. As it turns out, there are about a bazillion different versions of these little darlings out there on the web and I am apparently the last person to discover them. I am posting about them now. Just in case any of you were as clueless as I was. And in case you are wondering this is the recipe I was refering to when I mentioned on facebook that I had just made something super cute; as most things baked in a mini-muffin tim are!
What it comes down to is that these are super quick, quite tasty, and so darn adorable you will just want to eat them all up!! Healthy, they are not. They will probably make a rotation in my house only as a fun surprie to whip up on a weekend or as an addition to a quick brunch. But no matter when I make them, they will be devoured. They are super fast and totally fun-especially for kids! These are a much more convenient size than eating a huge carmel or cinnamon roll. Not that those are bad things…
 Bite-Sized Cinnamon Rolls
1 tube crescent rolls
1 T soft butter
3 T brown sugar
cinnamon
Open up the package of rolls into one big rectangle and gently press the seams of the dough together. Spread the butter evenly and thinly across the whole piece of dough. Use more butter if you need to. Spread the brown sugar evenly on top of the butter. It should be nice and thin. Sprinkle the whole surface lightly with cinnamon. Start rolling the dough along the long side of the rectangle, keeping it tight, until you have a long log. Pinch the seam together. Spray a mini-muffin tin with non stick spray and cut the log into 3/4 inch pieces with a sharp knife. Lay the rolls cut side down, one in each mufffin cup. Bake at 375 for 8-10 minutes, or until lightly browned and puffed. Yum!!
Buttermilk Brownies
Brittany wrote this on 22 February 2012![]() buttermilk, chocolate, cocoa
buttermilk, chocolate, cocoa
 For a couple of weeks now, I have been in a kind of ‘brownie mood’. This is a bit odd for me. I really like brownies and if you look through my recipe archive you will find a ridiculously high number of recipes there for me to try. But when it comes down to it, they are kind of rich for me. A good chocolate cake? More my style. My chocolate needs to be broken up by something. Something like….whipped cream or peanut butter or carmel or marshmallow. Something! Lately though, I have been after the texture of brownies. The chewy, dense kind of brownie. I made a batch for the Super Bowl and while they tasted great, the texture was crumbly and annoying; not worthy of passing on to all of you. So I kept paging through my recipes, still looking for that chewy, gooey brownie. Or at least one I could modify to be that way.
I failed. Miserably. What I ended up making were these buttermilk brownies-the opposite of what I was originally looking for. The first batch I made were so good, I turned around and made a second one so that I would know if they were reliable or not (the method is kind of weird) and, in turn, be able to post about them here. All thoughts of dense and chewy were gone! This is one of those recipes that I know I will be making for a dozen different reasons in the future. These are most definitely cake-like. If you are a lover of a soft, moist brownie, I have found the perfect one. What cemented it for me was the taste. They are sweet, but not really all that rich. And while I don’t usually frost my brownies, these need it. Of course, now that my husband has confessed to me (after more than 10 years of marriage and not saying a word) that he actually prefers his brownies frosted, I need to make it up to him!
I mentioned above that the method for this recipe is kind of odd. Somehow, they still turn out fantastic though. I know this is the first of many brownie recipes that I will post here so please don’t take this version as some kind of ultimate ‘brownie recipe to end all brownie recipes’! There are so many different kinds of them out there-all of them just as good-that there is plenty of room for a version to go with every occasion and every mood. I am very much looking forward to my next testing session. Maybe carmel brownies next…

 Buttermilk Brownies
Adapted from BHG
You will notice below in the instructions for these brownies that this recipe can be baked in either a 9X13 inch pan or an 11 X14 inch glass Pyrex pan. I have tried both, and although they turn out excellent either way, the bigger pan bakes up much better. Use the large one if you have it.
2 c flour
2 c sugar
1 tsp baking soda
pinch of salt
Combine the above ingredients in the bowl of an electric mixer. Meanwhile, in a medium saucepan, melt together:
1 c water
1 c (2 sticks) butter
1/3 c cocoa powder
Cook over medium heat, whisking constantly until smooth. Bring the mixture just to a boil and then pour into the dry ingredients with the mixer on very low. Scrape the bottom and sides of the bowl and mix again until everything is incorporated. With the speed on low again, slowly add:
1/2 c buttermilk
1 tsp vanilla
Mix until incorporated. Add, one at a time:
2 eggs
Mix and scrape the bowl if necessary. Turn the speed up as high as you can without making a mess of your kitchen (this is only about medium for mine) and beat the batter for 1 minute. Batter will be very thin! Pour the batter into a greased 11X14 inch glass Pyrex dish or 9X13 inch pan. Bake at 350 for 30-35 minutes or until toothpick comes out clean or with a crumb or two attached. During the last 10 minutes of baking, make the Chocolate Buttermilk Frosting.
Chocolate Buttermilk Frosting
In a medium saucepan (I just use the one from earlier in the recipe), melt together:
1/4 c butter
3 T cocoa powder
3 T buttermilk
Whisking constantly, bring the mixture just to a bubble! Remove it from the heat and add 2 1/4 c of powdered sugar, whisking vigorously until smooth. I add it in a bit at a time so I don’t make a huge mess. Once it is whisked smooth, spread it over the hot brownies you just took out of the oven, smoothing to cover the whole pan. Cool completel to room temp.
Banana Snack Cake With Honey Cinnamon Glaze
Brittany wrote this on 28 January 2012![]() bananas, honey, sour cream
bananas, honey, sour cream
 Isn’t snack cake a most wonderful name for a food? It implies that it is a sweet, moist cake that you can, well, snack on. Meaning, eat whenever you like as a snack! I mean, really! That is like the best thing ever! And this recipe is much like all other snack cakes. Simple and good. Quick to throw together as an afternoon treat or hasty dessert.
I am really not partial to any particular snack cake. Chocolate, chocolate chip, applesauce, lemon-all are good! And I am currently immersed in the process of making a master list of them to have at my disposal. This one is a bit more dense, like a banana bread, and perfect to soak up all the glaze. Simply scrumptious.
 One Year Ago: Vegetable Couscous
Banana Snack Cake W/Honey Cinnamon Glaze
Cake recipe adapted from Americas Test Kitchen, Glaze is a Brittany Original
This recipe is just fine without the glaze but it is REALLY GOOD with the glaze. Just don’t eat it all before pouring on the cake. Its kind of addictive.
In the bowl of an electric mixer or using a hand mixer, combine:
1 stick of softened butter
1 1/4 c sugar
2 large, very ripe bananas
2 eggs
1 tsp vanilla
1/4 c milk
1/4 c sour cream or plain yogurt
When that is fully incorporated, add:
2 c flour
2 1/2 tsp baking powder
dash of salt
Mix just until combined. Pour into a well greased 9X9 baking pan and bake at 350 degrees for about 40 minutes or until toothpick inserted into the center comes out clean. Cool ten minutes in the pan. If desired, remove cake to a cooling rack before glazing.
Glaze:
1/2 c powdered sugar
2 T honey
1/4 tsp cinnamon
1 T water
Combine all ingredients in a small bowl until smooth. Pour evenly over cooled cake.
Ok. So here it is. The ooey gooey chocolate dessert I told you I would post.
 I need to mention right off that this was kind of hard to photograph. How do you take a picture of something that is part cake, part pudding, part brownie, and all decadence? Because that is what this is like. If you have never made pudding cake before, let me explain. Its um…well…its kinda weird. I don’t really know how it ever turns out, just that it does. Most pudding cake recipes, regardless of what kind (I have a lemon recipe that is OUT OF THIS WORLD!), all seem to have a kind of heavy cake mixture on the bottom, then a dry sugary layer, and then-yes I know this is odd-you pour hot liquid over the top and don’t stir it in. Somehow (I think) the liquid seeps through the whole she-bang and mixes with everything. It is magic I tell you! Then voila! You take it out of the oven and you have this dense, cakey top with perfect pudding on the bottom. Whoever figued out how to do this on purpose, as I am guessing the first time was an accident, I am forever in their debt. I mean seriously! Does this not look like happiness on a spoon?!
 I thought so. I am only sad that it is now all gone and that I don’t have anymore to eat while I post this. Because looking at these pictures is making me drool on the keyboard.
 So on to the recipe. I got this recipe from my Mother-In-Law and I think it was in a Hershey cookbook of hers. I am telling you, this woman likes chocolate more than anyone I know, and this gets made in her house A LOT! And for good reason too! It is warm, chocolatey, not very complicated at all, and just so darn yummy. So please just trust me! It is weird going into the oven, but soooo wonderful when it is done!


 One Year Ago: Crispy Bars
Chocolate Pudding Cake
In a medium bowl, mix together:
3/4 c sugar
1 c flour
1/4 c cocoa powder
2 tsp baking powder
pinch of salt
After it is mixed well, stir in:
1/2 c milk
1/3 c melted butter
1 tsp vanilla
Mix until smooth and pour into an ungreased 9X9 pan, preferably glass.
In a small bowl, mix:
1/2 c sugar
1/2 c brown sugar
1/4 c cocoa powder
Dump dry mixture over the top and spread evenly. DO NOT STIR!
Lastly, pour 1 1/4 c very hot tap water over the whole thing. Again, DO NOT STIR!
Slide it carefully into the oven and bake at 350 degrees for 35-40 minutes. Let cool for at least 15 minutes before scooping out portions and devouring. This is very rich so a little goes a long way. Also, I don’t bother serving this unless I have freshly whipped cream to go with it! Enjoy!
Weeknight Apple Pie
Brittany wrote this on 19 January 2012![]() apples
apples
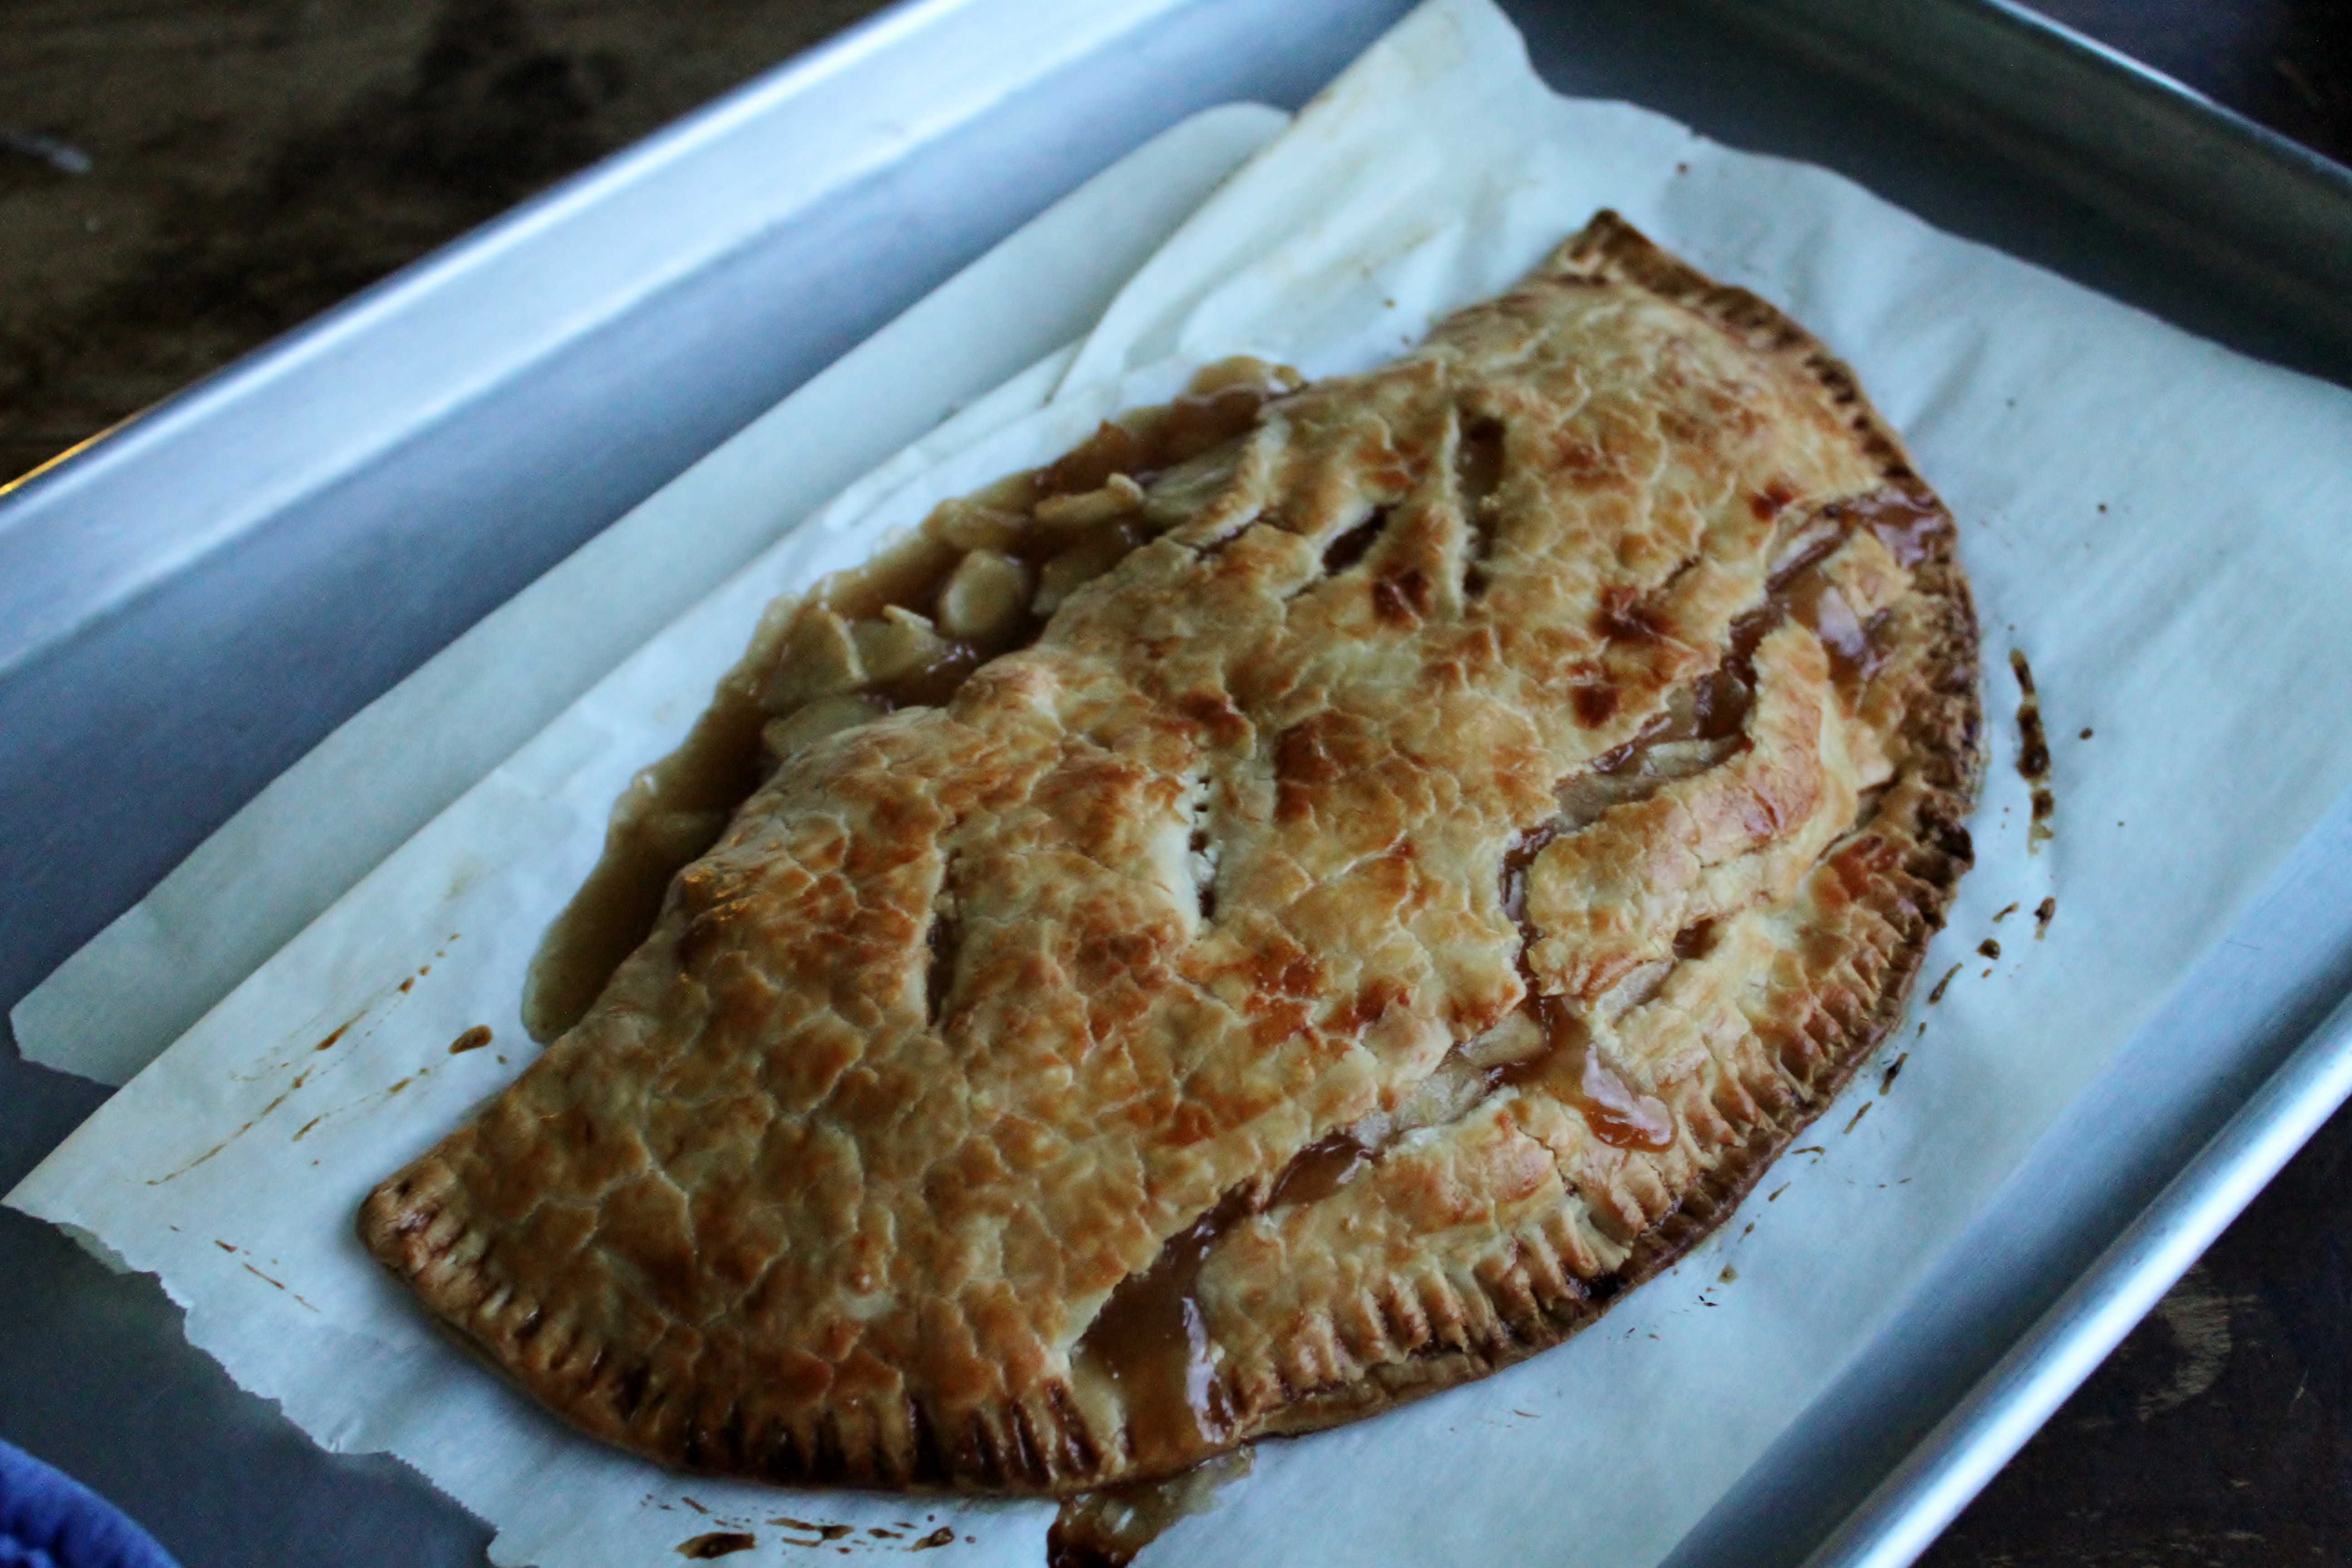
 This is going to be a quick post: short and sweet! I have a meatloaf in the oven and potatoes simmering away on the stove, nearly ready to be smashed. The carrots have been steamed and are just waiting for a glaze just before dinner. So far, dinner smells have not invaded the house. Only dessert smells. Apple dessert, to be exact. Always a good thing. Dessert is done and cooling on the counter in all its golden brown glory and I thought I would take this opportunity to tell you about it!
As you can see, my pie split a bit in the back, but no matter. Its all good! Also, I was losing my light so it is extremely hot in this picture. Like…molten hot. It will settle down a bit as it cools and not be quite so puffed up. I make this a lot in the middle of the week or when unexpected guests stop over. It is quick, easy, and makes just enough for what I need. No huge pile of leftovers that I end up finishing off myself! It really is perfect for a weeknight when you have just enough time for something special. If you ask me, it is the perfect ending for meatloaf night.
One Year Ago: Chicken Salad
Weeknight Apple Pie
1 refrigerated pie crust, store bought or homemade
2 medium apples, peeled cored and sliced thin
1/4 c brown sugar or raw sugar
1/3 c apple juice or apple cider or water
1 T butter, optional
cinnamon
2 tsp corn starch and a splash of water
In a medium sized saute pan over medium heat, mix the apple, sugar, apple juice, and butter together. Add dashes of cinnamon to taste. Simmer until the apples are just starting to soften, about 5 minutes. Mix the cornstarch and just a tiny splash of cold water in a small bowl to make a slurry. Add this to the apples and cook until thick, about 30 seconds. Meanwhile, lay out the circle of pie crust on a piece of parchment paper on a sheet pan. Pour the apple filling onto one half of the pie crust. Fold over the other half and use a fork to pinch the two halves closed. Poke a few holes in the top to vent. If desired, beat an egg with a splash of water in a small bowl and brush over the top of the pie. This doesn’t affect the taste, but it does make it look all fancy. Bake at 375 for 20-25 minutes or until golden brown. Let cool on the pan until just warm. Cut into wedges and enjoy. This is great with ice cream! When it is cool, you can even pick up the pieces like a piece of pizza!
Peppermint Meringue Cookies: Nostalgia
Brittany wrote this on 5 January 2012![]() chocolate, eggs, gluten-free
chocolate, eggs, gluten-free
 It has been a long week here with surprise visits and several trips to the doctor due to a relapse in illness. In addition, my plans for this weekend have suddenly changed and I now need to clean out the fridge. Amongst several unsalvageable items-i.e. leftover pork chops I don’t even remember making-were four lonely egg whites. Eureka!
I get excited about leftover egg whites, or yolks for that matter, for lots of reasons. Mainly because I don’t like to waste anything. So, if I am making ice cream for example, I immediately start thinking about the leftover whites I will have when all the yolks end up in the custard. Is it enough to make an angel food cake? A white layer cake? A meringue pie? Or something just as scrumptious but much less exciting, like an omelet? The beauty of egg whites is that they keep much better than yolks do. If you have a lot of egg yolks leftover, you are better off pitching them (There is a rumor going around that too many egg yolks aren’t good for you…) or making something with them immediately. Whites on the other hand-those beautiful, protein packed, cholesterol free whites, can actually be frozen and used later. With a label that says how many and a nicely sealed container, they will keep a month or two. Just leave them in the fridge to thaw overnight. Of course it is always nice when you have a recipe that calls for both, like a lemon meringue pie. You use the yolks to make the lemon curd for the filling and the whites for the topping. But just this past weekend I made creme brulee, a very unhealthy, egg yolk and heavy cream laden dessert with a burnt sugar topping. And it was soooooo good. Hence, the presence of four egg whites in my fridge. Unlike other times when I sort of ponder what I am to do with them, these egg whites had a purpose. A destiny, if you will. Peppermint Chocolate Chip Meringue Cookies. The moment I added creme brulee to the New Years Day menu, I instantly jumped to these cookies as a secondary treat. My mom used to make these all the time when I was a kid and I think it was because she always had intentions of making a lemon meringue pie, but usually only got as far as making the custard filling. It is kind of hard to beat warm lemon custard in a bowl and I can’t even tell you how many times the full pie was never made. I am guessing that is why we always had egg whites in the fridge. Whatever the reason, peppermint flavoring and mini chocolate chips always seemed to be the way she made them and I for one never complained.
The beauty of these cookies is that they seem really special, but only have a few ingredients. I have always considered them an easy, make anytime kind of cookie so please don’t save this recipe for a special occasion. The fact that they are a bit better for you than most cookies makes them a good treat for adults and kids alike, even if shrinking the size of your jeans was not a resolution this year. Personally, I am not a fan of using these in little treat bags for the holidays or a bake sale given the fragile nature of the cookie, but they are definitely a crowd pleaser. So placing them alongside a heavy dessert, say at Easter or even a barbecue, makes them a fun addition to a menu. I happen to enjoy them Monday through Friday, 365 days out of the year and my family has not complained once so I think they are safe to serve anytime. Whether it is ‘fridge clean out day’ or not.
One Year Ago: Hot Wings, Honey Waffles, Filet Au Poivre, Fettuccine Alfredo, Shrimp Quesadillas
 Peppermint Meringue Cookies W/Mini Chocolate Chips
Please note the time frame you need to make these cookies. It isn’t complicated, just a lot of waiting around. For that reason, they are also called Forgotten Kisses. They need time to dry out slowly and can’t be hurried. No shortcuts here people!
4 egg whites
1/4 tsp cream of tartar
3/4 c sugar
2 tsp cornstarch
1 tsp vanilla
1/2 tsp peppermint extract
1/2 c mini chocolate chips
In the bowl of a stand mixer fitted with a whisk attachment, beat the egg whites and cream of tartar on medium high until increased in volume and pillowy and foamy. In the meantime, mix together the sugar and cornstarch in a small bowl. When egg whites are ready, slowly pour in the sugar mixture while mixer is running, continuing to beat on medium high until glossy and at stiff peaks. The meringue should hold a peak when a spoon or the whisk is drawn through it and pulled away. This whole process will take less than five minutes. Add the extract and whisk a few seconds more. Fold the chocolate chips in by hand. On two sheet pans lined with parchment paper, drop the meringue by spoonfuls at least an inch apart, poking down any spiky peaks. Bake in a 225 degree oven for one hour and then turn the oven off, leaving the cookies in the oven for an additional hour. Remove the sheet pans and let the cookies cool completely on the counter top, on the sheet pans, for another hour. Store in a tightly sealed container at room temperature for up to 3 days.
 Get it? Midnight? Great recipe for New Years, don’t you think?
This picture actually doesn’t quite capture the correct color. They are super dark. Like…midnight dark:)
Actually, these cookies are fantastic just about anytime of the year, even though I usually make them around the holidays. They are a wonderful contribution to the cookie plate but honestly. Can you see many people looking at this treat in July and saying ‘No!’ to a dense, bittersweet chocolate cookie? I didn’t think so. The wonderful thing about these cookies is that the flavor is just a tiny bit different than a straightforward chocolate cookie. What does this mean? It means you end up really really liking them. Like…a lot. I have been making them for years and am always a little surprised when I eat my first one of the batch. “Oh yeah,” I say to myself, “THIS is why I always liked these!” If you follow my blog regularly, you may recognize this conversation. I have it with my self all the time and in turn, end up babbling about it here to you. No matter how many times I make a dish, I can still be wonderfully shocked at how fantastic it is. I like to think this is one of the things that my husband finds attractive about me. I pray he still finds it endearing that I can make a shrimp pasta that I make ALL THE TIME or a coffee cake I whipped up twice in one week and still roll my eyes to the heavens, savoring the flavor and hopping up and down in what he calls my ‘happy food dance’. All because food never ceases to amaze me. And on that note, I hope food continues to knock my socks of for the rest of my days. I once saw an extremely elderly couple at a pizza place and they looked so…um advanced in years that I would have had my doubts of their making it through the meal had I been their server. When I glanced at the table they each had one of the most enormous pilsners of beer I have ever seen and were sharing a huge pizza that from what I could tell, was covered with nothing but cheese and enough jalapenos to kill a cat. This was years ago and I still think about that couple. And I sincerely hope that is Mike and I someday.
Only I will probably be drinking milk, not beer, but that kind of shatters the image doesn’t it?
So back to the cookies! Like most cookie recipes, this one is easy and straightforward. It will satisfy the most intense chocolate craving so keep them in mind for the pregnant lady in your life. Just sayin. One Year Ago: Sweet Cream Biscuits & Cranberry Orange Scones
Midnight Crackles
Adapted from Dorie Greenspan
The ingredients in this recipe have not changed from the original, but after years of fussing with the baking technique, I realize that I have come to disagree with the wonderful Dorie Greenspan. Please don’t tell her. Also, don’t disregard what seems like unimportantly small measures of spice in this recipe. It makes a difference.
In a medium size sauce pan, melt together over very low heat:
10 T unsalted butter
1 1/4 c brown sugar
10 oz bittersweet chocolate chips, preferably Ghirardelli, or an equal amount of good quality bittersweet chocolate, chopped
Stir the mixture occasionally until the chocolate is just barely melted and smooth. Pour into a mixing bowl and let cool slightly. Add 2 eggs and mix well. Sift together and add:
2 1/2 c flour
1/2 c cocoa powder
1 tsp baking soda
pinch of salt
1/4 tsp cinnamon
1/8 tsp cloves
Mix all ingredients until just combined. The dough will come together in a ball and look kind of shiny. Scoop out a chunk of dough about the size of a prune and roll into a smooth ball. Place on a parchment lined baking sheet and flatten slightly with you fingers, keeping the cookies a good 2 inches apart from each other. Bake at 350 for 10-11 minutes or until cracked and dry on top. DO NOT OVER BAKE! Let cool for a few minutes on the pan to set up and then remove to a cooling rack. Store tightly sealed for up to 5 days or freeze for a month.
The BEST Carrot Cake EVER!!
Brittany wrote this on 16 December 2011![]() carrots, cream cheese, orange, raisins, walnuts
carrots, cream cheese, orange, raisins, walnuts
 In the interest of mixing up the sweet and savory recipes from my Christmas dinner menu, I will save the potato gratin recipe for the next post. So we are jumping ahead to dessert for today, and ooooooh MAN! What a dessert it is! Maybe not exactly the kind of holiday dessert that first comes to mind, but when you have trays of cookies and fudge and candy, something spicy and classic is absolutely perfect. I should tell you that the pictures here don’t nearly do it justice. It turns out that the bright color of the cake was difficult to photograph and my light kept changing. Please know that no matter how good this cake might look, it is ten times better in person.
I seriously don’t even know where to start with this cake. Do I tell that it is thick and moist and has the best texture? Will it help you out if I say the blend of spice is perfectly balanced with the sweetness? Should I mention that the frosting is so good you will want to just fill a bowl with it, grab a spoon, and then sit in the closet so no one will find you and want to eat it too? All these are good points but what I really wish I could do is just hand you all a piece. Not being able to physically share food with you is one of the major drawbacks to blogging. This would just be sooo much easier if I could just hand you a plate with a little sliver of cake and then you would eat it and then your eyes would pop out of your head and I would say, “See?” and you would be like “Wow! Yeah! I totally get it now!” and I would smile and be all, like “I told you!” and you would be like “OK enough already. Can I have another piece?” I am pretty sure that is how it would go…
 It is actually my husband that is such a fan of carrot cake and several years ago, I started trying different recipes-because wow, do they vary when it comes to carrot cake-trying to find a really great one that would become our only recipe. The addition or subtraction of nuts, raisins, coconut etc, is easily enough to swap and experiment with, but it was the balance of spice and sweetness and texture that I couldn’t quite get right. This cake ended my searching. I am told by some (I mean you , Mom) that the absence of crushed pineapple is its only flaw. I personally don’t mind if my carrot cake has it or not, so I don’t miss it here. But just in case you believe that carrot cake cannot be made without pineapple, I am sorry to disappoint. That minor adjustment aside, I think you will be happy with it. And even though cakes can be temperamental sometimes, this one has turned out the same every single time I make it. I consider it very reliable, making it perfect to serve around the holidays when you don’t want to experiment with something fussy. It will feed quite a crowd and simply decorated would be stunning at an open house.
The recipe comes from Zoe Francois, a pastry chef/blogger/cookbook author from my home state of Minnesota! If you want to really impress people, or just develop your skills, she posts video tutorials on how to frost cakes and other dessert related skills. Very helpful. You can check out her fantastic blog here. I took advantage of her expertise and trusted her judgement when she said this was the ultimate carrot cake. She was right. Make this cake once and you will toss all your old recipes. It really is the ultimate.
 One Year Ago: Hot Chocolate #1
The Best Carrot Cake Ever
Slightly Adapted From Zoe Bakes
If you want to get a jump on things, you can bake the cake layers ahead of time, cool completely, wrap well, and freeze for up to one month. Just defrost and then frost. 🙂 Feel free to bake this batter up as cupcakes. That would be awesome for a birthday party or display for the holidays. It would also be nice on a Saturday…
Cake:
4 eggs, room temp if possible
1 1/4 c sugar
1 c brown sugar
1 1/4 c canola oil
2 tsp vanilla
zest of 1 orange
2 1/4 c flour
1 1/2 tsp baking powder
1 tsp baking soda
1 tsp cinnamon
1/4 tsp ground ginger
1/4 tsp cloves
1/4 tsp nutmeg
healthy pinch of salt
1 lb carrots, trimmed, peeled, and grated
1 c walnuts, chopped
1 c raisins
Frosting:
3 blocks (24 oz) cream cheese, softened
8 oz (2 sticks) softened, unsalted butter
2 tsp vanilla
zest of one orange
5 c powdered sugar
For the cake, mix the first six ingredients in the bowl of an electric mixer fitted with a paddle attachment. Add the dry ingredients and mix just until combined, scraping down the sides of the bowl. Fold in the carrots, walnuts, and raisins by hand. Divide the batter evenly between two 9 inch round cake pans that have been greased and floured very well. Bake at 350 for 35-40 minutes, or until a toothpick comes out clean. Let cool for 5 minutes in the pan and then carefully turn out onto cooling racks and let cool completely. Frost cake.
For the frosting, mix all ingredients together, except sugar, until smooth and mixed well. Add sugar and mix thoroughly. This will give you PLENTY of frosting so don’t be skimpy! Leftover frosting can be frozen until needed for something else!
Peppermint Chocolate Chip Cookies
Brittany wrote this on 10 December 2011![]() chocolate
chocolate
 OK. So you know how I kind of avoid the recipes that include boxed ingredients because I would rather just make them from scratch? Yeah. Well that still stands. I like to cook and bake from scratch and truly believe that it just tastes better that way. Of course, as I have said before, there is nothing wrong with taking a little help now and then to make your life easier. Piggy Pudding is a prime example of this. As a matter of fact, I made it this morning with scrambled eggs and Apple Cider Syrup. But that is not the point! The point is that life is crazy and hectic and wonderful and most people just need to have an arsenal of great, quick ideas that don’t have a huge ingredient list and can be made in the time it takes my two year old to pretend to ‘read’ The Cat In The Hat. This recipe falls into those categories.
These cookies are perfect for this time of year! Because they are made with a sugar cookie mix, they are extremely fast to mix together and can withstand quite a bit of handling. Kids can mess with the dough as much as they want, dropping it on the sheet pans to bake and pinching it and squishing it, and it will still bake up the same. So often, as with traditional sugar or butter cookie dough, you have to chill it before and after every step and keep flour on it. It is just much more particular. This recipe, you can just have fun with. It also seems to consistently make 3 dozen cookies exactly. So if you have to whip something up last minute for an office party or school snack, these festive little treats will do just fine. It makes it feel like Christmas without having to commit to the hours of time in the kitchen that you need for some cookie recipes! Most of all, they are quite good. I was pleasantly surprised about that when I first made these with my daughter a few years ago. They have since become an easy weeknight treat during the Christmas season when I am pressed for time, but want to do something special. And wrapped up in a red bow, they would make any neighbor a happy camper! One Year Ago: Puppy Chow
Peppermint Chocolate Chip Cookies
From Betty Crocker
Besides being quite yummy, kids (including mine) seem to love the fact that these are green.
1 pouch of sugar cookie mix, such as Betty Crocker
1 stick of softened butter
1 egg
6-8 drops of green food coloring
3/4 tsp peppermint extract
1 1/2 c chocolate chips
In a bowl for a stand mixer or with a hand mixer, combine first three ingredients. Add the food coloring and mix well. I like the pale color of only 6 drops, but 8 drops will make them nice and green! Add the peppermint extract and combine. Measure carefully! It is very potent! If you like, taste the batter to see if you want more extract, but only add more in by drops. It is VERY strong and you can’t take it out once it is in there! Stir the chocolate chips in by hand. Drop by scant teaspoonfuls onto a greased or parchment covered sheet pan. Make these tiny! They are too overwhelming if you make them regular size! Besides, small cookies are so cute… Bake at 350 for 8-10 minutes or just until starting to barely brown on the edges. Don’t over bake! Let them cool on the sheet pan for a full five minutes before transferring them to a cooling rack. Cookies will firm up as they cool. These will last for several days in a tightly sealed container, or you can easily make them ahead of time and freeze them for when you need them!
 Wow. OK. I don’t even know how to start this post.
As good as these may look in the picture above, let me assure you. They are so much better than that.
My Mom used to make homemade doughnuts when I was really little, but as our family grew and the older kids took it upon ourselves to experiment with coffee cakes, (How much brown sugar topping can you really put on a coffee cake? Three times what it calls for in the recipe? Four times?) she abandoned any recipe that called for a vat of hot oil. But ooh! they were good. It is hard to beat a hot, fried pastry tossed in cinnamon and sugar. That said, these come close.
They have a few things going for them that my Mother’s-or Dunkin, or Krispy Kreme for that matter-did not. These are baked, not fried. They are made with vanilla yogurt, maple syrup, and canola oil, not butter and sugar. I mean, really! They are practically health food! Sure they are brushed with melted butter and then covered with cinnamon and sugar but that is neither here nor there…And in case you are wondering, when you raise the amount of gooey topping on a coffee cake, it squishes the actual cake part underneath to a very thin pancake, resulting in a pan of baked brown sugar and butter. Just so you know.
As you can see in the recipe below, I give you a maple glaze option if you don’t want to go the classic route. This was my Father’s genius idea and I am still can’t believe that I didn’t think of it first. However, after three batches and a lot of tweaking to get the consistency of the glaze juuuust right, we discovered that plain cinnamon and sugar was way better. And trust me. I am a plain glazed doughnut kind of gal. It is hard for me to admit this, but the cinnamon and sugar made the actual doughnut taste even better, not overpower it like the glaze did. In the end, the choice is yours, although I hope you make them both ways to get the full effect. Either way, you still win. And bonus! You can make a double batch and tell everyone that I made you make that many.
I think I speak for all my test subjects when I say that it was the texture that surprised us most about these doughnuts. I generally like raised yeast doughnuts more than the cake-like kind, but these are a pleasant cross between the two. Light and spongy, they aren’t heavy or dense or oily like many cake doughnuts are. WARNING: This also makes it easier to eat more than one. 

 Baked Doughnuts
Adapted from Lovin From The Oven
Please note that this recipe relies on a special piece of equipment. An inexpensive, non-stick doughnut pan, available here or from any kitchen store, is absolutely worth it. This recipe is so fast, easily done in 30 minutes, start to finish, making it perfect for Saturday morning brunch or even Christmas morning!
In a medium bowl, mix together:
1 c flour
3/4 tsp baking powder
3/4 tsp baking soda
pinch of salt
In a large measuring cup mix:
3/4 c nonfat vanilla yogurt
1 egg
1 T canola oil
3 T pure maple syrup or honey
When mixed, gently stir into dry ingredients just until incorporated. Batter should be thick but airy. Lightly spray a 6 doughnut pan and divide batter evenly. This makes exactly 6 doughnuts! Bake at 400 degrees for about 10 minutes, or until puffed and just starting to get golden brown on top. Let sit in pan for just a minute and then turn out onto a cooling rack. Melt 2 T of butter in a small bowl and brush both sides of the doughnuts. Mix 1/2 c sugar and 3 tsp of cinnamon together and toss the doughnuts in the mixture while still warm. Doughnuts are best eaten the same day they are made.
Maple Glaze: Mix together 1 c powdered sugar, 2 T maple syrup and 1/2 T milk in a bowl until smooth. Dip doughnuts in the glaze and set on a rack to drip.
Love a Good Recipe?

Then you’ve come to the right place! I’m Brittany, and I share tested, trusted recipes you’ll love. I prepare & photograph food, obsess over the perfect recipe, and enjoy grins of delight when I serve up something awesome. Enjoy!


