 Brittany's Pantry
Hot Cross Buns
Brittany wrote this on 1 April 2015![]() raisins
raisins
 Good Friday is nearly here and I needed to finally share my most favorite recipe for Hot Cross Buns.
I did not grow up eating these at Easter and as a child, thought they were some foreign kind of food that was only mentioned in nursery rhymes. Now that I am older and have access to Google, I love the story behind them. I started making them Easter weekend several years ago, but that new tradition kind of disappeared. In the last six years, on, just before, or just after Easter weekend, I have had a baby (twice), moved (twice) or been out of the state due to celebrations of previous baby births. I am crossing my fingers that the drama during this holiday in the future is limited to the celebration of the risen Christ, since neither moving or additional children are in our plans.
This recipe happens to be from Ree Drummond, The Pioneer Woman. I followed it exactly with no tweaking. If you are new to yeast breads and regard them as a rather scary endeavor, this is perfect for you. No kneading or guessing about how much flour. It is straight forward instructions and a very forgiving recipe. I highly recommend giving them a try. I also suggest that you eat one right out of the oven, with no frosting. Yeasty and wonderful!
Hot Cross Buns
For The Buns:
2 c whole milk
1/2 c oil-I recommend canola or grapeseed
1/2 c sugar
2 1/4 tsp active dry yeast (this is exactly one little package)
4 c flour + 1/2 c for later in the recipe
1 tsp baking powder
1/2 tsp baking soda
2 big pinches of salt
1/4 c sugar
1 tsp cinnamon
1/2 c raisins or currants-I use raisins because I always have them on hand and they are easier to find in the supermarket
For The Icing:
1 egg white
powdered sugar
milk
To make the rolls, combine the first three ingredients in a large saucepan. Place it over medium heat and stir occasionally, without letting it burn, until hot (not boiling please!) Remove from heat and set aside to cool until its only warm. When it is no longer hot, sprinkle the yeast over the top, add the 4 cups of flour, and stir until combined. It will be a very soft, sticky dough. Leave it in the saucepan and let it sit, covered loosely with a towel or plastic wrap, for an hour. Add the last 1/2 c of flour, the baking powder and soda, and the salt. Mix well.
Cover a sheet pan with parchment paper, or very lightly oil it. Set aside. Lightly flour your VERY CLEAN countertop and pull the dough down onto the surface, pressing all around to flatten the dough a bit. Combine the last 1/4 c of sugar and cinnamon and sprinkle one third or so onto the dough, along with a little less than half the raisins. Fold the dough in half and press and flatten, squishing the raisins and cinnamon/sugar inside. Sprinkle on more raisins and cinnamon and sugar and repeat. Repeat a third time, pressing gently to ‘mix’ the raisin mixture in layers inside. Pinch off a golf ball sized piece of dough and gently roll it into a ball, pinching the edges together at the bottom of necessary to form a smooth ball. Place on the prepared sheet pan. Continue until the pan is full, placing the rolls at least 2 inches apart, and cover lightly. Set aside to rise in a warm place until very puffed. I like to set them in the sunshine in front of a window!
Preheat oven to 400 degrees. With a fork, beat together one egg and a splash of water to make an egg wash. Brush the tops and sides of the buns with the egg wash and bake for 20 minutes, or until the buns are a nice golden brown. They smell so good!!!
Allow to cool on a cooling rack, but only after you have eaten one or two of them warm. So. Amazing. Don’t frost them too soon, or it will all melt off! When they are just barely cool, combine the egg white with enough powdered sugar to make a super crazy thick frosting. How much will depend on the size of your egg. Add a tiny splash of milk until you get the consistency you want. Make sure the frosting is thick enough to stay on the buns! Spoon or pipe the frosting in a ‘cross’ shape on top of your Hot Cross buns. Enjoy!

Sweet Pineapple Casserole
Brittany wrote this on 24 March 2015![]() pineapple
pineapple
 Just a quick post to pass along a favorite side dish recipe. Just in time for Easter!
About a bazillion years ago, a sweet southern woman served me this kind of baked, scalloped, pineapple, bread, thing. I was hooked. I have no idea what she called it, but we ate it with breakfast and I have been dreaming about it ever since. With a holiday coming up that has a meal traditionally centered around ham, I thought this was the perfect time to bring that tasty memory to reality.
To be honest, I don’t really remember if this is anything like the version I ate all those years ago, but I love it so much I don’t really care anymore. This stuff is addictive. In the past few weeks, I have eaten it with burgers, breakfast, and yes, some roasted meat. All good. All very very good. It is like the jack-of-all-trades of the side dish world. I’ve seen this wonderfulness served with Thanksgiving dinner as well as brunch. It is at home alongside quiche as well as barbecue. And yes, you can be sure it will be crazy good with that ham you will be making in a few days.
Pineapple and ham? Perfect.
 Sweet Pineapple Casserole
1 stick of butter (1/2 c) of softened butter
1 c sugar
3 eggs
1 tsp vanilla
1-20 oz can of chunked pineapple, drained
1 small loaf of french bread, cut into 1 inch chunks (4-5 cups)
Preheat the oven to 350 degrees and spray or butter a small casserole dish or glass 9X9 dish. In a large bowl, cream together butter and sugar until incorporated. Add the eggs and vanilla and beat until smooth. Fold in the pineapple and the bread cubes until well mixed and bread is coated. Pour into greased dish and spread evenly. Bake until bubbly in the center and golden brown on top, 35-40 minutes. Enjoy!
Savory Chicken Chile Hand Pies
Brittany wrote this on 19 March 2015![]() cheese, chicken, chiles, corn, cream cheese
cheese, chicken, chiles, corn, cream cheese
 One of the things I realized after having children is that anything that is able to be eaten with your hands is golden. Instant success, friends.
Come to think of it, this may be true across the board with adults as well as kids, hence our continued obsession with all things ‘on a stick’ at the summer festivals. But there is something incredibly appealing about being able to walk and munch at the same time. Is it because finger foods are so cute? Its fun? We like doing two things at once? Whatever the reason, these cheesy little pockets of goodness satisfy that need we all have to multitask.
Made with convenient, ready-made pie crusts, this dinner/lunch comes together faster than you would think. They are just a tiny bit spicy, but not enough to turn anyone off. Crispy and gooey and warm and satisfying. A portable little meal. Perfect for to enjoy while vacuuming. Or folding laundry. Or walking the dog…
Find the recipe and more photos over on the Columbia City Moms Blog website.
Enjoy!
 Cornflake cookies. Have you heard of these?
My Mom made these cookies all the time when I was growing up and they were always one of my favorites. The irresistible crunchiness of the cereal in them is incredibly appealing to a kid, but when I recently tested a batch and served them to a crowd of adults, the response was overwhelming. Apparently, grown-ups like crunchy cereal in their cookies too! I thought that everyone made them until recently when I took a very un-scientific poll and discovered that no one I knew had ever had one before. So I decide to SHARE THEM WITH THE WORLD!
If you are wondering what they are like, imagine a chewy sugar cookie with LOTS of texture. They have just a bit of oatmeal in them to give them a nice heartiness, but the crispy crunch of the cornflakes makes them fun and kind of addictive. Like most cookies, these freeze particularly great so be sure to mix up a double batch and tuck a few away. Snuck into a lunch box for school or nibbled on with a late night cup of tea, they are equally scrumptious for the whole family. Don’t worry. I won’t make you share yours with the world.
 Cornflake Cookies
You can use traditional rolled oats in this recipe, but the finer texture of the quick cooking just seems to work better here. To crush the cornflakes, place 1 1/2 cups in a zip top plastic bag and crush with your hands. You don’t want crumbs or powder, so just scrunch them up until there are no big flakes.
3/4 c (1 1/2 sticks) room temperature butter
1/2 c sugar
1/2 c brown sugar
1 egg
1 tsp vanilla
1 3/4 c flour
1/2 tsp baking soda
1/2 c quick cooking oats
1 c crushed corn flakes (about 1 1/2 c from the box)
Preheat the oven to 350 degrees.
In a medium bowl, cream together the butter and the sugars. Add the egg and vanilla and combine. Stir in the remaining ingredients. Scoop by rounded teaspoonfuls onto a sprayed or parchment lined sheet pan. Flatten slightly with your hands, then bake for 9-10 minutes, or until just golden brown around the edges. Let cookies cool and set on the pan for a few minutes before removing them to a cooling rack. Enjoy!
 I have confessed previously-not sure when, but I know I did at some point in time-that I love all things citrus. I take after my Mother in that respect. It is true that I inherited her facial features and love of music, but my Mom also loves all things lemon, and that is what we are focusing on today kids.
When I was a young, we returned home from school to lemon bars, still warm on the counter, more times than I can count. If Mom was craving something sweet, she made lemon bars. They were the first treat I saw her make where you had to bake them twice and I thought that was just about the coolest thing ever. The bars were quick to throw together and it made a 9 inch square pan. With eight people in the family taking some, there were no leftovers for the next day. And she wouldn’t just make lemon bars. She made a killer lemon meringue pie (another scientific phenomenon that I though was so neat), but more often than not, she would pull out the recipe and just make the lemon filling. We would all spoon hot, freshly made lemon pudding into our bowls and rarely get around to actually rolling out a crust, or whipping up the egg whites she had saved after using the yolks in the custard. It was the rich, lemony-ness that she wanted and let me tell you. It is hard to beat a rich homemade lemon custard.
I still think of my Mom any time I see or eat a lemon bar. Which are generally at the same time because if I see it, you can sure as heck bet on the fact that I am going to eat it too. The smell of them baking reminds me of our family kitchen, and eating them almost always prompts me to turn to my children and say, “Do you know who else loves lemon bars? Namma!” The kids cheer and I laugh, hopefully passing along the same sweet memories I had as a kid. It is something special for my children to know; that they have things in common with their extended family, despite the dozen or so states that currently separate us. It makes them feel closer.
Although I can’t help but wonder if my Mom somehow just knows when I pull a fresh pan of lemon bars, hot out of the oven, and set them on the counter as my kids arrive home from school…
 Lemon Bars
I have said it before and I will say it again-I LOVE LEMON BARS. I have been making different versions of them for as long as I can remember, but only recently settled on this recipe. Go figure, it was the first one I ever scribbled down for myself to test, hoping that they would turn out since I had completely guessed at all the measurements. Over the years I started adding a bit of cream to the filling, trying to mellow out the tang a bit. I know there is no zest in here but trust me when I say that you won’t miss it. These are not a super crazy, take you an hour to make, kind of bar. They are as streamlined and simple as I could make them, without sacrificing flavor. I may post another recipe sometime, making a fancier, more involved bar. But for now, when I want lemon bars, I make these. They never disappoint.
Crust:
1 1/2 c flour
1/2 c powdered sugar
1 stick of butter, barely melted
Filling:
2 eggs
1 c sugar
1/4 c lemon juice (taste testers surprisingly preferred the flavor of the batch made with bottled lemon juice instead of fresh, but its your call)
1 T flour
1 T heavy cream
Preheat the oven to 350 degrees and lightly spray or grease a 9X9 inch pan, preferably glass.
Combine all the of the crust ingredients and press into the prepared dish, making sure the crust is even. Bake for 15 minutes. While the crust bakes, whisk all the filling ingredients together until smooth. When crust is done, remove the pan, give the filling one last whip, and pour the lemon mixture over the hot crust. Return the pan (carefully) to the oven and bake for another 15-20 minutes, or until the filling is JUST SET! Remove from the oven and let cool to room temperature. Cut into bars and dust with powdered sugar if desired. Store bars in the fridge for 2-3 days, tightly sealed.
Watergate Cake
Brittany wrote this on 23 February 2015![]() pistachios
pistachios
 Once upon a time, there was a wonderfully sweet and precocious, curly haired little girl who had gone to visit her Grandmother’s farm.
This farm was a very special place. It was often the location of summer family reunions and get togethers; the yard and nearby orchard overflowing with Aunts and Uncles and Cousins. During one such visit, the little girl’s Aunt Mary handed her a small, white plate with a big square of moist, green cake on it. It was covered with a fluffy cream that looked so light and airy it seemed to have been pulled right from the clouds above! The girl slowly picked up a fork and took a bite. As the rich, sweet confection hit her tongue, the little girl’s eyes grew round with wonder and delight!
“Aunt Mary! Pray tell, what is this amazing treat you have passed to me that is the color of spring leaves and 70’s avocado kitchen cabinets?! What angel led you to this enchanted cake made from magical ingredients?”
Aunt Mary smiled angelically and leaned down close to the little girl. “My sweet, sweet child,” she said. “This is, Watergate Cake.”
All of a sudden, the clouds parted and sunshine streamed down on us. The chorus of ‘Hallelujah’ began to play and soon rose to a thundering crescendo of praise! Watergate Cake! The little girl’s life was forever changed for the better and from that day on, she would remember that day as ‘The Day of the Watergate Cake.’
True story.
 All right.
So maybe it didn’t happen exactly like that. But its pretty close to my first taste of this fantastic dessert. It doesn’t get much more retro and nostalgic than green cake made with instant pudding, so if you ever wondered about that dessert you ate years ago at the potluck in the church basement, this is probably it. It is another one of the ‘cheater’ recipes, as I call them, because it is made with boxed ingredients. However, in this case, there just is not a substitute. The very essence of this cake is rooted in childhoods of my generation and one bite will give you flashbacks of denim bell bottoms and polyester collared shirts. The fact that it tastes incredible is not lost on me and I STILL bring it to potluck dinners and serve it to crowds.
I also can still hear angels singing when I take my first bite. I can’t be one hundred percent sure, but I bet I am not the only one. 🙂
 Watergate Cake
I usually cut this cake into 15 pieces.
Cake:
1 box white cake mix
1 (3 oz) box instant pistachio pudding
3 eggs
1 c oil
1 c gingerale, Sprite, or 7-Up
Preheat oven to 350 and lightly spray a 9X13 inch baking pan. Set aside. In a large bowl, beat all of the above ingredients for a solid minute until smooth. Pour into prepared pan and bake for 30-35 minutes, or until a toothpick inserted in the center comes out clean. COOL COMPLETELY. While the cake cools, make the frosting.
Frosting:
1 (3 oz) box of instant vanilla pudding
1 1/2 c of milk
1 (8 oz) container of whipped topping, such as CoolWhip
chopped pistachios for garnish (optional)
Whisk the pudding and milk together until smooth and thick. Fold in the whipped topping. Pour it over the cake, spreading it smooth, and chill the whole she-bang until ready to serve. Top with chopped pistachios if desired. Enjoy!
Mini Corn Muffins W/Bacon, Chives & Spicy Cream Cheese Whip
Brittany wrote this on 2 February 2015![]() bacon, buttermilk, chives, corn, cornmeal, cream cheese, sour cream
bacon, buttermilk, chives, corn, cornmeal, cream cheese, sour cream
 Sometimes, inspiration just strikes. Like lightening. Or in my case, like cream cheese and bacon.
A few years ago I started adding bacon and chives to my regular Mini Corn Muffins. I still make them plain all the time and usually serve them with chili, salads, or just as a snack to munch on. But filled with extras, they make the perfect addition to a brunch buffet or breakfast. With the green of the chives and the chunks of bacon, they are more than a little tempting all piled up in a big basket. A nice, savory change of pace. And bite sized! How cool is that?! I decided to make them for a little get together I was at recently, but couldn’t shake the fact that they looked like they needed something extra. Hats of cream cheese? Yuppers. Perfect. All dressed up and ready for a party. It was my husbands idea to top them with bacon. I wanted to add some chives to the top for color, but bacon won out due to the enthusiastic and threatening insistent cries of my family. Ultimately, you decide which you want to top them with!
These are so easy to bake up and top that you are going to want to make them for everything. Parties are an obvious choice, but set out with a spread for a bridal shower or baby shower, these are a fantastic, non-sugary appetizer that are irresistibly pop-able. They are also the perfect size for little fingers so try adding them to a table at a kids party, with or without the topping. Bursting with flavor and fantastic textures, these little bites of wonderfulness are definitely ready for their close-up.

 Mini Corn Muffins W/Bacon, Chives, & Spicy Cream Cheese Whip
Top the mini muffins no more than an hour or two ahead of time. You can bake them up a day ahead and store them in an airtight container. Mix up the topping and chill it in the fridge until you are ready to use it and everything will be ready when you are.
Cook 1/2 lb of bacon and chop. Set aside several pieces for garnish. Preheat oven to 400 degrees and lightly spray a mini muffin tin.
Muffins:
Mix together in a medium bowl:
1/2 c sour cream
1/2 c buttermilk
2 eggs
1/4 c canola oil or grape seed oil
Add:
1 c white whole wheat flour or all purpose flour
1/3 c cornmeal
2 T sugar
1 1/2 tsp baking powder
pinch of salt
1/4 tsp ground black pepper
Mix all ingredients just until combined. Do not over mix.
Fold in 1 c frozen corn, thawed
2 T chopped fresh chives
Add most of the bacon, still reserving a bit for garnish on the tops.
Divide batter among the mini muffin cups and bake until puffed and golden, 9-11 minutes. This makes about 40 mini muffins so it may take two passes through the oven. Remove to a cooling rack.
Topping:
4 oz cream cheese, softened
2 T sour cream
1 tsp bottled hot sauce
1 T honey
1 tsp milk
Whip all ingredients together until smooth. Pipe, spread, or dollop whip on the cooled mini muffins and garnish with reserved bacon, more chopped chives, or both! Can be made and assembled an hour ahead.
 Lets chat about chocolate, yes?
It needs no introduction. Chocolate is good and chocolate is great. Blah blah blah. Nothing we don’t already know. So when you find a Ghirardelli recipe in a magazine for a double chocolate cookie, you take note and trust them. Who better to for me to listen to about chocolate cookies than chocolate experts? And we all know that Ghirardelli is the real deal. Also, I got this before Pinterest existed when people still read magazines for the recipes. Which, amazingly enough, wasn’t all that long ago…
I have been making this recipe for years, exactly as it stands, with no changes. When you want a fudge-y, brownie-like, chewy cookie, this is the ticket. I keep looking for other versions, trying out other kinds of cookies. I have posted a few of them; midnight chocolate, peppermint chocolate, triple chocolate. But these are the only cookies that are basically solid chocolate barely held together by a few other ingredients. As in, the high ratio of chocolate in these is pretty much just one step up from gnawing on a block of semisweet. Ul-ti-mate, baby.  It is the texture of these that really gets me though. The crispy edges give way to a chewy center that is all crackly with choclate-y goodness. Not cakey. Not too crispy. Perfect. Basically the perfect chocolate cookie.
Clearly we need to chat about chocolate more often, yes? I also may have just set a record for number of times the word ‘chocolate’ appeared in a blog post.
Ghirardelli Double Chocolate Cookies
The only thing I have changed about this recipe is the method. Feel free to add a teaspoon of peppermint extract to the batter for, well, obvious reasons. And it may be hard to believe, but this is not a sponsored post. Ghirardelli knows nothing about it. I just love their cookies.
1 (10 oz) bag of good quality, bittersweet chocolate chips
6 T soft butter
3 eggs
1 c sugar
1/3 c flour
1/2 tsp baking powder
1 (12 oz) bag semi-sweet chocolate chips
1 c chopped walnuts (optional)
In a small microwaveable bowl, heat the bittersweet chocolate and the butter together in 20 second intervals, whisking after each one until the chocolate is smooth. In a separate bowl, whisk together the eggs and sugar until well combined. Pour the chocolate into the egg mixture and whisk together. Whisk in the flour and baking powder. Fold in the chocolate chips and walnuts. Drop by large tablespoonfuls onto a parchment lined sheet pan and bake at 375 for 11-12 minutes, or until cracked and shiny. The insides should be soft and chewy so DON’T OVER BAKE! If you use a teaspoon scoop to make smaller cookies, they will only take about 9 minutes. Let cool on the pan for a full 5 minutes or so before removing to a cooling rack. Keep in an airtight container for up to 4 days. Enjoy!
Spiked Eggnog Cinnamon Bread
Brittany wrote this on 23 December 2014![]() rum
rum
 No doubt, the title of this post has you intrigued. Or at least has you drooling.
I never get sick of quick bread recipes and this time of year is the perfect opportunity to branch out. Bloggers go bananas trying new things and showcasing special recipes. The list of recipes I had to share with you was epic. I am talking EPIC here people!! Alas, life gets in the way. So does bronchitis, pneumonia, sinus infections, fevers, and all the other fun stuff that comes with three kids who obviously need to be washing their hands more. Our whole family has been sick and in the moments of health, concentrating on the continuing construction of our new home. I have not been in the kitchen nearly as much as I have liked and am sadly, setting aside cookie and holiday treat recipes for another year.
But. I have rallied for one last hurrah-er, recipe. We have been quite addicted to this bread, which you may have noticed on Instagram. It is so darn easy to mix up, my kids have been doing it for me. Which is why there are twice as many cinnamon chips in this batch than normal… It is definitely a snack bread and lacks the really super sweet taste of a dessert. But the flavors are so special, you can serve it either way. It will make anything it touches smell good. Wrapped tightly, I store it in my fridge for a day or two and the whole thing smells like rum eggnog. It is heavenly. And just in time for Christmas. Spiked Eggnog Cinnamon Bread
Recipe adapted from UniHomemaker
This bread is even better the next day so make plans to whip it up before you actually need it. Your house will smell ah-MAY-zing.
1/3 c canola or grape seed oil
1 c eggnog
1/4 c spiced or dark rum (both are good)
1 egg
2/3 c sugar
1 c white flour
1 c white whole wheat flour
2 tsp baking powder
1/2 tsp nutmeg
pinch of salt
1/2 c cinnamon chips
Preheat oven to 350 and spray an 8 or 9 inch bread pan. Whisk first five ingredients together until smooth. Fold dry ingredients into the wet until just incorporated. Gently fold in cinnamon chips and pour into greased pan. Bake 50-55 minutes, or until a toothpick comes out with just a crumb or two attached. Cool 10 minutes in pan and then turn out onto a cooling rack to cool completely. Store, wrapped well, at room temp for a day or two, or in the fridge for up to three days.
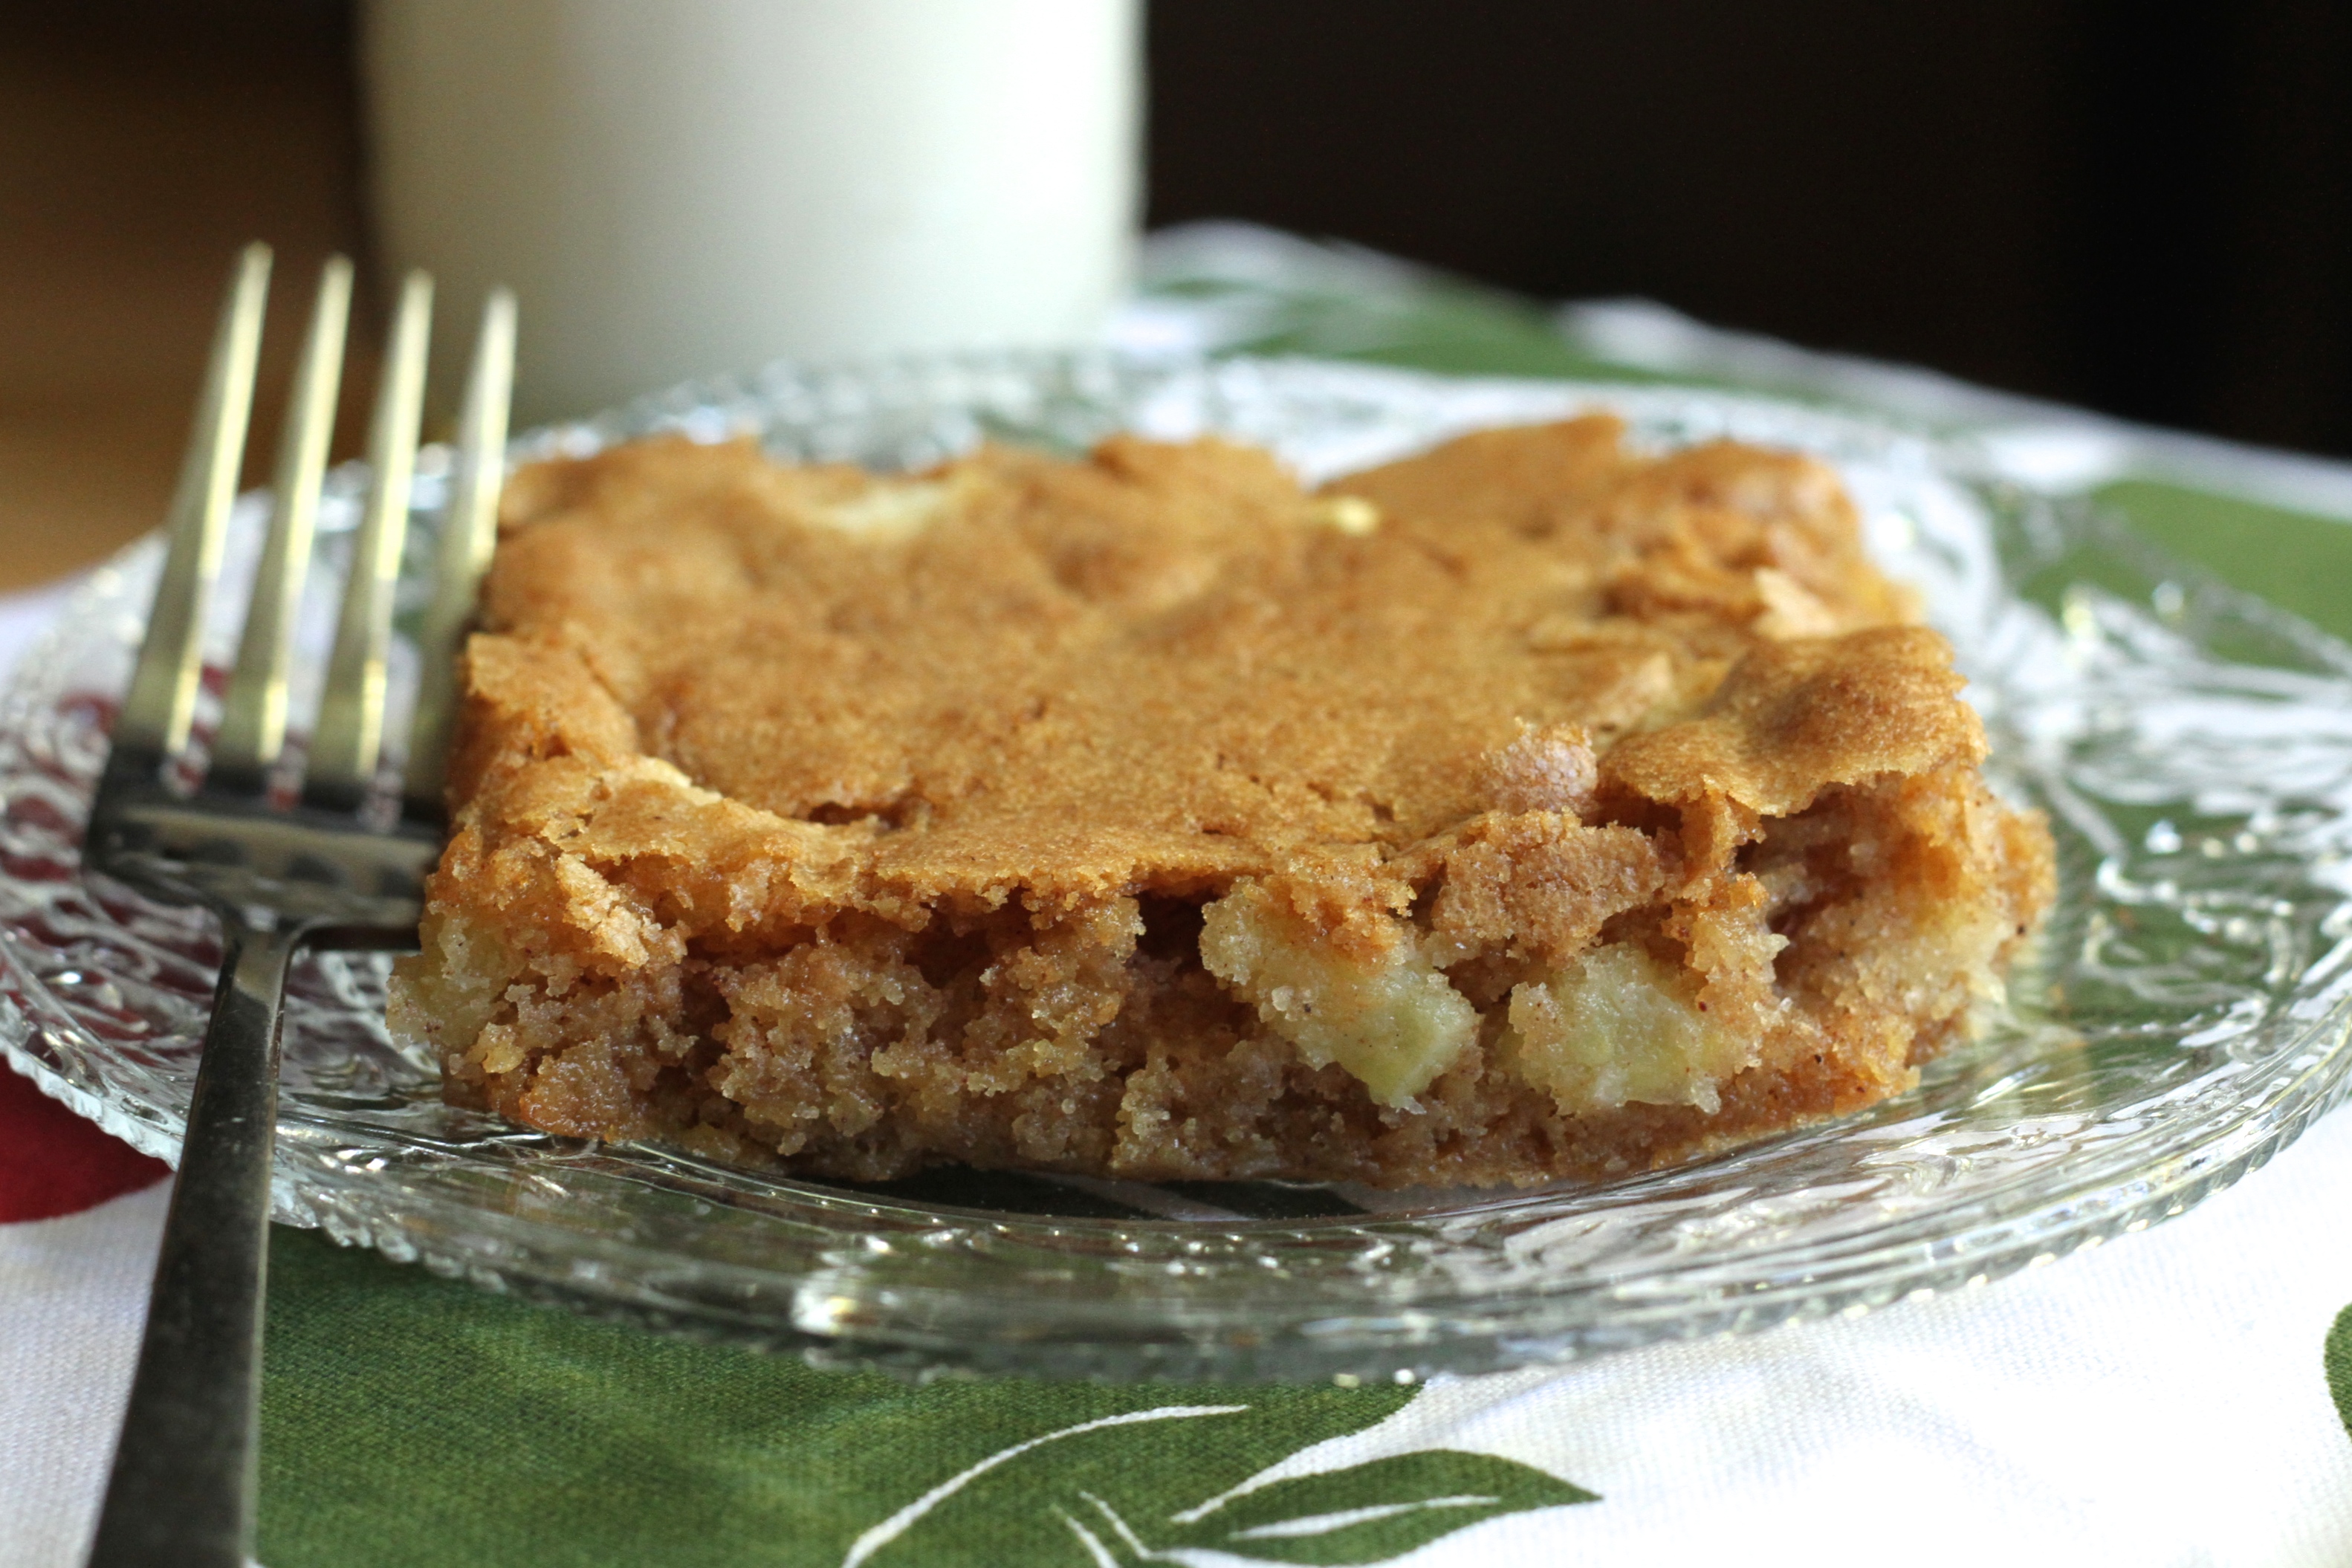
Caramel Apple Ginger Loaf Cake
Brittany wrote this on 1 December 2014![]() apples, ginger, sour cream
apples, ginger, sour cream
 Originally this recipe was classified as a quick bread. I think that is hysterical and here are the reasons why:
1.) It is covered with a glaze that is thick and sweet and can only be described as pourable caramel frosting. F-R-O-S-T-I-N-G. Not a quick bread type of feature.
2.) I don’t call a baked good with a moist crumb as delicate as this a bread. Definitely a cake.
3.) Its special. You can tell by looking at it!
And finally…
4.) Because of the gooey caramel frosting type ‘glaze’, it is easiest to eat on a plate with a fork. Do you eat bread with a fork? Me neither.
See? Cake. LOAF cake, for obvious reasons.
 Yes this is a good as it looks and yes, you too can make it at home. 🙂 This is studded with diced apples (yeah baby!) and minced crystalized ginger (say what?) so there is a nice, full flavor with this recipe. It is definitely the kind of thing you bake as an extra special treat. Not because it is necessarily so bad for you, but because the extra effort in making it results in a particularly indulgent loaf. This is the perfect thing to make for a beloved friend or neighbor around the holidays. Wrapped up in wax paper and topped with a bow, it makes an incredibly appealing picture. Besides gifting it to friend and family, this would be stellar sliced and put out on a breakfast buffet. It tastes even better the next day so bake it up and glaze it an hour or so before you serve it so the topping has a chance to set. Sliced on a plate with a hot cup of tea on the side makes the perfect, small serving, after dinner treat this time of year. A piece of cake that is just right.
Of course, sneaking a bite or two as a midnight snack is ‘just right’ as well. I did say this recipe was special, right?

 Caramel Apple Ginger Loaf Cake
Recipe adapted from CCA
I have to say that even thought I really really love the caramel topping on this, it is just as good without it. If you like, skip the final glazing step and just enjoy the apple-ginger bread as a snack. Delightful. Crystalized ginger is fresh ginger root that has been boiled in sugar. It is chewy in texture and covered with the crystalized sugar. You can usually find it in the baking isle, or anywhere with dried fruit.
1 c brown sugar
1/2 c canola or grape seed oil
1/2 c sour cream
2 eggs
1 3/4 c flour
2 tsp cinnamon
1 tsp baking powder
1/2 tsp baking soda
pinch of salt
2 medium/large apples, such as granny smith, macintosh, or other firm, baking apple, peeled, cored, and diced small
1/3 c finely chopped crystalized ginger
Glaze:
1/2 c brown sugar
1/4 c butter
1/4 c heavy cream
1 tsp grated fresh ginger
1 tsp corn syrup
Preheat the oven to 350 and thoroughly spray a large 8X4 loaf pan. Whisk together the first four ingredients in a large bowl until thoroughly blended. Add the dry ingredients and stir gently to combine. Carefully fold in the apples and crystalized ginger. Bake for 50-60 minutes or until a toothpick comes out with only a crumb or two attached. Let cool for 5 minutes in the pan and then turn out onto a rack to cool further.
While cake is cooling, add all the glaze ingredients to a small saucepan and bring them to a bubble over medium hight heat. Let boil 1 minute, the turn off heat and let set until it cools to a thick, but pourable consistency. Drizzle generously over loaf cake and let glaze set. Enjoy within 2 days or freeze, unglazed for several months. Defrost and glaze as directed when ready to serve.
Cinnamon Apple Cake
Brittany wrote this on 30 October 2014![]() apples
apples
 Last year, I had the fabulous privilege of sampling this cake at a meeting of our local Mom’s Group. I am not ashamed to admit that it has filled my dreams ever since. Apple cake. Gooooood.
I have always loved apple cake and really really loved this version. And not all apple cakes are created equal, mind you! Sometimes apple cake is light and fluffy and then the chunks of apple weigh it down in a weird way. Other times the apples are in big chunks that never seem to bake well. Getting the crumb right with pieces of fruit mixed in is a balancing act. Who knew it was such a delicate process with such a complicated formula?
This recipe gets around that by baking up a lot like bars. Chewy and more dense that a traditional cake, it supports the chunks of apple perfectly, but it is still light enough to warrant a plate and fork. Good gracious. It is just awesome. When I acquired the recipe from my friend, I learned that it is of course a family recipe. I am thrilled she shared it with me and while I adjusted it to my taste just a smidge, it stays true to the original. I dare you to bake this up and bring it to a gathering this holiday season. Just be prepared to deal with the aftermath of praise, high fives, recipe inquires, and offers of marriage. It is that good.
 I have no doubt that many other versions of apple cake will grace this little corner of the internet. I am, after all, an equal opportunity eater. But for now, I am having a hard time making it past this cake. I have kind of hit the pause button on apple cake experimentation. Maybe next year. For now, this is my ultimate.
***This is my final post in the series of comforting and cozy recipes that I am featuring during the GIVEAWAY! You only have a few more days to take advantage of my offer of free merchandise (yeah free!!) and enter for a chance to win loot from the top rated ETSY shop, Pine Tree Goods. If you haven’t entered yet-and there ways to put your name in up to 5 times-click here and git er done! Don’t forget to take advantage of the free shipping code just for BP readers! Good Luck!***


 I couldn’t resist tucking in this last picture of Lane, my 2 1/2 year old photo-bomber.
Cinnamon Apple Cake
Adapted from MaryAnn Hillard, friend of Brittany’s Pantry
I am loyal to golden delicious as a baking apple, but a recent visit to an orchard in North Carolina had me taste testing an apple called Gold Rush. It was awesome. Great in a pie (or cake) and great to eat out of hand. I highly recommend them if you can get your hands on them.
Preheat oven to 350 degrees.
Cream together in the bowl of a stand mixer:
1 c (2 sticks) of room temperature butter
2 c sugar
When combined and smooth, add:
2 eggs
1 tsp vanilla
pinch of salt
1 tsp cinnamon
1/2 tsp nutmeg
When combined and smooth, add:
2 1/2 c flour
1 tsp baking soda
1/2 tsp baking powder
Lastly, gently fold in 3 c of diced apple (peeled and cored).
Spread batter (it will be thick) into a sprayed 9X13 pan and bake for 35-40 minutes or until evenly golden brown and set. Cool cake until almost room temp before cutting and serving. Cake is best the day it is made, but leftovers aren’t too shabby.
 Mmm. Cheesy Bread. Just absorb that thought for a second.
It is spectacularly comforting which is why I am posting my favorite, easy version of this now. It is the perfect food for the cozy theme I am following during the duration of my Pine Tree Goods Giveaway! Melted cheese on chewy bread paired with a green salad or bowl of soup? Yeah baby!!
As you may have guessed from my previous postings of Garlic Toast and Herbed Garlic Bread, I like having a carbohydrate to dip in my food. I may or may not make noises like a crane on a construction site when I scoop with tools of bread. One of my favorite hot lunches when I was a kid was the dunkers; big slabs of bread with melted mozzarella on top served with a scoop of spaghetti sauce. Scrumptious. Essentially, that is what I make this bread for. The salad just makes me feel less guilty about eating a dinner centered around bread.
I was reading a recipe by Pioneer Woman recently and she mentioned that she freezes hers. This never once occurred to me, but you can bet I am going to be doing that from now on! Smear on the cheese mixture, wrap it up tightly, and pull out to thaw and toast whenever it is needed. Genius. And speaking of smart ideas, whoever paired bread and cheese together the first time (probably someone French…) and warmed it up and called it a meal, well they are my forever friend.
Here in South Carolina, I am learning about Southern Caviar (aka Pimento Cheese) and all its versions, uses, and adaptations. In some ways this recipe is a simpler version of that. I have been holding out on making my own pimento cheese but since it is everywhere down here, I am sure I won’t be able to resist for long. Then, of course, I may just have to smear it on bread and toast it up. That recipe and this recipe can be buddies. Hehe!
Oy vey…I really shouldn’t blog when I’m tired….


 ***Don’t forget to enter for a chance to win some one of a kind accessories from the top rated Etsy Shop, Pine Tree Goods! FREE STUFF FOR THE WIN!!! There are still a few days left to get your name in and it is just so darn easy, there is no excuse!! Want to get your Christmas shopping done early? Hannah, the artisan behind the goods, is offering a free shipping code just for Brittany’s Pantry readers! Simple enter BPGIVEAWAY14 to get your items shipped free! She does special orders too, so be sure to contact her if you want something specific! Click here to zip over to the post to enter and see official rules. Good luck!!***
Simple Cheesy Bread
1 large loaf french bread (not baguette-you want it softer than that)
8 oz grated colby-jack cheese
1/2 c good mayonnaise
1 stick (1/2 c) softened butter
Combine the cheese, mayo, and butter in a small bowl. Set aside. Cut the bread in half down the side lengthwise and open like a book. I cut it in half crosswise as well so that the pieces fit on my pan butter, but whatever works for you is fine! Divide the mixture evenly between the pieces of bread and smear evenly all the way out to the edges! Don’t forget the edges! **If you are freezing this for later, gently sandwich the bread together, wrap well in plastic wrap, and then again in foil, or place in a zip top freezer bag. Defrost in the fridge and proceed with recipe.** Preheat the oven to 375. Place the bread cheese side up on a parchment or foil lined sheet pan (because burnt cheese is a major bummer to clean off of metal) and toast for 10 minutes. Check the bread to see how it is melting and proceed at 5 minute intervals until it is toasted to your preference. Some like their cheese barely melted, other like it to be bubbling and turning brown. Your choice! Pull it out and let it set for a minute-if you can wait that long-before slicing and enjoying!
Sweet Orange Knots
Brittany wrote this on 21 October 2014![]() orange
orange
 I have been making these darling little pastries for years and I have yet to get sick of them. Who would turn down bread coated in orange flavored sugar?
I learned how to make these when I was catering during the earlier years of my life. I thought they were the most ingenious thing I had ever seen. So easy, yet so impressive. I learned a lot working with professionals in the food industry, but I think one of the things that stuck with me the most is that it just doesn’t have to be so hard. Case in point, these babies. Four ingredients. Four. And they are absolutely de-LIGHT-full. I have made them for bridal showers, baby showers, brunch, and even just for a fun snack on a weekend. These are also a great recipe to make with your kids!
As you may have guessed this is the first recipe in a series of recipes I am making to continue the ‘cozy’ theme that I started with a giveaway a few days ago. If you haven’t entered yet (*gasp* For SHAME!), check out the post here and see the loot I am giving away from the top rated ETSY shop, Pine Tree Goods. Remember, there will be two winners and you have a chance to add your name up to 5 times! If you don’t want to wait and see if you win (And you totally want to get some Christmas shopping done ahead of time!) take advantage of the free shipping code provided just to Brittany’s Pantry readers! Enter BPGIVEAWAY14 at checkout and it ships free!!
And while you wait for your warm and cozy accessories to arrive, you can enjoy filling your house with the smell of warm bread. Mmmmm…..


 Sweet Orange Knots
1 lb frozen, refrigerated, or homemade bread dough
1 c sugar
zest of 1 large orange
1 stick (1/2 c) butter, melted
If your dough is frozen, defrost in the fridge overnight. Divide the dough into 12 equal portions and set aside to rest. Preheat the oven to 350 degrees.
Place the melted butter in one medium bowl and the sugar in another bowl. Be sure to zest the orange directly over the sugar so that the oils and flavor from the zest all go into the sugar! With clean hands, combine the zest with the sugar, rubbing to break up any clumps and to evenly distribute the orange flavor throughout. Working one ball of dough at a time, gently roll the dough to create a ‘breadstick’ shape 6-8 inches long. Dip the dough in the butter, then toss in the sugar mixture, coating well. Tie the dough into a knot and place it on a silpat or parchment lined sheet pan. Continue with the other pieces of dough until all are done, spacing evenly apart on the pan. Bake for 15-20 minutes, or until golden brown. Baking time will vary depending on your dough, but make sure to check them after 15 minutes so they don’t burn on the bottom. Don’t over bake them or the sugar will scorch! Let cool slightly and then remove to a cooling rack. These are best eaten the day they are made.
Sweet Northern Cornbread (Yankee Cornbread)
Brittany wrote this on 10 October 2014![]() cornmeal
cornmeal
 If you read my blog with any regularity, you know that my family moved to South Carolina a few months ago. I am finding it a bit of a trial to keep a balance between my Northern upbringing and wanting to experience and immerse myself in my new region of the south. Case in point-cornbread.
So why, you may be asking, am I not posting a good southern cornbread recipe where the batter is poured into a cast iron skillet and baked to a perfectly crusty disc? The kind of cornbread that practically thirsts to be doused in black eyed peas? Cornbread that is to gravy as Curly is to Moe?
Because I haven’t perfected it yet. Everyone makes their cornbread a bit different around here and since I have Mississippi ‘family’ that influences me as well, I need to cover all the bases and possibilities. This requires more testing to come up with the final version and it will be, I assure you, coming soon. It will even be baked to the perfect state of crustiness in my cast iron skillet.
That said, I am, as you know, from the North. We Minnesota folk like our cornbread tall, fluffy, and sweet and I am not ashamed of it! That is how I grew up with it, and, if I may be so bold as to say, it is still my favorite way to eat it. *gasp* Its true. This is a safe place, friends. We accept fans of all kinds of cornbread here. No judgement.
Often called Yankee Cornbread, my version has flour in it, as well as cornmeal, to lighten the batter a bit. Most traditional southern cornbread recipes I have come across, either researched or those served to me by southern women, have little or no flour in them and much less baking powder, if any at all. The Northern version gets flack for being more cake like, while its counterpart is often criticized for lack of flavor.
Never one to discriminate against food (I am an equal opportunity eater), I like them both. In turn, I like to eat them in different applications. Today’s recipe is fantastic served with breakfast or brunch, spread with butter and jam. Generally though, my kids and I like to eat it plain. The texture and flavor is enough to warrant only a glass of milk on the side. It is great baked into muffins as well and is a nice balance between crumbly enough to still be cornbread but firm enough to eat out of hand. Since cornbread is just so darn easy to mix up, this is SO much tastier-and better for you-than reaching for a box of processed mix. Occasionally, those come in handy, but for straight up cornbread, there is no substitute.
So below is my staple, straight-up, no messing around, no frills recipe for sweet cornbread. Use it well and enjoy. No matter which side of the Mason-Dixon Line you call home.
 Sweet Northern Cornbread
Equal parts flour and cornmeal have always been my standard for cornbread. My mom made it that way, so I make it that way. I add a bit more baking powder to mine because I like it extra fluffy. The white sugar forms just a bit of a sweet crust on the top that I can’t resist. Makes great muffins too!!
1 c flour
1 c cornmeal
2/3 c sugar
pinch of salt
3 1/2 tsp baking powder
1 egg
1 c milk
1/3 c grape seed, canola oil, or even melted butter
Preheat oven to 375.
Combine all dry ingredients in a medium bowl with a whisk. In a large measuring cup, mix the egg, milk, and oil together with a fork. Slowly combine the wet and dry ingredients with the whisk, careful not to over mix! Pour into a greased, 9X9 glass or metal baking dish and bake for 25-30 minutes, or until puffed, golden, and a toothpick comes out clean. Cool in pan until just barely warm. Cut into squares and enjoy!
Cranberry-Orange Pumpkin Spice Muffins
Brittany wrote this on 4 October 2014![]() cranberries, orange, pumpkin, whole wheat flour
cranberries, orange, pumpkin, whole wheat flour
 I should warn you. I will never have enough pumpkin recipes. Muffins, quick breads, dip, pie, shakes-everything. I. Love. Pumpkin.
You will probably never find me with a pumpkin spiced latte as the sweetness level is a bit much for me, but other than that, I happily submit to all the pumpkin craziness that ensues from Labor Day to the end of the year. And beyond, as I make pumpkin muffins and quick breads year round. These Pumpkin Pie Muffins are my go-to, make ALL the time, never fail, can’t-get-enough-of-them-type of recipe. So much so that I only ever so briefly stray from my loyalty to them.
Until now. (Cue dramatic music)
I saw a version of the following recipe on the food network website. I did my usual changes and tweaked things to make it a bit more streamlined, shave off a few steps, and make it ever so more healthy. More healthy means I can eat more of them, yes? But the point here is that I made these up and thought I may have just found my new favorite pumpkin muffin. Then I made another batch and was sure I had found it. The tang and chewiness of the cranberries make these extra special and just so darn irresistible. They have been inducted into the Brittany’s Pantry hall of fame, which may sound prestigious, but actually just means they are a recipe that I make on a regular basis. High praise for my family. And since these adorable muffins are a kind of dressed-up, boss is coming to dinner, pumpkin muffin, they make a great quick bread to give as a gift this season.
Or just do as I do and eat them all yourself. I won’t judge. Cranberry-Orange Pumpkin Spice Muffins
Inspired from Food Network
Preheat oven to 350. In a large bowl, whisk together:
1/3 c canola or grape seed oil
zest of one orange
2 eggs
2/3 c sugar
1/2 c pumpkin puree
1/3 c unsweetened applesauce
1/2 c milk
Combine ingredients until smooth. Add:
1 c all-purpose flour
1 c white whole wheat flour
1 1/2 tsp cinnamon
1/2 tsp cloves
1/2 tsp ginger
1/4 tsp nutmeg
pinch of salt
2 tsp baking powder
Gently fold in the dry ingredients. When nearly combined, add:
2/3 c dried cranberries
Continue to gently fold batter together until JUST COMBINED! Do not over mix. Portion the batter evenly amongst 12 sprayed or paper lined muffin cups. Sprinkle each muffin cup with just a pinch of granulated sugar, raw sugar, or casters sugar, if desired. Bake for 18-22 minutes, or until a toothpick comes out with a moist crumb or two. Let set for a few minutes then remove to a cooling rack. Enjoy!
Love a Good Recipe?

Then you’ve come to the right place! I’m Brittany, and I share tested, trusted recipes you’ll love. I prepare & photograph food, obsess over the perfect recipe, and enjoy grins of delight when I serve up something awesome. Enjoy!


