 Brittany's Pantry
Red Velvet Cupcakes
Brittany wrote this on 29 June 2011![]() cocoa, cream cheese
cocoa, cream cheese
 I mentioned a few days ago on facebook that I had leftover cream cheese frosting and that it needed a home. Well, not so much a home as a reason to continue to keep it in my fridge and eat it with a spoon. I could have froze it-leftover frosting keeps in the freezer for several months, tightly sealed-but I needed a special dessert for this holiday weekend anyway, so….red velvet cupcakes it is! Decorated with blueberries to make them patriotic, of course!
Also, I can now state with absolute confidence that this is my only recipe for red velvet cupcakes. Out of hundreds (thousands?) of cake recipes, I went through every single one and sorted out just the red velvet. I then compared and contrasted the ingredient lists to narrow it down to three. I am going for a classic recipe here. I baked them all and ate them all. Let me tell you, it was rough! Then my family ate some, a friend, some neighbors, and everyone picked a favorite based on flavor, texture, and overall level of yumminess. It was unanimous! All were great, but only one recipe had the moist, traditional flavor of true red velvet cake. So, I threw away all my other recipes. Now I don’t have to wonder if I have a better version stashed somewhere else! This is the best one! And just maybe, coming soon to a BBQ near you!
Red Velvet Cupcakes
Adapted from Better Homes & Gardens
In a large bowl, cream together:
1/2 c (1 stick) butter, softened
1 1/2 c sugar
1 tsp vanilla
Add 2 eggs, one at a time beating well after each addition
Add 1 tsp vinegar
Add 1 (1 oz) bottle of red food coloring (Yes! The whole bottle!) and mix thoroughly.
In a separate bowl, whisk together:
2 1/4 c cake flour (or 2 c all purpose flour)
1/3 c cocoa powder
1 tsp baking soda
Add the dry ingredients in three installments, alternating with 1 c buttermilk, ending with buttermilk. Mix just until combined. Scrape the sides and bottom of the bowl and finish mixing by hand. Bake in muffin tins sprayed, greased, or lined with paper liners. Bake at 350 degrees for 20-25 minutes or until toothpick inserted in the center comes out with just a few moist crumbs attached. Frost with cream cheese frosting.
Note: This recipe can also be baked in a 9X13 pan or two 8 or 9 inch rounds. Just adjust the baking time accordingly.
Cream Cheese Frosting
There are lots of recipes out there for cream cheese frosting. Use any one you like, or give this a try!
1-8 oz block of cream cheese, softened
1/2 stick (1/4 c) softened butter
1 box (16 oz) powdered sugar
1 tsp vanilla
In a medium bowl, beat the cream cheese and butter together until fluffy. Add the powdered sugar and vanilla and beat together until smooth.

Chocolate Chip Blonde Brownies: Memories
Brittany wrote this on 14 June 2011![]() chocolate
chocolate
 So..these are Chocolate Chip Blonde Brownies. Okay. Commence with drooling, yearning, longing, and dreaming about these wonderful bars.
Go ahead…I’ll wait…
Can we continue? Okay.
First of all, I have been absent the last few days due to a minor neck injury and sitting at a computer was, and is, sorta painful. I am suffering through the discomfort to post this recipe because everyone out there should have access to these and I can’t, in good conscience, keep them to myself any longer. Posting the recipe here for all of you seems like a better choice than shouting it from the rooftops! Ironically, the bars themselves have also kept me away from the computer (No-not because I was too busy eating them). I’ll try to explain.
There are certain foods that evoke memories in all of us. A favorite meal or food or smell that takes you to that time and place. In my experience, these ‘food memories’ have great power. One tiny whiff of Spiced Nuts and I am instantly transported to my parent’s kitchen, watching my Mother carefully turn the steaming glob of cinnamon spiced snacks in a pan on the stove. I can’t make Tator-Tot Casserole without smiling and thinking of my sister. And don’t even get me started about the ache in my heart when I eat Rose Lake walleye. These bars are part of that elite grouping of foods. Everything about them fills me with the sights, sounds, smells, and memories of dear friends. How can I possibly convey the emotions this simple dessert wells up in me?! *sigh* I won’t bore you with my ramblings as it would take way too long anyway. Suffice to say that these bars fill me with joy, and I hope you love them as much as I do.
Speaking of bars, anyone who has ever eaten in the 4-H building at the Minnesota State Fair may recall this fantastic dessert. The two very special ladies who introduced me to these made them for years, and to my knowledge, they are still served there today. While working there, I myself baked thousands of them (literally, not kidding) and probably snitched hundreds. Okay dozens, at least. I have no idea where the recipe comes from, but the creator was a genius. Just the smell of them baking will make your heart race with anticipation. They are gooey, chewy, and decadently rich. Unfortunately, they are also ridiculously easy, giving you no excuse not to indulge in them whenever the mood strikes. And it will strike often! So mix up a batch and make some memories! Because sharing them with those you love makes that a virtual certainty.


 Chocolate Chip Blonde Brownies
These bars are the perfect ‘mix and dump’ kind of recipe. They are fast, super easy, and my fall back recipe when I need to bring something to a pot luck at the last minute! Made a day ahead, they are a convenient dessert for a BBQ. They also freeze wonderfully, but we rarely have any left to save for later.
2 c brown sugar
2 eggs
2 T water
2/3 c oil
1 1/2 tsp vanilla
2 c flour
1 1/2 tsp baking powder
1/4 tsp baking soda
1/2 tsp salt
1- 1 1/4 c chocolate chips (I like 1 c, but add more if you prefer)
Using a hand mixer or stand mixer, blend the first five ingredients together until smooth. Add the dry ingredients (not the chocolate chips), and mix until combined. The batter will be thick, sticky and look like carmel! Spread into a sprayed 9X13 pan and sprinkle the chocolate chips evenly over the top. Bake at 350 degrees for 30-35 minutes or until evenly golden brown across the top. The edges will be higher than the rest of the pan and this is what you want! Cool completely in pan (I realize this may take an absurd amount of self control, but do the best you can!) and cut into squares. Twenty four bars (4X6) seems to be the perfect size bar.
How To: Freeze Berries
Brittany wrote this on 5 June 2011![]() blackberries, blueberries, gluten-free, How To, raspberries
blackberries, blueberries, gluten-free, How To, raspberries
 Berries! Specifically, blueberries! Tis the season for these healthy, antioxidant rich fruits to hit the shelves of your local market in abundance. And while I know we all love to enjoy them fresh and right out of the container, it is definitely worth it to save some of that goodness for those times of the year when summer berries are a distant memory. When food is in season, any food, it has better flavor, is less expensive, and in some cases, even has more nutritional value. The environmental impact is less as well when you are buying fruits picked a few days prior from the next county(or if you are blessed enough to have a local farmer’s market nearby, that same day) instead of the grapes you buy in January that are shipped in from Peru.
I am generally a big fan of freezing foods for future use, but I really love to freeze berries. I fold them into muffins and coffee cake all winter long and their superior flavor exudes summer when I dump them into a smoothie while the snow falls out my window.
So plan ahead! You will be so glad you did. Follow these steps and avoid the block-o-berries that may result if you just pop them in the freezer as is. This is how you do it. Pick over the berries as soon as you get them home. Toss or compost any that are moldy or crushed. Raspberries, blueberries and blackberries work the best and there should be no need to wash them first. As always, buy organic if you can. Due to their thin skins, berries absorb pesticides more than other fruits, but that is a lecture for a different day.
Dump the berries onto a dry sheet pan in a single layer. Freeze for several hours or overnight. The berries will move freely and become individual little ‘rocks’ that won’t stick together.
Transfer the fruit into resealable freezer bags and label. I like to make sure I know at a glance which ones are the oldest in my freezer so the phrases ‘use first’ and ‘use last’ are often scribbled on the bags somewhere. Enjoy!
 My sister-in-law must be psychic. I made these scones just when she requests a recipe for anything coffee flavored. I didn’t want to waste any time posting this for her, and well, all of the rest of you that are just a little bit addicted to the brew! I don’t blame her one bit, but usually prefer my coffee, in any form, accompanied by chocolate. Truthfully, I prefer just about anything accompanied by chocolate…hence, these scones.
Yes, for those of you who follow this blog regularly, this recipe was part of my ‘scone phase’. My husband especially was beyond thrilled when I started to develop a recipe for a coffee pastry, but I surprised myself by dreaming about them in my sleep. If I was a fan before, I am a down right stalker now! Everything changed when I decided to add cocoa powder to the dry ingredients and my test testers (and a few lucky ladies at the local salon) agreed. Honestly, I feel like there may still be something missing with them, but I eat them too fast to really contemplate changing the recipe any time soon. And once I came up with a combo that worked, I stuck with it. These are moist, decadent, and the perfect treat to serve with brunch. I wonder how well they would ship to my sister-in-law in MN…
Mocha Chocolate Chip Scones
Recipe modified 7/24/12
The key is to work the dough as little as possible, and you will have a tender scone. However, this recipe is pretty forgiving so don’t stress out about it. If you find the dough a little dry at first, let it rest a minute to allow the liquid to absorb some of the flour and then continue.
2 c flour
1 T cocoa
1/3 c sugar
1 T baking powder
1 tsp salt
3/4 c chocolate chips
1 1/4 c c heavy cream
1 tsp instant coffee powder
In a large liquid measuring cup, combine the cream and instant coffee. Set aside, stirring occasionally to dissolve the powder. In a medium bowl combine all dry ingredients. Add chocolate chips. Pour the cream and coffee mixture in (I scrape the cup with a rubber spatula to get every drop!) and stir carefully with a fork, just until clumps start to form. With clean hands, gather the dough together in a ball, turning and pressing to mix it completely, but as gently as possible. Put the dough onto a sheet pan covered with parchment paper and flatten into a large disc about an inch and a half thick. With a knife, cut the dough into 8 pie shaped pieces and separate evenly on the pan. Bake at 375 for 15-18 minutes, or until raised and evenly golden brown. *Optional: Before popping the pan in the oven, brush the tops of the scones with a bit more cream and sprinkle with sugar.
White Chocolate Rainbow Cake & A Party
Brittany wrote this on 24 May 2011![]() buttermilk, white chocolate
buttermilk, white chocolate
 My daughter turns five this coming weekend and I am not only in serious denial, but so sad about the whole thing I just may get physically ill. You see, if she turns five, then that means kindergarten in the fall and I can’t even fathom the thought of what a wreck I will be then! If I inexplicably drop off the face of the earth somewhere around the end of August, it is because I am working on a secret formula that somehow allows children to grow-up without really growing up.
I let my daughter choose the menu for her party that was this past weekend and the first request was BBQ Pork-a girl after my own heart! I am so proud… I made coleslaw from this recipe and apparently (I don’t like coleslaw) it was outstanding, or so I was told! Grilled chicken, fried corn, panzanella salad, lemon-thyme orzo, and watermelon rounded out menu. And it was goooooood. Recipes this week will be from her menu so get ready for an influx of summer dishes that are perfect for the holiday weekend coming up! You will be all set for those Memorial Day bbq’s and potluck parties!
But in honor of this birthday (five is a big girl after all!) I made a very special cake for her. When I turned five I thought I was so old! I was convinced that people could tell just by looking at me I was a headed to school in the fall! So I wanted to do something special in honor of my big (sob sob sniff wail gasp sigh) girl. This is the cake pre-party when I had time to take its picture:
 This is the cake mid-celebration when I wasn’t manning the camera, children were everywhere underfoot and I was trying to cut the cake and make sure we didn’t run out of forks. As you can see, the birthday girl was excited to cut into the rainbow!


 While I am extremely sad to even acknowledge the fact that Evelyn is going to be five in a matter of days, I was thrilled to be able to make her the coolest cake she had ever seen. A white chocolate rainbow cake covered in fluffy stars of white chocolate buttercream. There wasn’t even one crumb left for me to photograph! Thank you to my devoted husband who snapped a few shots in between passing out plates so that I would have something to show for my hard work! Evelyn requested vanilla ice cream too but that will have to wait for another post! Thank you a million times over to my cousin who forwarded me this recipe. I can’t wait to make it again! Maybe in all ‘boy’ colors? Red, white and blue? Hmmmm…
White Chocolate Rainbow Cake
Cake:
4 oz white chocolate, chopped
1/4 c very hot water
1 c butter, softened
2 c sugar
4 egg yolks
1 tsp vanilla
2 1/2 c cake flour
1 c buttermilk
1 tsp baking soda
4 egg whites
Melt the white chocolate in the hot water and set it aside to cool. Cream butter and sugar until fluffy. Add egg yolks 1 at a time. Add vanilla. Add cooled, melted chocolate. Sift flour and baking soda together and add to creamed mixture in three installments, alternating with buttermilk, ending with buttermilk. Blend just enough to incorporate ingredients, stirring by hand in the end if you need to. In a separate bowl, beat egg whites on high until peaks form. By hand, fold gently into batter. Streaks are just fine because you will mix more when you add the food coloring. Divide the batter into 6 bowls evenly, about 1 1/2 c of batter for each color. Color batter with gel food coloring, mixing it VERY GENTLY so as not to deflate the egg whites! Grease and flour the pans well. Bake in 9-in round pans at 350 for about 15-17 min. Cool 10 minutes in pan and then cool completely on wire rack.
Note: If like me, you don’t have six cake pans to bake them all at once, chill the separate bowls of batter until ready to use and bake them in shifts.
White Chocolate Buttercream
1 c of butter, softened
2 1/2 c powder sugar
6 oz white chocolate, melted and cooled in microwave in 30 second intervals
1T heavy cream
Beat butter and sugar until fluffy. Add melted and cooled white chocolate and cream. Beat on high 3-4 minutes, scrapping sides of bowl. Add more powdered sugar or cream to achieve the desired consistency. 1 1/2 batches will do the filling and a thin crumb coat and 1additional full batch is perfect for a final coat using a star tip. Keep frosted cake cool, but not cold.
Whole Wheat Cornbread
Brittany wrote this on 18 May 2011![]() cornmeal, whole wheat flour
cornmeal, whole wheat flour
 I have been trying to get this recipe made for months. I have had it printed out from the Eating Well website which, by the way, is fantastic. Anyone interested in food that tastes great but has a healthy twist will LOVE the website, the magazine, the emailed newsletters; all of it. If you have never heard about it, you can take a peek here. But anyway, I printed it and then lost it, and then found it again, then lost it again. Then we tore apart our house and I couldn’t make it anyway, and then I was looking for it, and then I found it. It is so simple, I find it a little embarrassing that I haven’t made something like this before.
 I was once told, after I had been asked if I liked cornbread-to which my answer was of course yes-that I actually liked “that northern cornbread.” When my brow furrowed in response, I was informed that the cornbread I liked wasn’t real cornbread, but the fluffy, cake-like, sweet stuff they eat in the north. You see, I am from Minnesota, and I was having this conversation with a lovely middle-aged woman from the deep south. Southern Mississippi, to be exact. And she was right! Her family (her daughter actually) introduced me to the wonderful creation that I call ‘Southern Cornbread.’ The batter, nothing too sweet or too light, is actually poured into and baked in a hot, oiled, cast-iron skillet. It pops out of that skillet all round and crunchy, just begging for black-eyed, purple hulled peas. Scrumptious.
But for now, I am going to leave that method to the experts. My apologies to any out there who think it is a crime to eat tall, light, sweet cornbread, but this is how we eat it in the north! And by golly, I like it! When the occasion calls for it, I even smother it with butter and honey *gasp* or jam, (no swooning, please!) although this batch was made to accompany a light salad for supper.
And my son woke up early from his nap to help me mix it up! This recipe has all the simple goodness of cornbread, but is wonderfully healthy. And you can’t tell the difference in the slightest! Next time, I am going to use a flax egg in the recipe and see how it turns out, and for those of you who have no idea what that means, stay tuned. Also, if cooking with whole wheat flour or white whole wheat flour is your ‘page turner’, here is a great place to start! In the meantime, enjoy! And happy baking!
 Whole Wheat Cornbread
Adapted from Eating Well
1 1/4 c yellow cornmeal
3/4 c white whole wheat flour or whole wheat flour
3T honey or sugar
1 tsp baking powder
1/2 tsp baking soda
1 tsp salt
1 egg
1 1/4 c buttermilk
2 T canola oil
In a medium bowl whisk together all dry ingredients, including the sugar if you are using it. In a large measuring cup or separate small bowl, whisk together the buttermilk, egg, oil, and honey, if using. Add the wet to the dry and mix just until combined! Pour batter into a sprayed 8-inch square baking pan and bake at 350 degrees for 25 to 30 minutes or until golden and toothpick inserted in the center comes out clean. Let cool for a few minutes before cutting and serving.
 The normal things kept me from blogging this week; internet was down, sites were down, house projects needed finishing, my husband and kids were in a race Saturday morning (in the rain no less) and life generally got in the way. Now, it is Sunday afternoon and I have a ton of stuff to do before we leave town on a mini stay-cation tomorrow. But you, dear readers, are on my priority list. Don’t you feel blessed? 🙂
I was reading this blog the other day and have been pondering the subject matter ever since. You should definitely read it (and all the comments, they are really fun) but the basic gist of it is that we all have something that is our ‘page turner’. A technique or ingredient that makes us-wait for it-turn the page whenever we see it in a recipe or cookbook. Some examples were puff pastry, saffron, any recipe that called for deep frying, that sorta thing. But what really surprised me was how many people said that cream of tartar scared the begeezus out of them. Seriously? Cream of Tarter? Like, the white stuff in the back of my baking cabinet that looks like baking soda or powdered sugar? It is so innocent! So unassuming! Are there more of you out there who are intimidated by this small container of powder that has the ability to make egg whites bend to your every will and desire?! Sheesh! I had no idea!
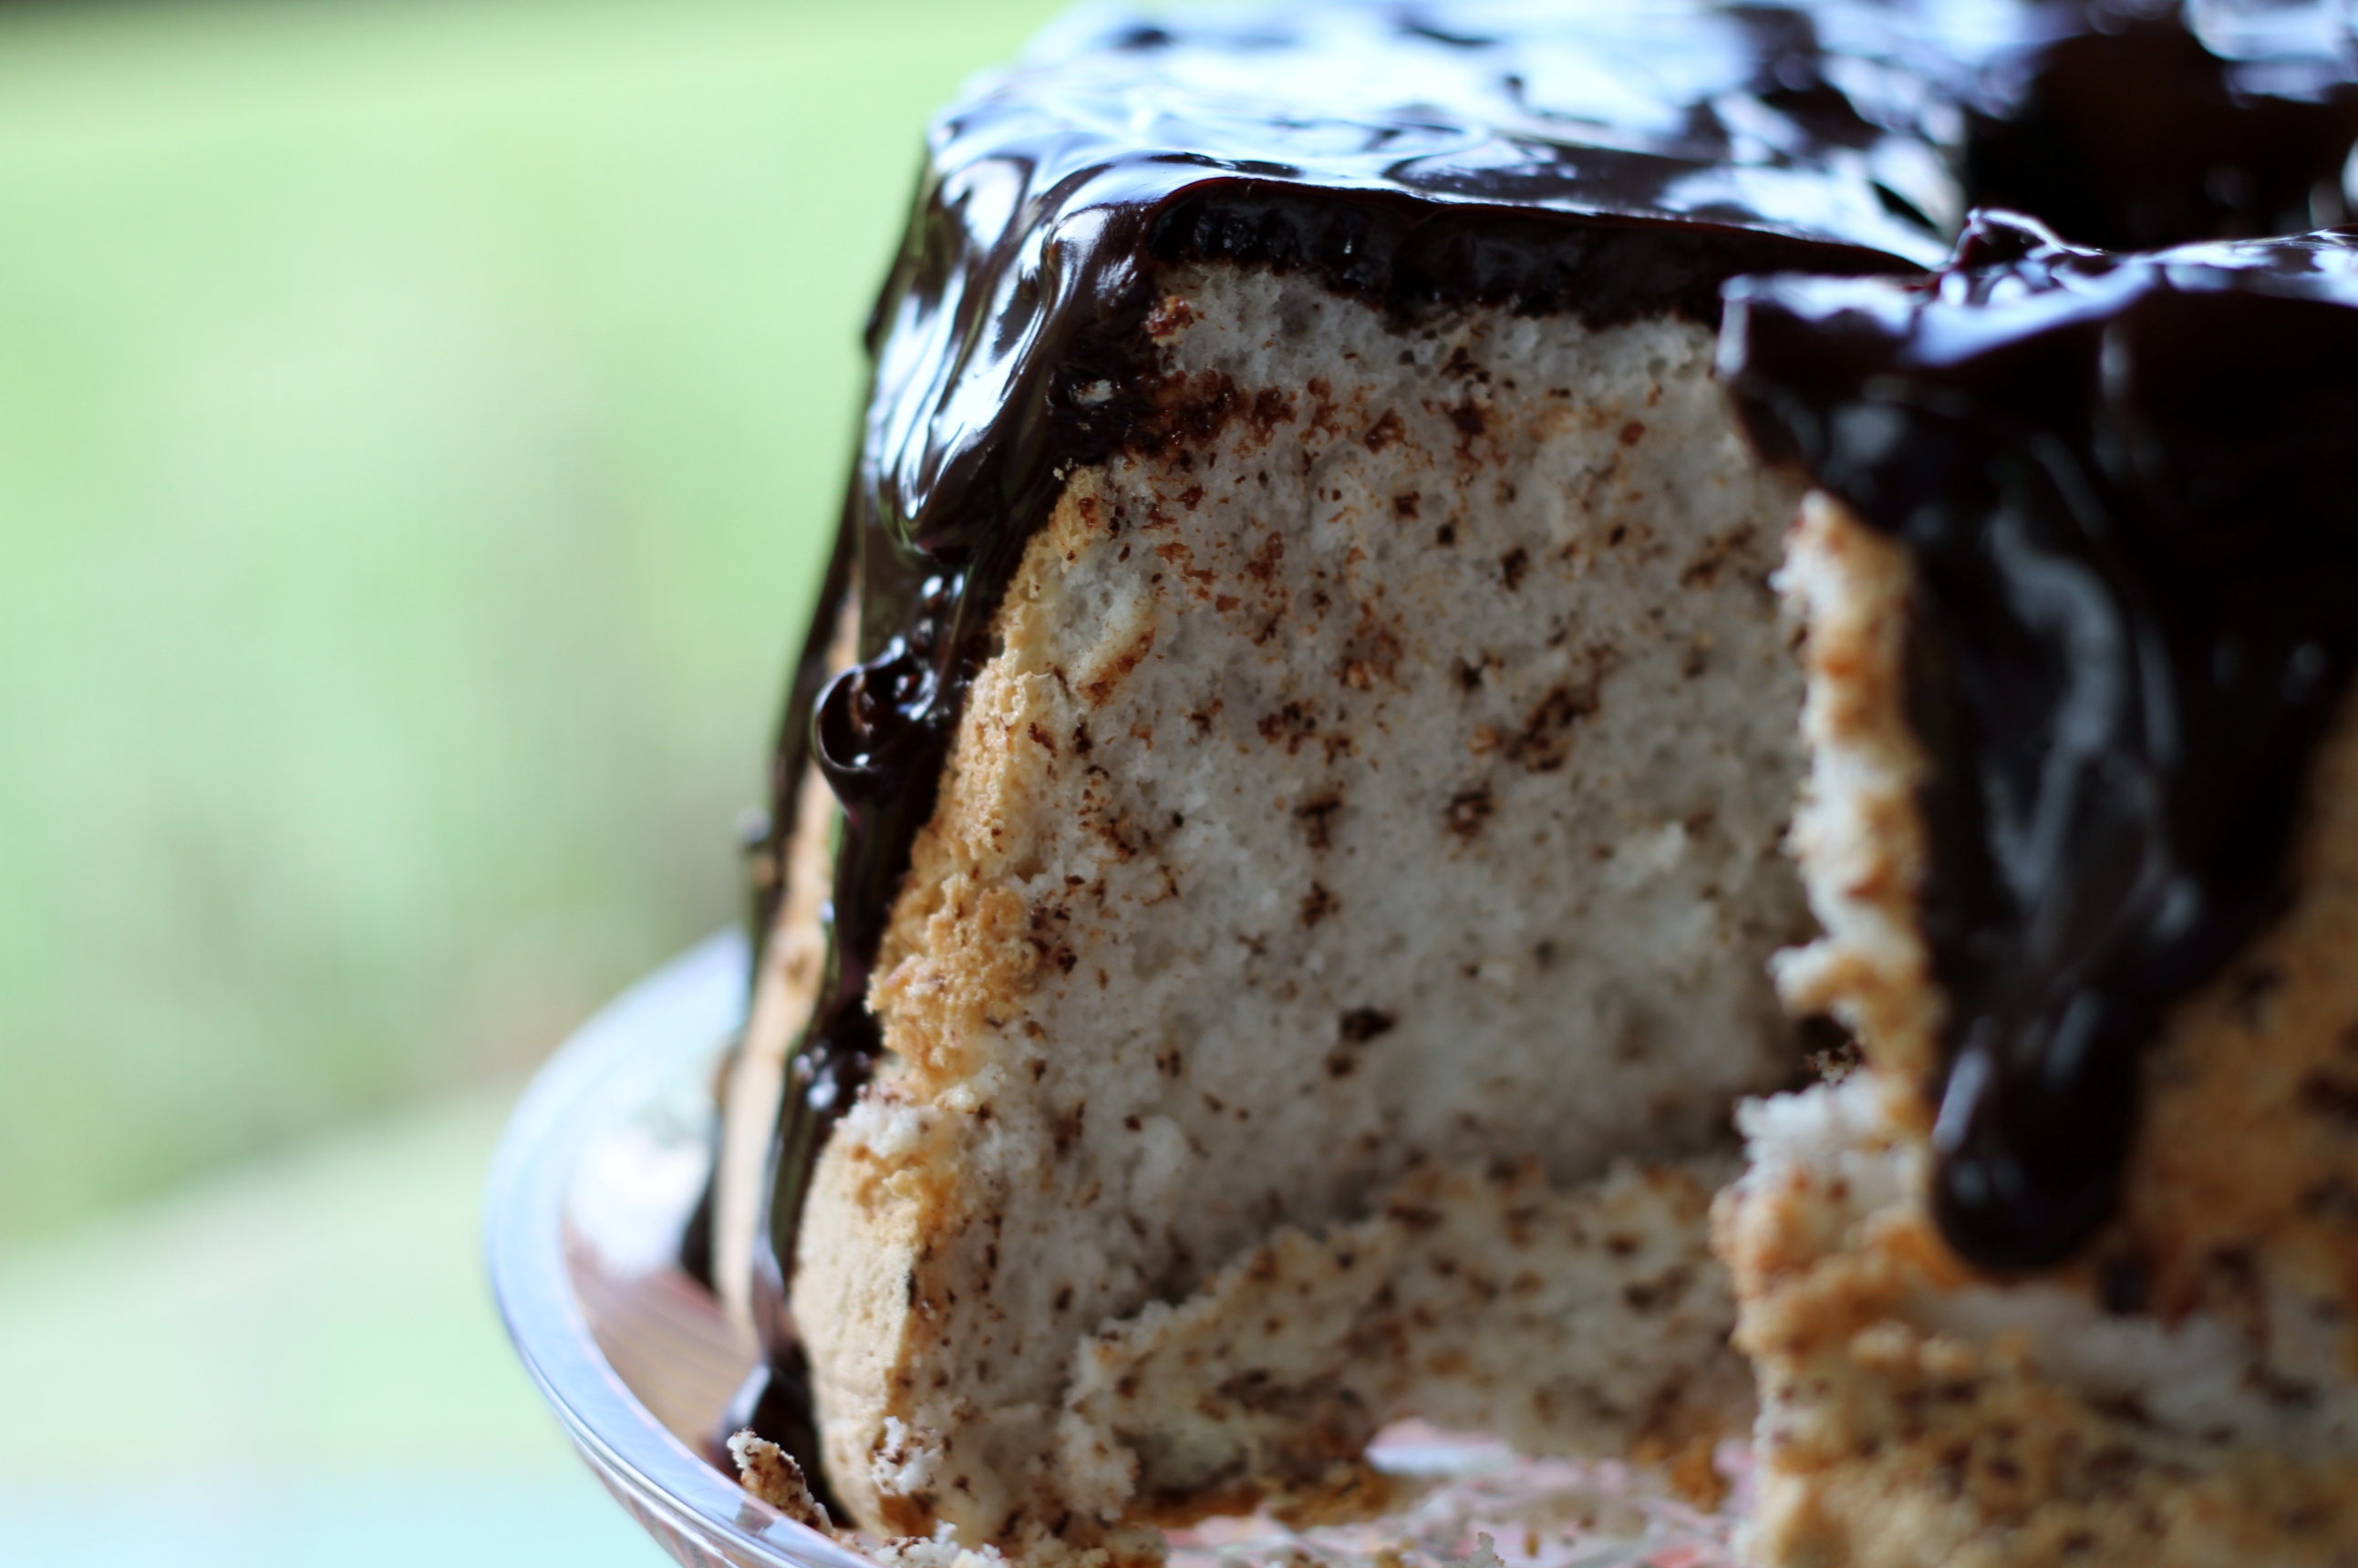
Let me put your fears to rest! Behold my new favorite recipe! Psst…it contains cream of tartar!! I had to make it several times just to be sure that it would be a good one to share with you. I know! I know! The things I do for you guys! And after much tasting and sharing of it with my friends and family-they too were very put out with taste testing- we have come to a decision: this is fantastic! It will make your skirt fly up and your hair blow back. It will knock your socks off and float your boat. It will…well you get the picture. There aren’t words for how wonderful it is. The first batch vanished several minutes after the first cut was made and while I would like to tell you that there were a dozen people here that night eating dessert, that would be misleading. Because there were really only a few of us and we at it all anyway. I turned to my husband and said, “I must make this again. Now.” And I did. And shared it with a different group of people (an even smaller gathering, if truth be known) and we at it all again. ALL OF IT. I think the chocolate ganache on top must have some sort of magical power…
 So here it is. I won’t keep it from you any longer. Dust off that jar of cream of tartar (check the expiration date please!) and conquer your fear. You can check out the basics of this magical ingredient here. For the present time though, just know that it will help stabilize your egg whites making this recipe a cinch to make. Please note that this recipe, like all angel food cakes, is baked in a tube pan. A tube pan looks like this:
 It has a hole in the middle and the sides are straight. Ignore a non-stick version; you actually want an angel food cake to stick. They are inexpensive and available almost anywhere. Also, this recipe calls for A LOT of egg whites. Use the real thing, not the pasteurized ones from the carton. What do you do with all the egg yolks, you ask? I recommend strawberry ice cream, but that’s just me…
And if, after eating this cake,you are still in any doubt about the stellar capabilities of cream of tartar , you can always use it to make your own baking powder. Yup. No joke. If you ever find yourself out of baking powder, as I did not too long ago whilst in the middle of making pancakes, just mix 1 tsp baking soda and 2 tsp cream of tartar together. Yield: 1 T of baking powder. But I’m warning you. It makes you feel a little like a mad scientist to mix your own leavening chemicals. *insert evil laugh*
I would love to know what your ‘page turner’ is! Comment below and if I can, I will try and feature a recipe just for you! Unless, like me, you don’t even want a recipe that calls for fresh vanilla bean because you like the flavor of pure vanilla extract better. Hmmm…what is my page turner…


 Black & White Angel Food CakeRecipe adapted from Ina Garten
2 c sifted superfine sugar (see note below)
1 1/3 c cake flour
1 1/2 c egg whites, preferably at room temperature (10 to 12 eggs)
3/4 tsp salt
1 1/2 tsp cream of tartar
1 tsp vanilla
1/2 c coarsely grated semisweet chocolate (This is easiest on the biggest side of your box grater. The same one I use to grate cheese.)
Ganache Topping:
1/2 lb semisweet chocolate chips
3/4 c heavy cream
Mix 1/2 c of the sugar with all of the flour and sift them together 4 times. Yes, this seems excessive, but it is needed to achieve a nice smooth batter. Set this aside. Place the egg whites, salt, and cream of tartar in the bowl of an electric mixer fitted with the whisk attachment and beat on high speed until the eggs form medium-firm peaks. They should just barely hold their shape. With the mixer on medium speed, add the remaining 1 1/2 cups of sugar by sprinkling it over the beaten egg whites. Beat on high speed for a few minutes until thick and shiny. Add the vanilla and continue to whisk until very thick, about 1 more minute. Sift 1/4 of the flour mixture over the egg whites and fold it very carefully into the batter with a rubber spatula. Keep adding the flour in 3 more additions, sifting and folding until it’s all incorporated. Fold in the grated chocolate (see above pics). Pour the batter into an ungreased 10-inch tube pan, smooth the top, and bake it for 35 to 45 minutes at 350 degrees until it springs back to the touch. Remove the cake from the oven and immediately invert the pan on a cooling rack or flat, heat proof surface (see pic). When cool, run a thin knife around the cake to remove it from the pan.
For the chocolate ganache, melt the chocolate chips and cream together in the microwave in 30 second intervals, stirring between each one, just until the chocolate is melted. Pour the ganache over the top of the cooled cake and cover the top completely, allowing it to drizzle down the sides.
Note: Superfine sugar is just what it says it is: sugar that is finer than regular granulated sugar. Usually it is called for in recipes when the sugar needs to melt fast without a lot of heat. The use of it here makes for a light cake with a smooth, fluffy texture. No graininess, like with some angel food cakes. But I hate to make an extra trip to the grocery store to buy it so I usually just make my own. For this recipe, add 2 1/4 sugar (this will yield the 2 c needed for this recipe when the texture is finer) to your food processor and blast away. Let it run for a few minutes and you are good to go.
 You may remember my mentioning previously that I have food phases.
Some people have cravings.
“Oh cheesecake sounds sooooo good!” or “What I wouldn’t give for some BBQ ribs!”
Not me. No, sir! I have weeks-sometimes months-when I can’t get enough of a certain food. Quite some time ago it was banana bread. I wanted a straight forward recipe that didn’t have any kind of twist or interesting flavor combo that I had never tried before. Now don’t misunderstand! I like to have…you know…versions of the classics as well. I have a dark chocolate walnut banana bread that is out of this world. And another recipe that I make where the bananas are sauteed in brown sugar and rum before being mixed into the batter. Fantastic! But when you have a half dozen (at least!) recipes that are all just plain ‘ol banana bread, you start to wonder which one is the best one.
After making this version, I stopped looking. One day I may branch out and again experiment with some basic recipes, but for several years, this has been my trusty stand by. I almost always bake it as muffins or mini-muffins so that I can freeze them for snacking later. They are sweet and moist and perfect. And while I tend to be more critical of my cooking and baking than anyone else, I haven’t heard any complaints from the peanut gallery. They also are usually at the top of my list when I am making food to tuck into the freezer of family and friends with a new baby.
Hmmmm. What phase will be next…? Banana Chocolate Chip Muffins
Adapted from Everyday Food
These are great with chopped walnuts in them too.
In a large bowl combine:
1/4 c canola oil
2 eggs
3 medium bananas, mashed
1 c sugar
1 tsp vanilla
Add:
1 1/2 c flour (I use 1 c all purpose and 1/2 c white whole wheat, but do whatever you like)
1 tsp baking soda
1/2 tsp salt
Mix just until combined, leaving a few lumps. Gently stir in 1/2 c mini chocolate chips. Spray the muffin cups or line with paper liners. Fill muffin tins 2/3 full and bake at 350 for 15-20 minutes or until golden brown and a toothpick in the center comes out with only a few moist crumbs attached. Baking times vary based on how ripe your bananas are.
Good For You Cranberry Chocolate Chip Cookies
Brittany wrote this on 15 April 2011![]() chocolate, cranberries, oatmeal, walnuts, wheat germ, whole wheat flour
chocolate, cranberries, oatmeal, walnuts, wheat germ, whole wheat flour
 These aren’t just any cookies. Oh no. Yes, they are chewy and crunchy and sweet. But they are also good for you.
Years ago, I came across a recipe for cookies made with canola oil. And while with certain recipes I am definitely a purest (Low fat alfredo? Uh..No.) there are as many cookie recipes out there as there are people. Variety is good. We should all have variety in our lives. And a cookie made with canola oil tells me two things. First of all, it means I don’t have to have softened butter on hand or take the time to cream it with sugar. Second, it means that I can cut out fat and calories, making the recipe better for my arteries. But none of those things is worth it if the food tastes terrible. Taste is the ultimate deciding factor in any recipe. So I started experimenting. And ultimately, this was the result.
You dump the ingredients in a bowl, mix it up, and bake them. They are fast, easy, and while they do have a wonderful amount of brown sugar in them-hence, the crispy and chewy texture we all crave in a cookie-they are as good for you as they can be and still taste like a treat. I make these all the time. Especially when we have company over. Its fun to pass them around and see the look on their face, which is inevitably followed by “These are good for you? Wow!”
So direct from my kitchen to yours. Give them a try. And maybe have two!
 Good For You Cranberry Chocolate Chip Cookies-Recipe modified 1/7/13
You can absolutely use any combination of dried fruit and chocolate and even nuts that you like!
In a large bowl, combine:
1 1/4 c brown sugar
1 c canola oil
2 eggs
1 tsp vanilla
Add: 3/4 c oatmeal
1/4 c wheat germ
1 c white whole wheat flour or whole wheat flour
1 c all purpose flour
1 tsp baking soda
1 tsp salt
Mix until well combined and add 1 c chocolate chips and 1 c dried cranberries. Drop by rounded teaspoonfuls onto a greased or parchment covered sheet pan, pressing to flatten just slightly. Bake at 350 for 10 to 12 minutes or until slightly golden brown on top.
Honey Bran Muffins & Distractions
Brittany wrote this on 11 February 2011![]() bran, buttermilk, honey, whole wheat flour
bran, buttermilk, honey, whole wheat flour
 Sadly, it has been just over a week since my last post. I know. It never hurts to state the obvious.
I hadn’t planned on it being that long. I had planned to get another entry done a week ago before my family left for a weekend of fun at a water park. That didn’t happen. I had also planned to blog on Monday after we got back; surrounded by luggage, empty snack containers, and the magna-doodle that keeps our kids busy in the back seat on road trips. That didn’t happen. My husband planned on going to work this week too. That didn’t happen.
Appendicitis is what happened. For my husband, that is. Surgery Monday night and a week to recover. You just can’t plan everything, can you?! But now Mike and I are scar buddies. Granted, I had my appendix out when I was 18 weeks pregnant so our experiences were a little different, but still!
So my week has gone a little differently than I planned. I thought I would be cooking all week because my husband can’t lift anything over ten pounds, hence, no working on the house. Which means my temporary kitchen will be clean for a few more days. But really, I ended up either ordering out, a reality in a house being renovated, or cooking food that I have already shared with you. Simple Soup, Stuffed Shells-pause for play time while I scoot down the stairs on my butt with Eli-Blueberry Sr. Cream Coffee Cake Muffins, and Vegetables With Pasta (not pasta with vegetables). And right now, I have BBQ Pulled Pork in the oven for Mike to take into his crew when he goes back to work. These recipes I post aren’t just any recipes people! They are my recipes! And yours too, I hope. So when I say I make them all the time, I do actually make them. All. The. Time.
So speaking of things I make a lot, I should add muffins to the list. I’m sorry! I am hooked! They are fast, easy, perfect for snacking or a quick breakfast, and generally good for you. The perfect package of carb-o-licious goodness. As bran muffins go, this is one of our favorites.
Honey Bran Muffins
Feel free to use maple syrup in place of the honey. If you want the maple flavor more pronounced, add 1/2 tsp of maple extract as well.
In a small bowl, stir together:
1 3/4 c low fat buttermilk
2 c All Bran
Let sit for 5 minutes until cereal is soft and buttermilk is absorbed. Add:
2 eggs
1/4 c brown sugar
1/4 c honey
1/4 c canola oil
Mix all ingredients until combined. Add:
1 c white whole wheat flour, whole wheat flour, or all purpose flour
1 tsp cinnamon
1 3/4 tsp baking powder
1/4 tsp baking soda
1/2 tsp salt
Mix all ingredients just until combined. Do not over mix. Bake in a sprayed muffin tin at 350 for 25 minutes, or until toothpick inserted into the center comes out with only a few moist crumbs attached.
Note: Add 1/2 c chopped walnuts and/or 3/4 c raisins, if desired.
Buttermilk Yeast Bread & Random Acts of Cooking
Brittany wrote this on 11 January 2011![]() buttermilk, yeast
buttermilk, yeast
 That is what I feel like lately. Random foods, flying out of my kitchen in all directions without rhyme or reason or direction. One day, salads. Another day, Buttermilk Bread. Lunch on Sunday was pancakes. Today? Chicken and Dumplings. I blame a portion of this on the fact that my couch is in my kitchen while we finish renovating our family room. I wonder if my husband comes home from work and inwardly braces himself for my answer when he asks “What is for dinner?” Because…well…you just never know.
I’m sorry! Its me! I need variety in my food! I don’t like a lot of repetition. For example, there seems to be a large group of people out there who eat the same thing for lunch every day. The same thing! How is this possible?! After days and days of ham and cheese, wouldn’t you want to arm wrestle a coworker just for a bite of his reheated Thai food? Is there some kind of secret society that no one knows about that exists in office building broom closets? A noon-time black market of sorts? Do they boast to friends and family that the lettuce with egg and fat free vinaigrette that is lunch every single day is so satisfying that they do not wish to vary it, while secretly trading stellar office supplies for a Cobb salad with extra bacon, lasagna with garlic bread, or Jimmy Johns with salt and vinegar potato chips? The bonds of secrecy are strong, so we may never know.
So here is to randomness! Variety! Ahah! I feel better already!
This recipe is for the bread machine but as always, adapts well to the old fashioned method. It is directly from the Breadman Ultimate Plus, Instruction Manual and Recipe Guide.
3/4 tsp baking soda
2 tsp salt
1/4 c sugar
1/4 c canola oil
1 1/2 c plus 2 T low fat buttermilk
2 1/4 tsp active dry yeastPlace the ingredients in the bread machine in the order given or according to your machines manufacturers directions. Bake on the basic white setting for a 2 lb loaf. This bread does better if you do not use the rapid mode.
Sweet Cream Biscuits: Hello, Old Friend
Brittany wrote this on 29 December 2010![]() cream
cream
 Every once in awhile, I come across a recipe that I wonder how I ever did without. It becomes an instant classic, a regular, a staple that I make over and over again and never get sick of. It turns out the same every time and you can count on its predictability. If it happens to be fast, versatile and soooo good that I wish I could eat it every day…*sigh*…even better! Raise your hand if you knew I was talking about carbs!
Sweet Cream Biscuits. Dozens of batches and many years later, I still love these things! OK. I may have said this before but I am totally serious this time. If there was only one recipe you ever make off this blog, let it be this one. They are ridiculously easy. They taste heavenly! And you can modify them for endless possibilities. You can call them scones, you can call them biscuits-whatever! The beauty of these is how versatile they are. They are perfect for breakfast, a great addition to a brunch menu, and in my experience, a sure way to win kisses from the man in your life. Every time I mention them, my husbands eyes light up like a marquee. And I am not exaggerating. This recipe started me on my ‘scone’ phase. I think I made scones three or four times a week for months, creating new recipes, testing out different ingredients, and generally enjoying all the bread! I still make tons of biscuits and scones the old fashioned way, cutting in butter and rolling them out. But this is my favorite method and much more conducive to my lifestyle. Hope it becomes a favorite of yours too!
Sweet Cream Biscuits-Recipe Modified 2012
Make these! I am not kidding!
2 c flour
2 1/2 tsp baking powder
1/2 tsp salt
1/3 c sugar
1 1/4 c cream
1/2 tsp vanilla
Preheat oven to 425. In a medium bowl, mix all dry ingredients together. Add cream and vanilla and mix with a fork until moisture is evenly distributed. Using your hands, gently press the dough against the side of the bowl just until a ball forms. The less you handle the dough, the more tender the biscuits will be. Divide the dough into 6 equal parts, gently forming each into a flat disc. Place onto a baking sheet and sprinkle with sugar, if desired. Bake for 15 minutes or until tops are golden brown.
And if you want to vary it a little…Cranberry Orange Scones! After you mix the dry ingredients, toss in 1 c of dried cranberries. Before you add the cream, add the zest of two oranges to it and mix it in. Or use lemon zest and dried blueberries. Both are awesome.
Brown Sugar Shortbread-The 5 Minute Christmas Cookie
Brittany wrote this on 21 December 2010![]()
 Nope! I am not exaggerating! This cookie will literally take you 5 minutes to make. A half an hour total from start to finish if you count baking time, a few minutes to cool and then cutting it into squares. Its light, crunchy, and the perfect addition to a holiday cookie tray or treat box for the neighbors. I was feeling a bit guilty that I haven’t flooded you with Christmas recipes so I thought I would make up for it with the easiest recipe I know. And everybody loves shortbread, right? Most shortbread recipes only have a few ingredients and this one is no exception. Three to be exact. So no excuses! You barely even need a recipe! Feel free to be really sinful and dip one end of the cookie in melted chocolate.
 Brown Sugar Shortbread
1 c flour
1 stick of softened butter
1/3 c brown sugar
Mix all ingredients until fully incorporated. Press into the bottom of an 8X8 or 9X9 pan. Bake at 350 degrees for 15-20 minutes, or until evenly golden brown across the top. Cool slightly and then cut into 16 squares. Cool completely. Store at room temperature, tightly sealed.
Mini Corn Muffins
Brittany wrote this on 20 December 2010![]() buttermilk, corn, cornmeal, sour cream, whole wheat flour
buttermilk, corn, cornmeal, sour cream, whole wheat flour
 These little gems are perfect with Indian Summer Chili. They are also good to whip up in the summer when you want a little something to go with a salad.
Mini Corn Muffins
Adapted from Bon Appetit Recipe modified 2/28/13
Mix together in a medium bowl:
1/4 c sour cream
1/4 c buttermilk
1 egg
2 T canola oil
Add:
1/2 c white whole wheat flour or all purpose flour
3 T cornmeal
1 T sugar
3/4 tsp baking powder
pinch of salt
Mix all ingredients just until combined. Do not over mix.
Fold in 1/2 c frozen corn, thawed
1 T chopped fresh dill, or 1 tsp dried dill (optional)
Preheat oven to 400 degrees and lightly spray a mini muffin tin. Divide batter among the mini muffin cups and bake until puffed and golden, 9-11 minutes.
Blueberry Sour Cream Coffee Cake Muffins
Brittany wrote this on 13 December 2010![]() blueberries, sour cream
blueberries, sour cream
 I ‘heart’ Ina Garten. And these muffins!
I have said it before and I will say it again. The woman is awesome. For those of you that have missed my references to her in previous blogs (and there have been many) she has a show called Barefoot Contessa on The Food Network. She used to own a specialty foods store in the Hamptons with the same name and has several cookbooks under her belt. I truly believe that we could be close friends if we were to ever meet. I’m fun! I’m charming! And I like to cook from her recipes. That should be enough to guarantee me a Christmas card, at least! Don’t worry, I won’t continue to gush, but will get right to the task at hand. Blueberry Sour Cream Coffee Cake Muffins. Ooh baby.
When you find a great recipe and it works out well, the flavor is good, and it consistently produces fantastic results, you know you have a winner. At this point I stop looking for more of those recipes. I have dozens of different coffee cake recipes, but this is my ultimate blueberry coffee cake recipe. I have found nothing better, so this is the only one I make when the fruit is in season or I have bags of blueberries frozen in the freezer. It is perfect for company and they taste better than anything I have had from a bakery. They have a moist, delicate crumb, and are simple to mix up the night before and bake off in the morning. And who doesn’t like breakfast that you can make ahead of time! Sign me up! So Ina, if you are reading this, I just want to say…thank you. Thank you for your recipes. Thank you for your inspiration. But most of all, when you mail your Christmas cards this year, my address is… Blueberry Sour Cream Coffee Cake Muffins
Recipe by Ina Garten
12 tablespoons (1 1/2 sticks) unsalted butter, at room temperature
1 1/2 cups sugar
3 extra-large eggs, at room temperature
1 1/2 teaspoons pure vanilla extract
8 ounces (about 1 cup) sour cream
1/4 cup milk
2 1/2 cups all-purpose flour
2 teaspoons baking powder
1/2 teaspoon baking soda
1/2 teaspoon kosher salt
2 half-pints fresh blueberries, picked through for stems
Preheat the oven to 350 degrees F. In the bowl of an electric mixer fitted with the paddle attachment, cream the butter and sugar until light and fluffy, about 5 minutes. With the mixer on low speed, add the eggs 1 at a time, then add the vanilla, sour cream, and milk. In a separate bowl, sift together the flour, baking powder, baking soda, and salt. With the mixer on low speed add the flour mixture to the batter and beat until just mixed. Fold in the blueberries with a spatula and be sure the batter is completely mixed. Scoop the batter into muffin pans lined with paper liners, filling each cup just to the top, and bake for 25 to 30 minutes, until the muffins are lightly browned on top and a cake tester comes out clean.
Tip #1: To bring eggs to room temperature quickly, place in a bowl with warm water for 15 minutes.
Tip #2: These are great to mix up the night before, cover the mixing bowl with plastic wrap, and leave in the fridge over night. Bake as directed the next morning! Baked muffins freeze wonderfully!
Tip #3: When blueberries are in season and inexpensive, freeze them for later use. Place dry blueberries on a clean dry sheet pan in a single layer and place in the freezer. Once frozen, dump into a plastic freezer bag. This makes it very easy to scoop out just what you need for baking. This freezing method works great for all other berries and sliced peaches too!
Love a Good Recipe?

Then you’ve come to the right place! I’m Brittany, and I share tested, trusted recipes you’ll love. I prepare & photograph food, obsess over the perfect recipe, and enjoy grins of delight when I serve up something awesome. Enjoy!


