 Brittany's Pantry
Carrot & Ginger Rice W/Lime
Brittany wrote this on 19 June 2013![]() brown rice, carrots, ginger, gluten-free, lime
brown rice, carrots, ginger, gluten-free, lime
 A year or two ago, a good friend of mine told me that even though she cooked all kinds of recipes from this blog, she spent the most time finding side dishes and new ways to cook vegetables than anything else. This was kind of interesting to me and I thought about that comment a lot. I think that at this time of year it is more true than any other time. Its hot outside, you want to avoid turning the oven on at all costs, and maybe do something other than another potato or pasta salad to go with those burgers coming off the grill. We see the same dishes brought to every barbecue, potluck, and backyard grill-out. Pasta salad, potato salad, jell-o salad, waldorf salad, and bags of chips. I get it and I agree. I discuss my need for variety here quite regularly and since professional help is not in my future, do not expect it to let up anytime soon! I mean, I looooove me some pasta salad. Like this Sweet Veggie Pasta Salad or Margarita Pasta Salad. And this Cobb Potato Salad is so fantastic it is ba-na-nahs! But when you are looking for a different sort of starch that is versatile and just a little bit different, I have your solution.
And it is better than therapy.
This is really what every good side dish should be; made with few ingredients. You can actually taste each and every part. It is fast and it isn’t fussy and piling it on the plate next to some type of grilled meat is definitely the way to go. I recently served it with grilled pork loin, but it is outstanding with pork chops, chicken, or thinly sliced grilled flank steak. There is a bit of heat from the ginger, a sweetness from the carrot, and a tang of the lime. It is all brought together and mellowed out by the chewy, nuttiness of the rice. Super healthy and super versatile. And since it is great hot, room temperature, or cold, it is a nice chameleon for your summer menu.
 Two Years Ago: How To: Roast Asparagus
Carrot & Ginger Rice W/Lime
Do yourself a favor and top the leftovers with a fried egg. Stellar.
4 c cooked brown rice-you could use white rice or quinoa if you like
1 large carrot, peeled and grated coarsely
zest and juice of 1 lime
1 inch section of fresh ginger, peeled and finely grated, as on a microplane
salt and pepper to taste
In a medium bowl, combine the carrot, lime zest and juice, and ginger. Mix it thoroughly, breaking up any clumps of ginger and zest so that everything is evenly distributed and there are no large bites of any one thing. Add the hot rice and stir until very mixed. Taste and season with salt and pepper.

 There are so many things I love about this dish, that I just…like…I can’t even deal.
This might sound weird, but the fact that I finished this recipe just in time for summer is really the best part. Because now I, and of course you, can enjoy it all. season. long. *sigh* I’m so happy.
So yes, this is a continuation of my quinoa love fest, but if you don’t like quinoa, well, it actually doesn’t really matter. This dish is just as fantastic made with brown rice, couscous, or a personal favorite of mine, orzo. Although, I wish you wouldn’t! It would be doing yourself a serious disservice. The texture and nutty flavor are part of what make this one-plate meal so addicting. Addicting. As in it is nearly impossible to stop snacking on it before it hits the table, type of addicting.
With all the veggies and lean meat thrown in, it is certainly not short on satisfaction. I picked these particular vegetables and flavors because they lend themselves to each other very well; almost like a greek salad, but better. But if you didn’t add the chicken, it would be an awesome dish to bring to a summer barbecue when you needed something to pass around. You can make it ahead, it is fine chilled or at room temperature, and it goes with everything. The Honey-Lemon Grilled Chicken is so fantastic in this you won’t even believe it, so grill extra and save yourself some time for a meal later in the week. The Grilled Yogurt Chicken is good too. Plan ahead and take advantage of the convenience! If I ever have extra, which is quite rare, I plan to use leftover cold flaked salmon in here too.
Maj-or drool fest.

 One Year Ago: Marshmallow Buttercream & Homemade Granola Bars
Two Years Ago: Vanilla Ice Cream, Lemon Thyme Orzo, Strawberry Watermelon Coolers, & Fried Corn
Mediterranean Quinoa Salad
The dressing isn’t heavy for strong. It is just enough to boost the flavor of the veggies without drowning them!
1 recipe Basic Quinoa
1/2 cucumber, cubed
1 sweet bell pepper, cubed
1 pint cherry or grape tomatoes, halved
2 cooked chicken breasts, cubed
2 T chopped fresh mint
8 oz feta, diced
Stir all ingredients together and chill. Meanwhile, in a glass measuring cup, add:
1/4 c extra virgin olive oil
1/4 c red wine vinegar
1 T honey
1/2 tsp salt
1/4 tsp pepper
Whisk together and pour over salad, tossing well to distribute the flavors. Taste for seasoning. Enjoy!
Caesar Salad
Brittany wrote this on 17 May 2013![]() anchovies, chicken, gluten-free, parmesan cheese, romaine
anchovies, chicken, gluten-free, parmesan cheese, romaine

Caesar salad and I have a kind of love, hate relationship.
Up until just a few years ago, I was more of a french or bleu cheese dressing type of gal. I thought caesar salads were quite boring actually. At least with a house salad you get tomatoes, maybe some cheese, a few shreds of carrot, and on a good day, a crouton or two. Caesar salads are always the same; romaine, which has no flavor whatsoever, dressing, parmesan cheese if you are at a reputable place.
But then I got pregnant.
I know. Not the statement you were expecting, eh? But nevertheless, there I was. Pregnant and sick and tired and not hungry. And for reasons still unknown, I found myself at a deli and ordering a chicken caesar salad wrap for the first time in my life. And it tasted amazing. It was cold and crunchy and tangy and salty and…ghah. After that day, I never looked back. There are some great places with some pretty fantastic salads out there, and I now know which ones to skip, and which ones to order every chance I get.
Now, though not pregnant :), I find myself craving that same salad love at home. But I so rarely purchase bottled salad dressings anymore, I started messing with my own version of caesar dressing. And believe you me! It was quite a process! Too much anchovy, too much garlic, not enough vinegar, too thin-sheesh. But I finally nailed it. Ha! And then I had to go and make it one more time to make sure that I could actually follow all my notes and scribblings and produce a solid recipe! Now, I plan to enjoy the fruits of my labor with all the fresh greens coming out of the Farmer’s Markets. I am quite particular about salads in general and almost always eat my caesar salads the same: romaine (because its traditional), hard-boiled eggs, grilled chicken, and parmesan cheese. I also like to make what I call a ‘loaded caesar salad’ but that is a recipe for another day! And remember when I said that I had a favorite way to eat that Honey-Lemon Grilled Chicken in the last post? Well, voila!


One Year Ago: Hobo Dinners
Two Years Ago: Whole Wheat Cornbread
Caesar Salad
Do not be afraid of the anchovy paste in this recipe! If you have ever purchased it, you can usually find it by the tuna and canned meats at your grocery store and it comes in a little tube. It lasts in your fridge for forEVER and it is not a big deal so just be brave and pick some up! The flavor is unbeatable and it is amazing in so many things! You never know its in there, but you miss it if you don’t use it! Be sure to use it in this recipe too! I prefer to use mayo in place of the egg yolk used in a traditional caesar recipe, but only for the sake of convenience. Feel free to go old school.
2 cloves garlic
1 tsp anchovy paste
1 T lemon juice
1 tsp Worcestershire sauce
1 heaping T mayo
1/2 c extra virgin olive oil
1 T honey, optional
salt and pepper to taste
Blend all ingredients in a blender or mini food processor. Taste for seasoning, but be careful with the salt. Chill. The dressing will thicken up and become creamy when it is cold, but is more pourable when freshly made! Serve over fresh romaine with hard boiled eggs and Honey-Lemon Grilled Chicken. Sprinkle with parmesan cheese.
Honey-Lemon Grilled Chicken
Brittany wrote this on 13 May 2013![]() chicken, gluten-free, grilling, honey, lemon
chicken, gluten-free, grilling, honey, lemon
So here it is.
Many of you email me or send messages asking for healthy, gluten-free, dairy free, easy meals. Well, my lovelies, it doesn’t get much better than this.

Much like the oh so popular grilled pork chops, this recipe requires minimal ingredients and minimal effort with a big return. The lemon is bright but not overly tangy and the honey adds more flavor than you would expect! And you know how much I love to cook with honey. It is just. so. good. In a future post I will show you one of my favorite ways to serve this dish, but for now, you get it straight up. Grill it, slice it, serve it. Spring veggies are the perfect thing to share the plate with this chicken so make sure that you have lots of fresh greens, peas, asparagus, or beets piled on the side. Aaahh. The smell of a grill, the snap of fresh vegetables-delicious!
Can I take this time to chat with you a little about your zesting though? I feel as if we know each other well enough to discuss this. In regards to your preferred zesting apparatus, I hope you are all using a Microplane, or something similar. You can buy them anywhere nowadays and they all run about fifteen bucks. Not too shabby for a tool that does so much! Of course I use mine mainly for zesting citrus which means it is pretty much always dirty. But it can turn a block of parmesan cheese into wonderfully fluffy gratings that stir into pasta much easier than the grainy store bought stuff. Back to the whole zesting dealy-o, make sure that you always zest with the grater OVER THE VESSEL YOU ARE MIXING IN, as opposed to zesting onto a counter, plate, or cutting board! Believe it or not, you get way more flavor this way. When you scrape your citrus over the blade, it cuts the rind into teeny tiny little ribbons, spraying the oils-which have a TON of flavor-as you go. That beautiful essence of lemon, orange, or whatever, should be in your recipe, not making your counters sticky.
Ding! Zest lecture complete.
Now go grill something!
One Year Ago: Lemon Quick Bread
Two Years Ago: Black & White Angel Food Cake
Honey-Lemon Grilled Chicken
White meat is more versatile but boneless, skinless chicken thighs are equally awesome in this recipe. Don’t skimp on the black pepper; it adds a subtle heat that is part of what makes this chicken so addictive. Replacing the lemon with orange is just as stellar.
4 boneless, skinless chicken breasts
zest of 1 lemon
juice of 1 lemon
1/4 c honey, preferably local
1 tsp kosher salt
1/2-3/4 tsp ground black pepper
1/4 c extra-virgin olive or grapeseed oil
Combine all ingredients in a large resealable plastic bag or large bowl. Squish and turn to mix and coat the chicken. Let marinade for at least 4 hours, or up to 8, turning occasionally if you can. Grill chicken over medium, direct heat, letting the extra marinade drain off before placing it in the grill. Grill about 4 to 5 minutes per side, or until chicken is just done, but not dry. Cover and let rest for 10 minutes before serving. Enjoy!!
Spring Asparagus W/Raspberry Vinaigrette & Walnuts
Brittany wrote this on 23 April 2013![]() asparagus, gluten-free, raspberries, vegetarian, walnuts
asparagus, gluten-free, raspberries, vegetarian, walnuts
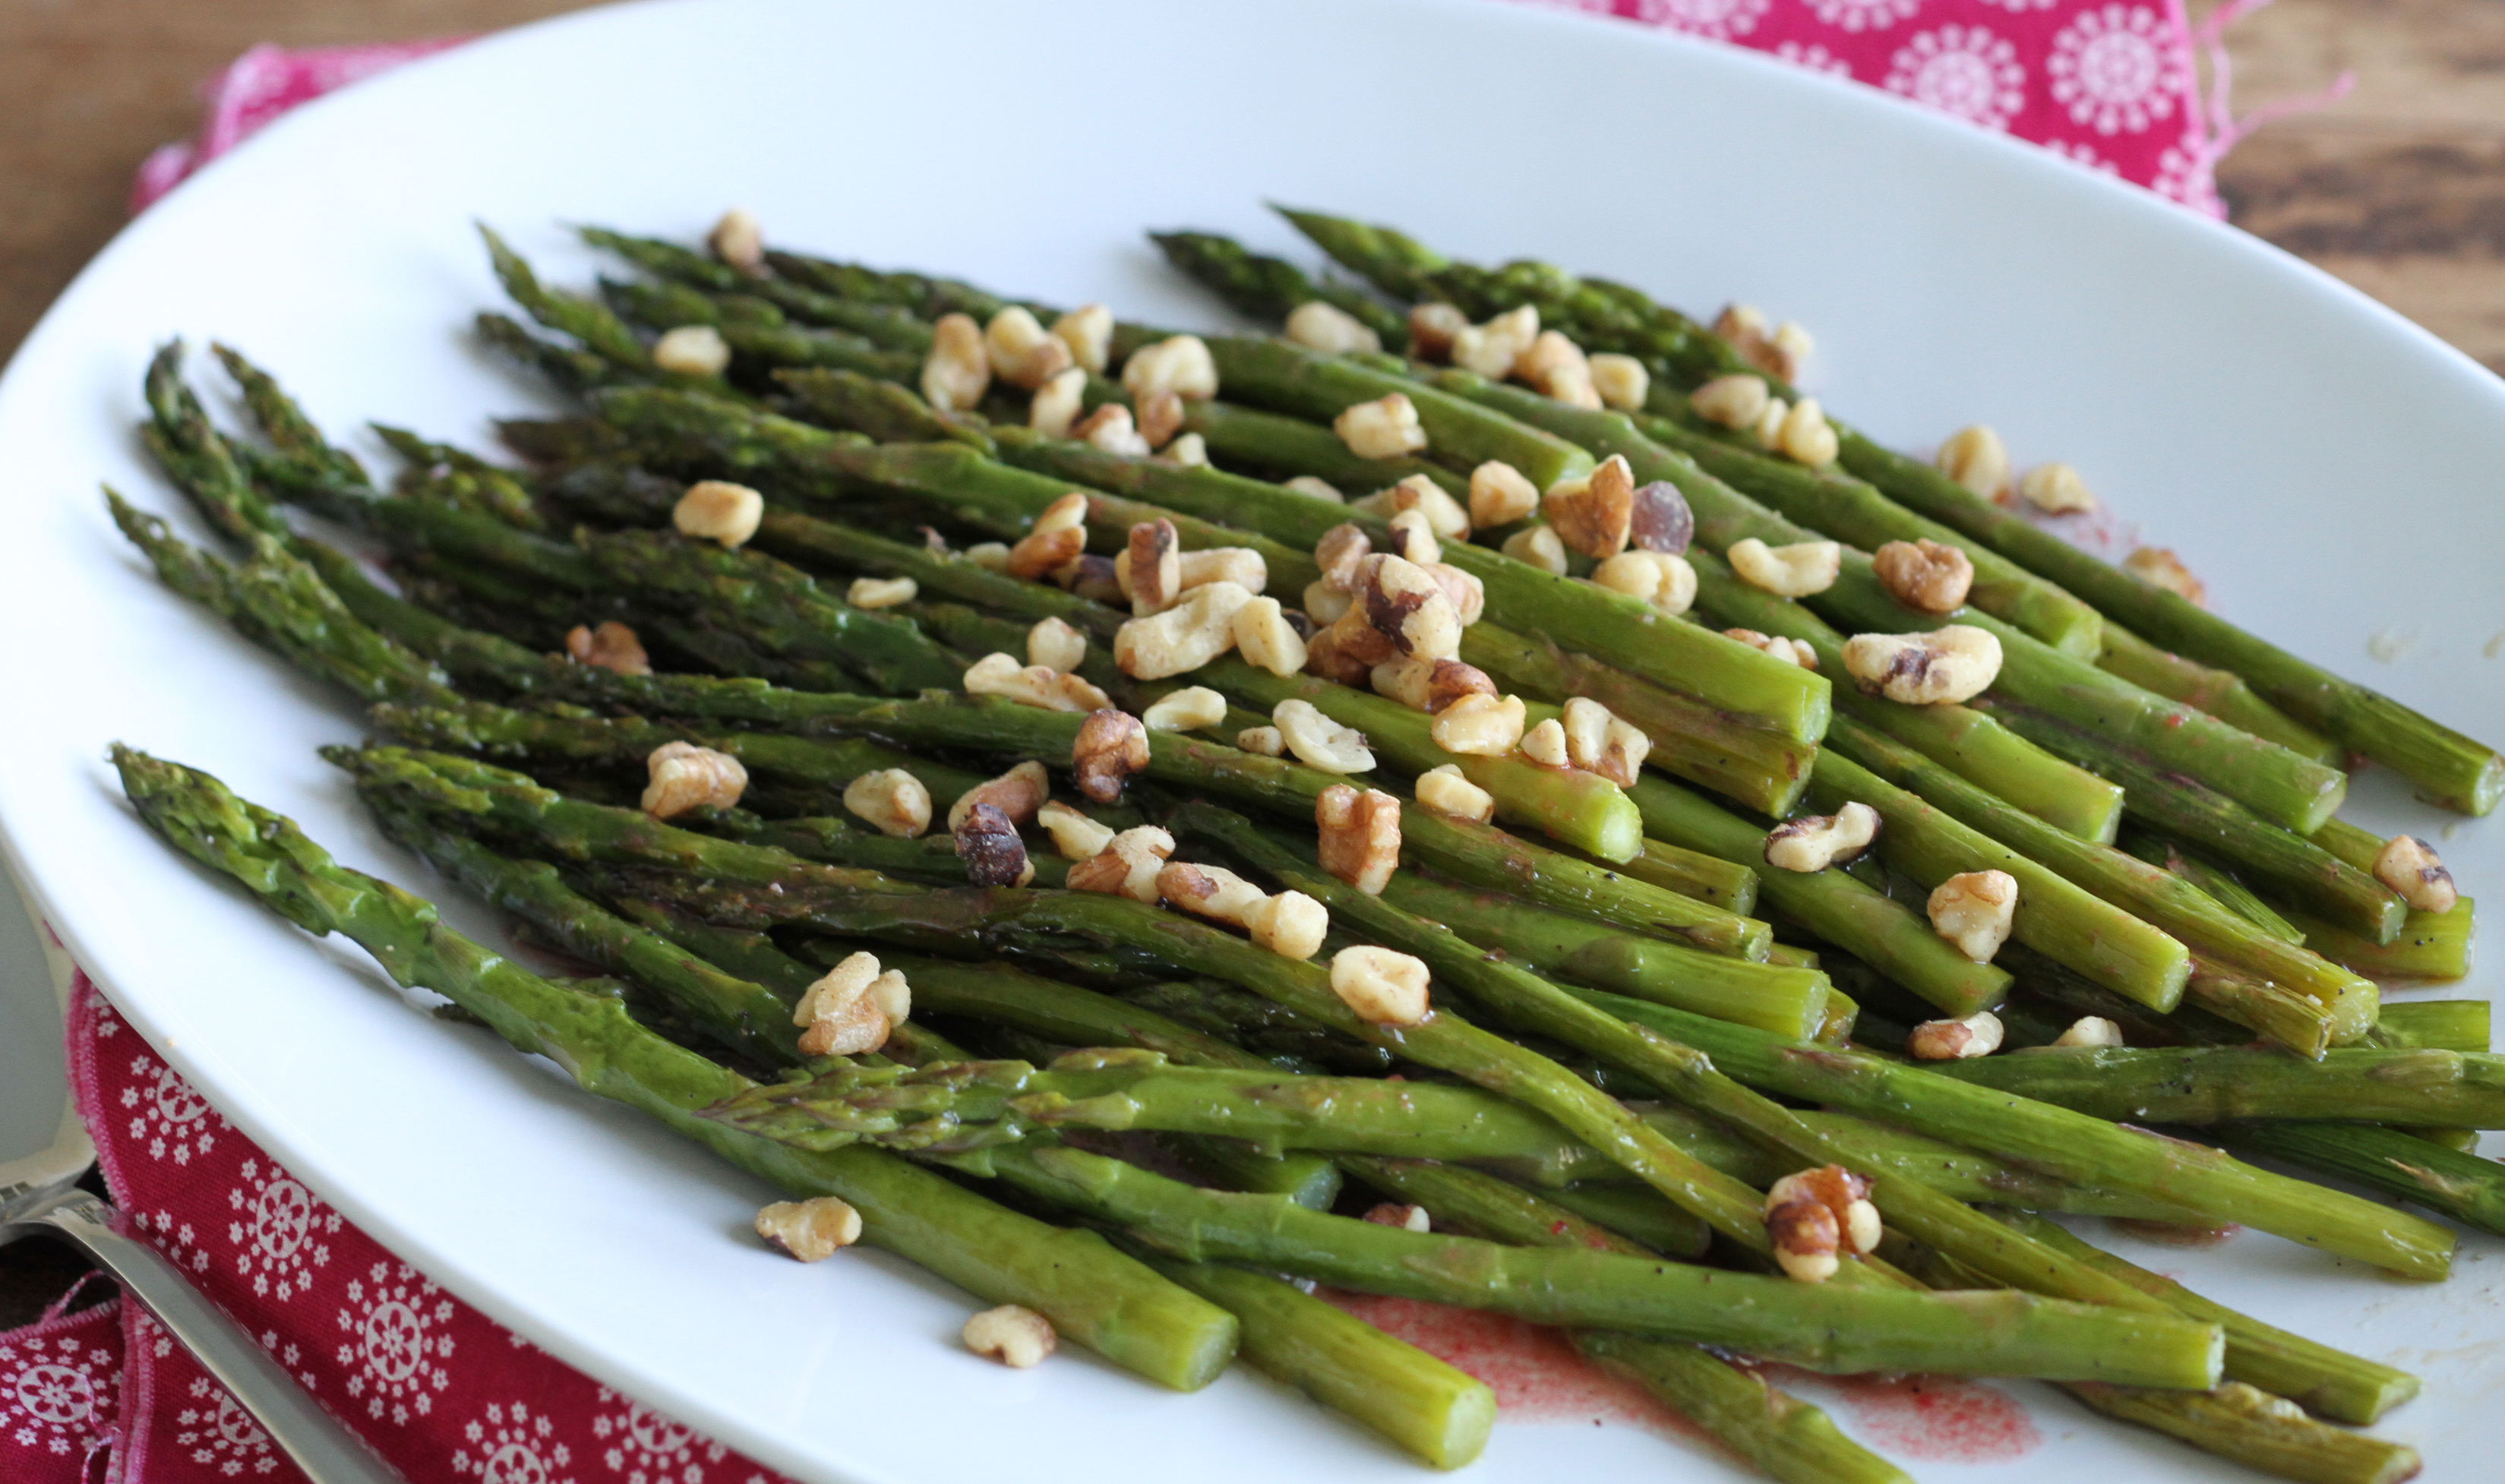
Its spring! And spring means asparagus!
My family and I wait all year for asparagus to fill the farmer’s markets and grocery stores. I know that nowadays we can get it imported from Peru and thus enjoy it year round, but I prefer to eat it in season from as local of sources as I can. And now is the time, people. Now is the time!
Of course, its abundance is the reason for this timely post! Years ago, my good friend used to cater with a dish similar to this. Served cold, it is the most lovely thing to nibble on while mingling in a crowd. As a matter of fact, this exact dish (but made with bottled dressing) converted my best friend to an asparagus eater! I had blanched and chilled a few pounds of it, intending to serve it later for dinner, and she grabbed a spear, dipped it in a raspberry walnut vinaigrette, and it changed her life forever. I am happy to report that she is now a die hard fan of asparagus, after having previously sworn off ever eating the stuff. I am telling you. This recipe has magical powers.
Just think of it as a kind of salad. Room temp or cold, the flavor of the fresh vegetables with the bright tang of the vinaigrette is a surprise that you wouldn’t think would be so amazing. Add some toasted walnuts on top, and you have a side dish-or even the base of a light lunch-that is worth celebrating.

One Year Ago: Fruit Dip
Two Years Ago: Breakfast Burritos
Spring Asparagus W/Raspberry Vinaigrette & Walnuts
I highly recommend throwing a fillet or two of grilled salmon on top of this for dinner.
2 lbs fresh asparagus, woody ends trimmed
1/2 c oil-canola, extra virgin olive oil, grapeseed, or a combo
6 raspberries-1/4 c raspberries, fresh or frozen
pinch of salt
black pepper
1 T honey
1 tsp dijon mustard
1/4 c chopped walnuts, toasted *see note*
Cook the asparagus until crisp tender. You can roast it, which is my preferred method, or blanch the spears in boiling water for a few minutes, shock them in a water bath, and then drain thoroughly. Be sure not to over cook them! Either way, arrange the asparagus warm, room temp, or cold, on a large platter. Meanwhile, place all the vinaigrette ingredients in a small food processor or blender. Use 6 raspberries if you want a very subtle, mild, fruit flavor. Use a full fourth of a cup if you want a stronger, more pronounced flavor. Both ways are fantastic. Blend until smooth. Taste for seasoning and don’t skimp on the black pepper! Pour the dressing through a fine mesh sieve, pressing to extract all juice and flavor from any solids. This step is optional, but I always do it because I really hate seeds in my food. Drizzle the asparagus lightly with the vinaigrette-you will use about 1/3 of the dressing. Top with walnuts. This can be made an hour or two ahead of time. Just wait to top with walnuts until the end so that they stay nice and crunchy! Enjoy!
*Note* The reason certain recipes call for toasting nuts before using them is to bring out their flavor. The heat makes the oils in them rise to the surface, thus leading to much tasty nut! The difference in taste between toasted and un-toasted nuts is huge. To toast walnuts, or really any kind of nut, place them in a dry sauté pan over low heat, tossing occasionally. When you can smell them, they are done! Alternatively, I like to just throw them in the oven on a dry sheet pan at around 350. It only takes a few minutes, so watch carefully! Let them cool a bit before you pop one in your mouth. They will be crazy hot!
How To: Basic Quinoa
Brittany wrote this on 20 April 2013![]() gluten-free, How To, quinoa
gluten-free, How To, quinoa
 Over time, there are some things that eventually become part of your life, even if they never made an appearance in it before.
My children, high heels, heirloom tomatoes and kale, my MacBook-all these things that were previously absent from my life, but now are permanent fixtures. I could easily add quinoa to that list. Though not a food that I have a long history with, it has become a staple in my kitchen. Quinoa just kind of showed up, said all the right things, did all the right things…wooed me a bit, and I let it stay. And believe you me, that is not always the case. Lentils for example. They came, I ate them, I cursed them, and they left. I don’t care what anyone says. Lentils taste like dirt.
But back to quinoa. Oh! wonderful quinoa. All that nutrition stuff they talk about is true, so just trust me: its good for you. Like, crazy good for you. While I tend to veer in the opposite direction of food trends, i.e. bloggers putting nutella on everything, the fact that quinoa has gotten so popular is just good sense! Finally! Something caught on that wasn’t ridiculous! Some of the reasons why I am so fond of quinoa are (and these are in no particular order) it cooks faster than brown rice, the flavor is mild and kind of nutty and nice, its fluffy like pasta but its gluten free, and it is really versatile. I add plain cooked quinoa to my Sloppy Joes and soon, I am going to try it in my granola. Yup. Quinoa for breakfast. It’s everywhere, man.
 This is what I make when I just need basic quinoa. Nothing fancy, nothing involved, just plain. Something I can serve with fish or seafood and have leftovers to do with as I please. My kids love it stirred into scrambled eggs where its chewiness gives fantastic texture. I have tried using the package directions, but it always comes out kind of wet. My version uses less liquid, but steams it for a bit at the end. It is much more fluffy than regular methods and is easier to add to other recipes, like the sloppy joes or scrambled eggs I mentioned above. So after some trial and error, this is now what I stick to. It has never failed me. Unlike lentils.
So lets get started.
One Year Ago: Freezer Fajitas
Two Years Ago: Banana Chocolate Chip Muffins, Mexican Rice W/Black Beans, Pasta W/Zesty Bolognese
Basic Quinoa (pronounced keen-wah)
I like the Bob’s Red Mill brand. It is organic and I get exactly two batches out of a bag. In turn, I sometimes get two or three different meals out of a batch. We eat it as a side dish, add some leftovers to eggs for breakfast, and maybe stir some into muffins or pancakes. Once cooled, it freezes great! Just make sure it is sealed well and it will last for a month or two.
2 c quinoa, white or red or a mix of both
3 c liquid (all water or all chicken or veggie broth or a 50/50 mix)
pinch of salt
Start by rinsing the quinoa. Some people say this isn’t necessary due to the fact that almost all varieties of quinoa come pre-rinsed now. But quinoa has a natural coating on it that makes it bitter-blegh-and since it is easily rinsed off, I err on the side of caution and just always rinse. Years ago, I made quinoa and didn’t rinse it and it was so ishy I had to throw it out. So, safety first. Rinse the quinoa. Just measure it into a fine mesh sieve and rinse well with cold water. No biggy.
 Dump it into a medium sauce pan that has a lid.
 Add your liquid and put over medium high heat.
 Bring it up to a low boil, stirring occasionally. Once it is boiling lower the heat and reduce it to a simmer. Cover with a lid, cracking it to vent just a bit. This keeps it from bubbling over.
 Set your timer for 10 minutes, stirring after five. This gives the quinoa about 15 total minutes of cooking. Once the 10 minutes are up, it should be almost dry. Remove it from the heat, snuggle the lid on tight, and let it steam until you are ready for it. At least five minutes, or as much as twenty.
 Beautiful! Stir and fluff and eat! Remember, this is just plain. A little salt and pepper and it is lovely with fish or roasted meats. Now is the time to toss it with roasted veggies, parmesan cheese, fresh herbs, whatever you like!
 Enjoy!
Parmesan Tilapia
Brittany wrote this on 15 April 2013![]() fish, gluten-free, lemon, mayo, parmesan cheese, seafood, tilapia
fish, gluten-free, lemon, mayo, parmesan cheese, seafood, tilapia

Yeah, tilapia!
You all know how much I love tilapia. Next to salmon and shrimp, it is one of my most favorite kinds of fish or seafood. It has a clean, mild flavor that is just…good. The whole family does a collective cheer if it shows up on the menu. In the spirit of doing something totally different, I started messing with this recipe, and it was a hit. After a few more times, it became a regular. It is so quick and so easy, I would consider it a crime if I didn’t share it here. It is exactly what Brittany’s Pantry is all about. Tried and tested recipes that work well, taste great, and that you are going to want to make again and again. Uh, yup! This checks every box! And did I mention it is fast?
I have a feeling that this is going to be one of those dishes that my kids end up serving when it is their turn to make dinner. Not yet, as they need a bit more practice before they get to use the hot oven, but I can see that day in the future! Just a few…more…years…
It is crazy quick and ridiculously simple, so pay attention to the cooking method. If you aren’t careful, you may miss it. But don’t be turned off by the ingredient list! Regardless of the butter and mayo, it comes out surprisingly light. Serve it along side some quick quinoa or brown rice and a stemmed green veggie and you have a healthy dinner in about 20 minutes. I’d say that earns another, yeah for tilapia!

Two Years Ago: Good For You Cranberry Chocolate Chip Cookies
Parmesan Tilapia
Recipe adapted from Allrecipes.com
1 1/2 lbs tilapia fillets, fresh or frozen (about 5 or 6)
1/4 c parmesan cheese
2 T soft butter
1 rounded T mayo
1 T lemon juice
1/4 tsp dried basil
1/8 tsp black pepper
1/8 tsp onion powder
1/8 tsp celery salt
Mix all ingredients together, except fish. Topping can be made one day ahead; just cover tightly and store in the fridge.
Preheat your ovens broiler and adjust the oven rack to be about 8 inches from the heat. Lay the tilapia fillets on a foil lined sheet pan, upside down. Broil about 2 minutes, or until the edges start to turn opaque. Carefully flip the fish and broil another 2-3 minutes, or until nearly cooked through. Remove from oven, and divide parmesan topping evenly among the fillets, spreading to cover thinly over the fish. Return to the oven and broil another 2 minutes, or until the topping is bubbly and just starting to brown.
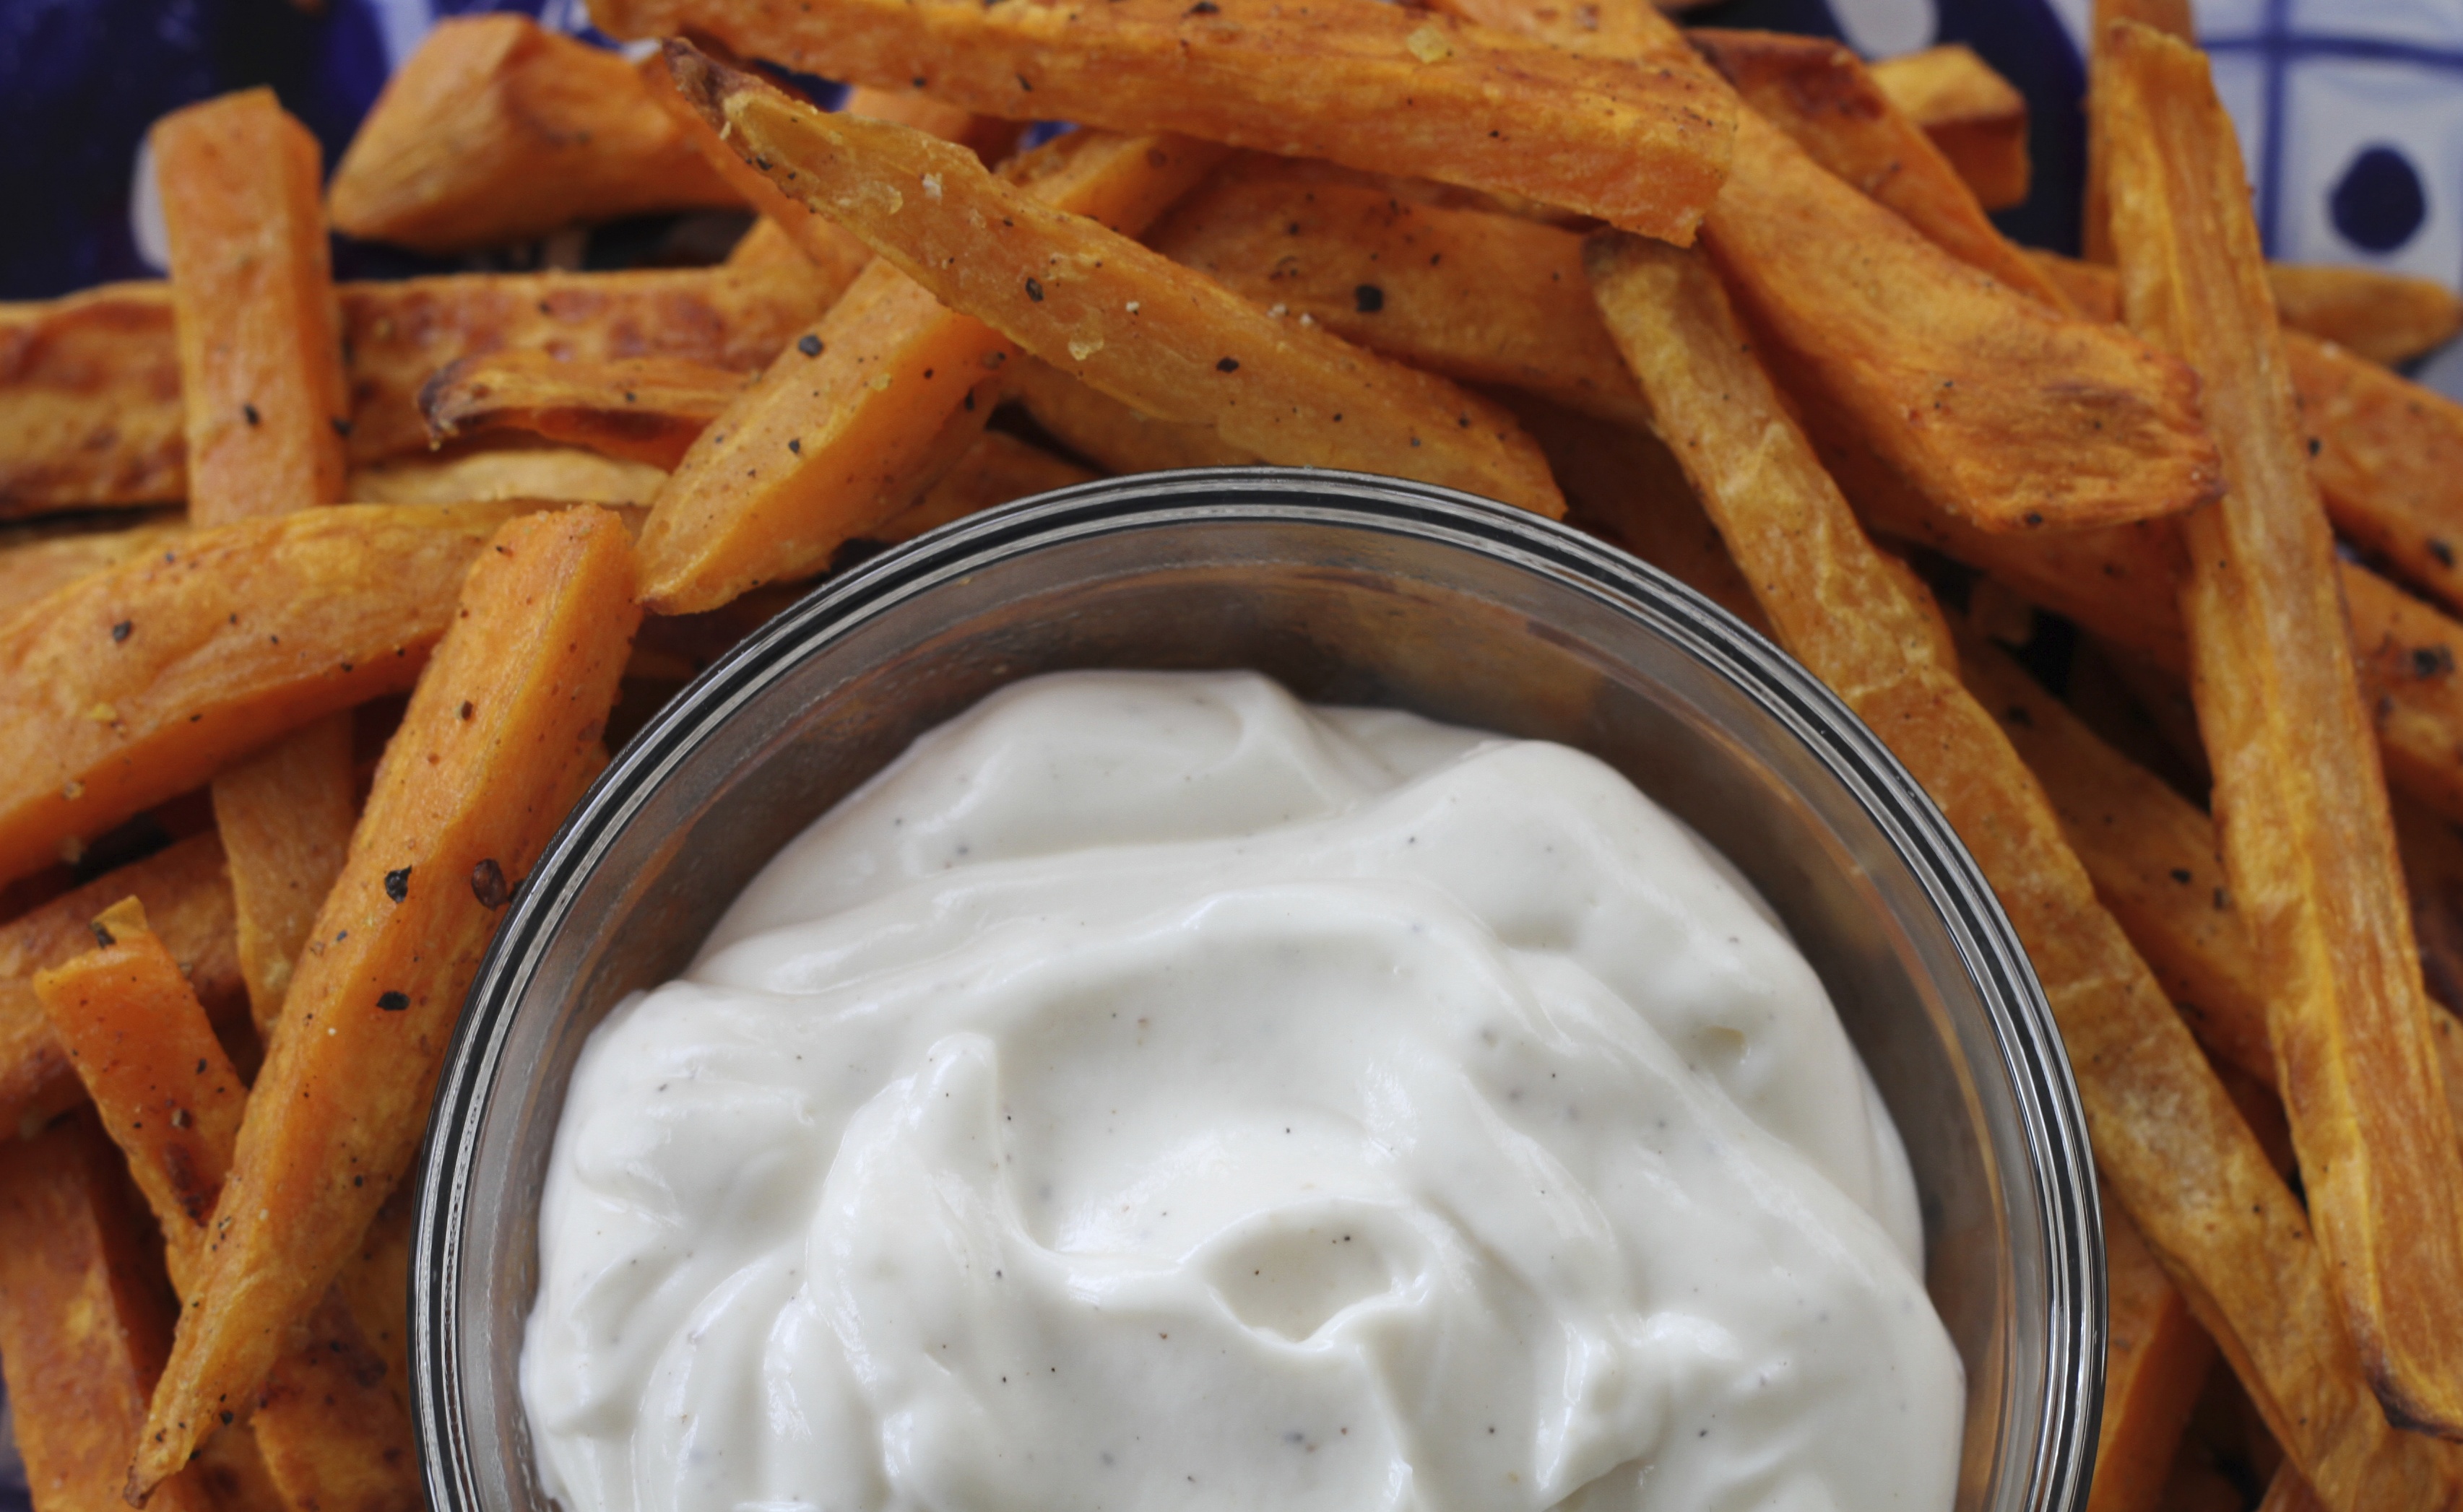
Sweet Potato Fries & Pepper Lime Mayo
Brittany wrote this on 11 April 2013![]() gluten-free, lime, mayo, sweet potatoes, vegetarian
gluten-free, lime, mayo, sweet potatoes, vegetarian

I love love love sharing recipes like this with you.
I love them because they take something as simple and humble as baked sticks of sweet potatoes and elevates them to a side dish or snack that you remember. Like the difference between wearing a little black dress on a date with your sweetie with 1.99 flip flops from Old Navy or these sandals from Yves Saint Laurent. It makes a difference. Can you eat sweet potato fries without this dip? Of course. But every once in awhile it is really nice to…well…dress up. You know?
This is especially good to serve guests as an appetizer. Just make a whole big tray of fries, dump them on a big platter and plunk this dip down with it. Healthy, easy to make ahead, and utterly snack-able. It is unexpected and fun without being all froophy. Yeah thats a made up word, but it fits here. And when you are finally able to brush the snow off your grill (sorry MN) and enjoy a burger, this dip is equally good smeared on a bun. Heck, we even dunk our carrot sticks in it. As it turns out, just like this dip, a sleep pair of black stilettos is a nice change of pace from flip flops.

One Year Ago: Cherry Frozen Yogurt W/Mini Chocolate Chips
Two Years Ago: Egg Ribbon Soup
Pepper Lime Mayo
Inspired by Giada
1 recipe sweet potato fries
1 heaping spoonful of sour cream
2 heaping spoonfuls of mayo
2 T lime juice
1/2 tsp pepper
salt to taste
Mix all ingredients together. Taste it. You should be able to taste the lime and it should thin it out a bit, but it shouldn’t be sour. And it should be peppery but not choke you. Add more lime juice and seasoning as needed. Serve with fries.
 Greetings!
Sorry I have been MIA for a week! I have been cooking and baking up a storm but it has been mostly new recipes and experiments. We were out of the state for several days and I literally didn’t even have time to sleep, let alone get any blogging done. Our two boys share a birthday and we had the opportunity to celebrate it with our families in Minnesota! Aren’t they cute?
 While it is nice to unplug sometimes, I uh…well…I missed you. I blog because I love it, and when life keeps me from my computer, I spend most of my time away writing recipes and posts to all of you in my head. Not like, love notes or anything. Food notes. Sheesh! This is one of those recipes!
To be fair, I feel like I should mention that this is SO not what I had planned on sharing today. I actually have another stellar scone recipe to pass along and my new go-to chocolate cupcake recipe. But until I get them finalized and dress them up fancy and take their picture, you get quesadillas! Healthy and flavorful, you can think of them as the ‘good’ food before the chocolatey ‘bad’!
This recipe has been years in the making. I keep messing with it, changing it, forgetting what I did last time and starting over. But eventually, I paid attention and became consistent. Aren’t you proud of me? 🙂 Sometimes some of the ingredients don’t make it in due to lack of proper grocery shopping (ahem), but in general, this is how I throw them together. They are so chock full of good things-heavy on the veggies and beans-that they are more than enough to satisfy for dinner!
 One Year Ago: Lime Sherbet Punch & Cream Cheese Banana Bread
Two Years Ago: Honey Carrots, Non-Traditional Shepherd’s Pie & One Bowl Chocolate Cake
Loaded Black Bean Quesadillas
Feel free to omit the chicken and make an entirely vegetarian dish! Check out the note below for a freezer tip!
2 T olive oil
1 onion, diced small
3 cloves garlic, minced
6-8 oz portabella or shitake mushrooms, diced small
2 huge handfuls fresh baby spinach
salt and pepper
1 1/2 tsp cumin
2 cans black beans, rinsed and drained
2 c cooked, shredded chicken
1/4 c salsa, plus additional for serving
2 c shredded cheese
8 whole wheat tortillas
salsa, sour cream, and diced avocado for serving
In a small bowl, mix together the chicken and the 1/4 c salsa. Set aside.
Drizzle the oil into a medium skillet over medium heat. Add the onion, garlic, mushrooms, and a bit of salt and pepper, and sauté until mushrooms are brown and the onions are translucent and caramelized, about 6 minutes or so. Add the cumin and heat together for an additional minute or two. Taste for seasoning. Add the spinach and stir and heat for another minute or two, until the spinach is wilted, but not mushy. Remove from heat and set aside.
In a large bowl, mash the rinsed and drained black beans with a potato masher (my personal weapon of choice) or a fork, until most of them are broken, but it is still chunky. We don’t want it smooth like baby food here people! Stir in the mushroom and spinach mixture. Taste for seasoning. Go ahead and add a little cayenne here if you like it spicy!
Smear 1/4 of the black bean mixture onto a tortilla, making sure to spread it evenly out to the edges. Top with some of the chicken and then sprinkle with cheese. Top with a second tortilla, and toast until crispy on the outside and melty on the inside. We like to use our panini maker, but a toaster oven, or dry, nonstick skillet is great too! Repeat with remaining ingredients and tortillas. Serve with more salsa, sour cream. and avocado!
NOTE: We usually can only eat two, full quesadillas in our family, but the there is the perfect amount of black bean mixture to make four. So usually, I use up all the chicken on only two of them, and I make the other two quesadillas vegetarian with just beans and cheese. Smoosh them together a bit, but don’t toast them! Put them on a sheet pan in the freezer and when they are solid, carefully place them in a gallon freezer bag and freeze for later. Then you can defrost a bit and toast as normal!
 When it comes right down to it, the fact that this dish has a no-cook sauce and that I can make it entirely in the blender…well…that is really what drew me to it originally. After I made it once, it was the flavor that drew me in. The second time I made it, I started adding vegetables. The next few times it barely made it to the table due to the extensive snitching that may or may not have been done by the chef. Kitchen rights, you know.
As it turns out, I am a bit amazed at the fact that I have only added to the original recipe. The flavor is so spot on, I have no improvements or detractions. Only the addition of vegetables and chicken to make it more of a well rounded meal. That said, this is very easy to make entirely vegetarian or to load it up with lean meat. The sauce can be thrown together in a matter of minutes and the entire she-bang can be made ahead of time to make an easy weeknight meal you can just pull right from the fridge and eat. Not bad for dinner out of a blender.

 One Year Ago: Chicken Tetrazzini
Two Years Ago: Crock-Pot Chocolate Mess
Peanut Noodles
Recipe adapted from Tyler Florence
As I mentioned above, these noodles are entirely customizable. Originally, they were meant to be eaten cold, but our family loves them warm. Do what we do and enjoy them fresh and then fight over the chilled leftovers the next day.
12 oz linguini, regular or whole wheat
3 T sesame oil
Sauce:
1 inch piece of fresh ginger, peeled and minced
2 cloves garlic
juice of 1 lime, about 1 1/2 T
1 tsp red chili paste
2 T brown sugar
3 T rice vinegar
3 T soy sauce, preferably low sodium
1/2 c creamy peanut butter
6-8 T hot water
Optional add ins:
1 1/2 c shredded, cooked chicken
2 carrots, peeled and grated
2 c fresh spinach, packed
1 bell pepper, chopped
2 green onions, chopped
1 T sesame seeds
red pepper flakes to taste
Cook the pasta according to package directions. Drain and toss with sesame oil. Set aside. In a blender, combine all the sauce ingredients except the water. Fear not! This is not a spicy sauce! Hence, the optional red pepper flakes. The red chile paste is all for flavor so don’t be tempted to skip it! Add the hot water, a tablespoon at a time, until the sauce is the consistency of heavy cream. Err on the side of thin if you are uncertain. Pour every bit of the sauce over the noodles and scrape the blender clean! The pasta will absorb the sauce so you want every drop! Toss in any add-ins you want (I recommend them all) and enjoy warm, or chill and eat cold.
Sweet Potato Hash
Brittany wrote this on 28 February 2013![]() eggs, gluten-free, onions, sausage, sweet potatoes
eggs, gluten-free, onions, sausage, sweet potatoes
 I made this for dinner last night and my husband was very upset with me. Not because we had Sweet Potato Hash for dinner, but because I was making it while he was on the treadmill.
He came up from the basement, panting and sweaty, with a scowl on his face. “Are you trying to torture me??” he exclaimed with more than a hint of annoyance in his voice. Whoops. I guess it was a long nine miles! 🙂
Of course, the beauty of hash is that you can throw anything in it. It goes back hundreds of years and usually consists of some type of meat and potatoes, diced small, and sautéed with onions and spices. You will see turkey hash around a lot after Thanksgiving, given the ease at which you can throw it together. An abundant amount of leftover meat? Check. Veggies? Check. The need to make something other than sandwiches? Check.
Leftover roast beef, potatoes, and veggies (carrots, broccoli, cauliflower, brussels sprouts, spinach, kale, & winter squash all work great) make an outstanding hash for dinner, but for breakfast (or in this case having breakfast for dinner) there is something about crispy sweet potatoes, melt in your mouth caramelized onions, and spicy sausage all topped with a hot fried egg; over easy of course because I am, after all, my Father’s daughter and that is just how I roll. If you brown the sausage ahead of time and keep it in the fridge or freezer you can make this hash on a Saturday morning without too much fuss. If you dice the potatoes and onions a day or two in advance (they will keep just fine in a sealed container in the fridge) it is even faster. It smells so good it will pull your family right out of bed. Or off a treadmill.
 One Year Ago: Bite-Sized Cinnamon Rolls & Roasted Sweet Potato Fries
Sweet Potato Hash
Obviously you can serve this with any type of egg you like. Or feel free to omit the egg or even the sausage. It is equally good any way you do it.
1/2 lb bulk breakfast sausage
3 or 4 large sweet potatoes, peeled and diced small (about 6 cups)
1 large onion, diced small
salt and pepper
2 T butter
2 T olive oil
1/4 c fresh chopped parsley
In a large skillet (cast iron works great) brown the sausage, drain, and set aside. In the same skillet (I like to wipe out most of the grease with a paper towel) add the olive oil and butter and let melt over medium heat. The butter is for flavor and the oil is to keep it all from burning. Add the potatoes and onions, toss to coat, and let sit for several minutes to brown. Continue to stir and leave them be for several minutes, allowing them to get crispy on all sides. Cook until potatoes are tender when pierced with a fork, maybe 20 minutes, depending on how big or small your potatoes are diced. Add the sausage back in and heat together, tossing well. Taste for seasoning, being careful not to add too much salt as the sausage already adds quite a bit! Add the chopped parsley and top with fried, poached, or scrambled eggs. Enjoy!
Note: If I have it, I like to add fresh thyme, but don’t use dried! Also, chopped garlic is good in here, but we found we prefer it left out so that the flavors of the sausage and potatoes shine through a bit more. Fresh diced mushrooms are stellar too!
 If you are a regular reader of this blog, you know that I only post recipes that I make regularly; recipes that have made an appearance on my table several times and will continue to do so long after these words are archived. I have actually been making this dish for years and haven’t ever posted it here because…well…I guess I wanted to keep a little mystery. I liked having something in my back pocket that my friends had never seen before, even if my family has been eating it once a month. I didn’t want to share it with anyone and instead, just revel in its simplicity and goodness all by myself.
Well, ok. Not by myself. Technically this recipe is Ina Garten’s and technically it is posted on the food network website and is included in her cookbook, Barefoot Contessa: Family Style. Not exactly a secret. As it happens, there are so many versions of this dish, all with just subtle variations from each other. Generally, I just stick with this one. I cook it from memory, sometimes adding crushed red pepper flakes for a little kick, sometimes not. The point is, this is a classic. A simple, fast, easy, fantastically tasty dish that you will make over and over. It will become a staple, a go-to, a regular. And regardless of wether or not you get the recipe from me, a cookbook, or from another website, I hope you enjoy it. Maybe it will even add a little mystery to your life.

 One Year Ago: Buttermilk Brownies & Strawberry Avocado Salad
Lemon & Garlic Shrimp Linguini
Adapted from Ina Garten
3/4 lb linguini
1 lb medium shrimp, peeled and deveined
3 T butter
2 T olive oil
salt and pepper
2 cloves garlic, minced
zest of 1/2 lemon
juice of 1/2 lemon
1/4 c chopped fresh parsley
Cook pasta according to package directions. Meanwhile, over medium heat, melt the butter and olive oil in a large skillet. Add the garlic, and let it heat till fragrant, but not burnt, about 30 seconds. Add the shrimp and sauté, tossing gently, for 2 minutes. Season with salt and pepper and add the lemon zest and juice. Heat together, lowering the heat if necessary so as not to overcook the shrimp. Add the pasta and the parsley, toss everything together, taste for seasoning, and serve immediately.
 Quite simply, sometimes a recipe will just surprise you. Much like the skinny jean craze. I didn’t see that coming.
Anyway, I was watching Food Network about a million years ago, and saw Robin Miller make a version of this dish. What I liked about it was that it used a few shortcuts (jarred marinara and canned mushrooms) but didn’t rely on a store bought pie crust, puff pastry, or salty refrigerator biscuits (blehg) for the crust. Not that there is anything wrong with that, but health wise, I would rather make it myself. The topping on this casserole bakes up like magic! Pour it on and a half hour later it has puffed up to a soft, cheesy, ‘pizza crust or gooey breadstick like’ hat! Quick, super simple, and kind of amazingly tasty.
I sent this recipe to a few of my friends-all Moms with little ones and busy lives-just to see how it would do. They loved it and even made a few adjustments of their own that I kept in the final recipe. I’m thinking I should have them road test my recipes more often!!
You can easily make this in two installments in order to save you a few minutes on a weeknight. The filling can be made a day or two before you bake the final dish. Just store it in the fridge and make the topping just before you slide it into the oven. It also freezes well, so baked leftovers can be cooled, cut into single serving sizes, and popped into the freezer in small, re-heatable containers; perfect to grab for lunch when you are headed out the door to work.
Warm, hearty, and just the thing for winter.
 One Year Ago: Lemon Potatoes
Two Years Ago: We were remodeling our house and I had no kitchen!
Upside-Down Pizza Casserole
Adapted from Robin Miller
I haven’t gotten around to it yet, but much like everything else, I plan to try using the white whole wheat flour in this and see how it bakes up. If you try it before me, let me know how it goes!
Filling:
2 links (about 8 oz or so) sweet or spicy italian sausage, removed of casing
1 small onion, diced
1 can (6 oz) sliced mushrooms, drained
1/4 c sliced black olives
1/2 jar good marinara sauce
Topping:
2 c shredded mozzarella
1/2 c flour
2 T grated parmesan cheese
1/4 tsp garlic powder
1 egg
1 c milk
1 tsp dried parsley
Preheat the oven to 400 degrees.
To make the filling, brown the sausage with the onion until cooked through. Drain off any excess fat if necessary. Add the mushrooms, olives, and sauce. Heat through. Pour into a sprayed 9X9 glass baking dish or other similar sized casserole dish. Set aside.
In a small bowl, whisk together the flour, parmesan cheese, and garlic powder. Add the egg and milk and whisk until smooth. Sprinkle the mozzarella cheese on top of the sausage filling and pour the crust evenly over the top. Its OK if it doesn’t hit every spot; it will spread in the oven. Sprinkle the top with dried parsley and bake for 25 minutes, or until bubbly around the edges and the curst has baked up and is firm. Cool for a few minutes before serving. Enjoy!
Roasted Garlic Sandwich Spread & Mason Jars In The Fridge
Brittany wrote this on 16 February 2013![]() garlic, gluten-free, mayo, vegetarian
garlic, gluten-free, mayo, vegetarian
 I was mixing up this spread and found myself telling my husband this story:
When I was a kid, there was always a quart mason jar in the back of the fridge filled with what looked like mayonnaise, but that I knew was really filled with a strong smelling garlic concoction my dad used to make. It was bright snowy white and every time it was opened it made our whole house smell like raw garlic. I actually have no idea what all he put in it, but I am assuming it was a kind of garlic oleo; I only have a vague memory of it being mixed up in a blender. It lasted forever and didn’t seem to spoil or go bad! My dad smeared it on meatloaf sandwiches (now that I am older than six this sounds incredible), cold cuts, and just about anything else you can put between two pieces of bread.
The first time I threw this in my little mini food processor, I giggled to myself and thought about how much roasted garlic I would need to make a whole quart of this! The second time I made it, I had a momentary lapse in judgement and planned on making mayo from scratch and then adding the roasted garlic to make the same spread, but even BETTER! Then my 10 month old started chewing on my pant leg (because he is teething, not out of hunger :), my daughter needed help with her spelling words, and Eli walked into the kitchen in tears because the fort he was making out of couch cushions wouldn’t stay up. So I abandoned my ambitions of homemade mayo (at least for now) and stuck with the realistic process of throwing a few ingredients in the processor and whizzing away! I keep thinking I will change this recipe and tweak it a bit, but I never really do. It tastes so amazing, why change what works? On the off chance that you want to fill a quart mason jar and stash it in the back of your fridge, I recommend multiplying the recipe by eight.

 One Year Ago: Party Potatoes & Hot Chocolate #3
Two Years Ago: Honey Bran Muffins & Freezer Coffee Cake
Roasted Garlic Spread
Want to make this even more amazing? Add a tiny squirt of dijon mustard to taste or even a bit of honey. Heck! Add both! Then smear it on a panini or broiled chicken. Just make sure you are close to your counter or a sturdy chair because it may make you swoon.
1 recipe (two whole bulbs) of Roasted Garlic
1/2 c mayo-canola or olive oil mayo is great
just a pinch of salt and pepper
Whiz all ingredients in a mini food processor until smooth. Taste for seasoning. Store in the fridge and use on sandwiches or panini. Alternatively, chop or mash the roasted garlic and just stir the ingredients together in a bowl.
Note: If you double the amount of mayo, it makes a great dip for veggies or chips!
How To: Roast Garlic
Brittany wrote this on 12 February 2013![]() garlic, gluten-free, How To, vegetarian
garlic, gluten-free, How To, vegetarian
 Roasted garlic! Finally!
I have been meaning to blog about this for forEVER! If you have never done it before, you are in for a tremendous treat! Not only is it ridiculously easy, but once you eat it and cook with it, you will wonder how you ever got along without it. I will post some recipes using roasted garlic in the future, but for now, here is your step by step instructions. Lets get started!
 Roasted Garlic
2-3 heads (or bulbs) of garlic
olive oil
salt and pepper
In the above picture you can see three heads, or bulbs of garlic. Just to be clear, the individual pieces are called cloves. If you are going to roast garlic, I recommend doing at least 2 heads so that you have enough to use in a recipe, but you can do as many or as few as you want! Generally, you should avoid any heads that have green shoots growing from them as this some times makes the garlic kind of bitter. Look for bulbs that are nice and tight with no blemishes.
 First, cut the head of garlic in half, crosswise-not stem to stem, exposing the individual cloves.
 Depending on the size of your bulb, this may take some muscle. It will also smell great. Mmm. Fresh garlic…Remove any extra paper skin from the outside, leaving just enough to hold the cloves together.
 Place the garlic halves on a small piece of aluminum foil. Aren’t they pretty? I love garlic.
 Drizzle with olive oil.
 Sprinkle lightly with salt and pepper.
 If you want to be like me, fold the foil into a nice little packet, leaving room for air to circulate. If you are less particular, just gather up the foil and wrap it up. Its all good.

 Isn’t it cute? Now throw that puppy in a 350 degree oven for about a half hour. You want the garlic soft and buttery.
This is where you can mess with the process a bit. Sometimes I put it in the toaster oven. If I am already using my oven for something, I will throw garlic in to save time. If the oven is set lower, I roast the garlic a little longer and vice versa. As long as the oven isn’t set really hot, because then the garlic might burn. And burned garlic is NOT yummy.
 Behold! The sweet goodness of roasted garlic! Your house will smell so good, do not open your windows unless you want the neighbors to come running. At this point, I suggest popping out a clove and just eating one straight up. No sharp garlic taste, just unbelievable sweetness and amazing flavor. So now what do you do?
 Grab one half and gently squeeze the whole thing into a small bowl. The cloves will pop right out. You may have to turn it and squeeze again to get all of them out, but the skins generally stay put. You can leave them like this, or…
 …mash with a fork. Either way you can eat it just like this.
 Smear it on a piece of bread, a sandwich or mix it into a bazillion different things.
Uses for roasted garlic (including but not limited to):
* turn it into a dip
* stir it into mashed potatoes
* mash and smear on a pizza, or leave the cloves whole and sprinkle them on
* stir the cloves into cooked brown rice with salt and pepper and plenty of freshly chopped parsley
* add it to an alfredo sauce and toss with the pasta of your choice
* add it to your favorite mac & cheese recipe
* toss it with steamed green beans
* mix it into scrambled eggs
* top a salad with it
* stir it into your favorite potato salad
* puree it into hummus
* marinade freshly chopped tomatoes with roasted garlic, olive oil, salt and pepper, and a splash of red wine vinegar then top crostini with it
Leave your favorite ideas in the comments below and enjoy!
Love a Good Recipe?

Then you’ve come to the right place! I’m Brittany, and I share tested, trusted recipes you’ll love. I prepare & photograph food, obsess over the perfect recipe, and enjoy grins of delight when I serve up something awesome. Enjoy!


