 Brittany's Pantry
Spring Asparagus W/Raspberry Vinaigrette & Walnuts
Brittany wrote this on 23 April 2013![]() asparagus, gluten-free, raspberries, vegetarian, walnuts
asparagus, gluten-free, raspberries, vegetarian, walnuts
Its spring! And spring means asparagus!
My family and I wait all year for asparagus to fill the farmer’s markets and grocery stores. I know that nowadays we can get it imported from Peru and thus enjoy it year round, but I prefer to eat it in season from as local of sources as I can. And now is the time, people. Now is the time!
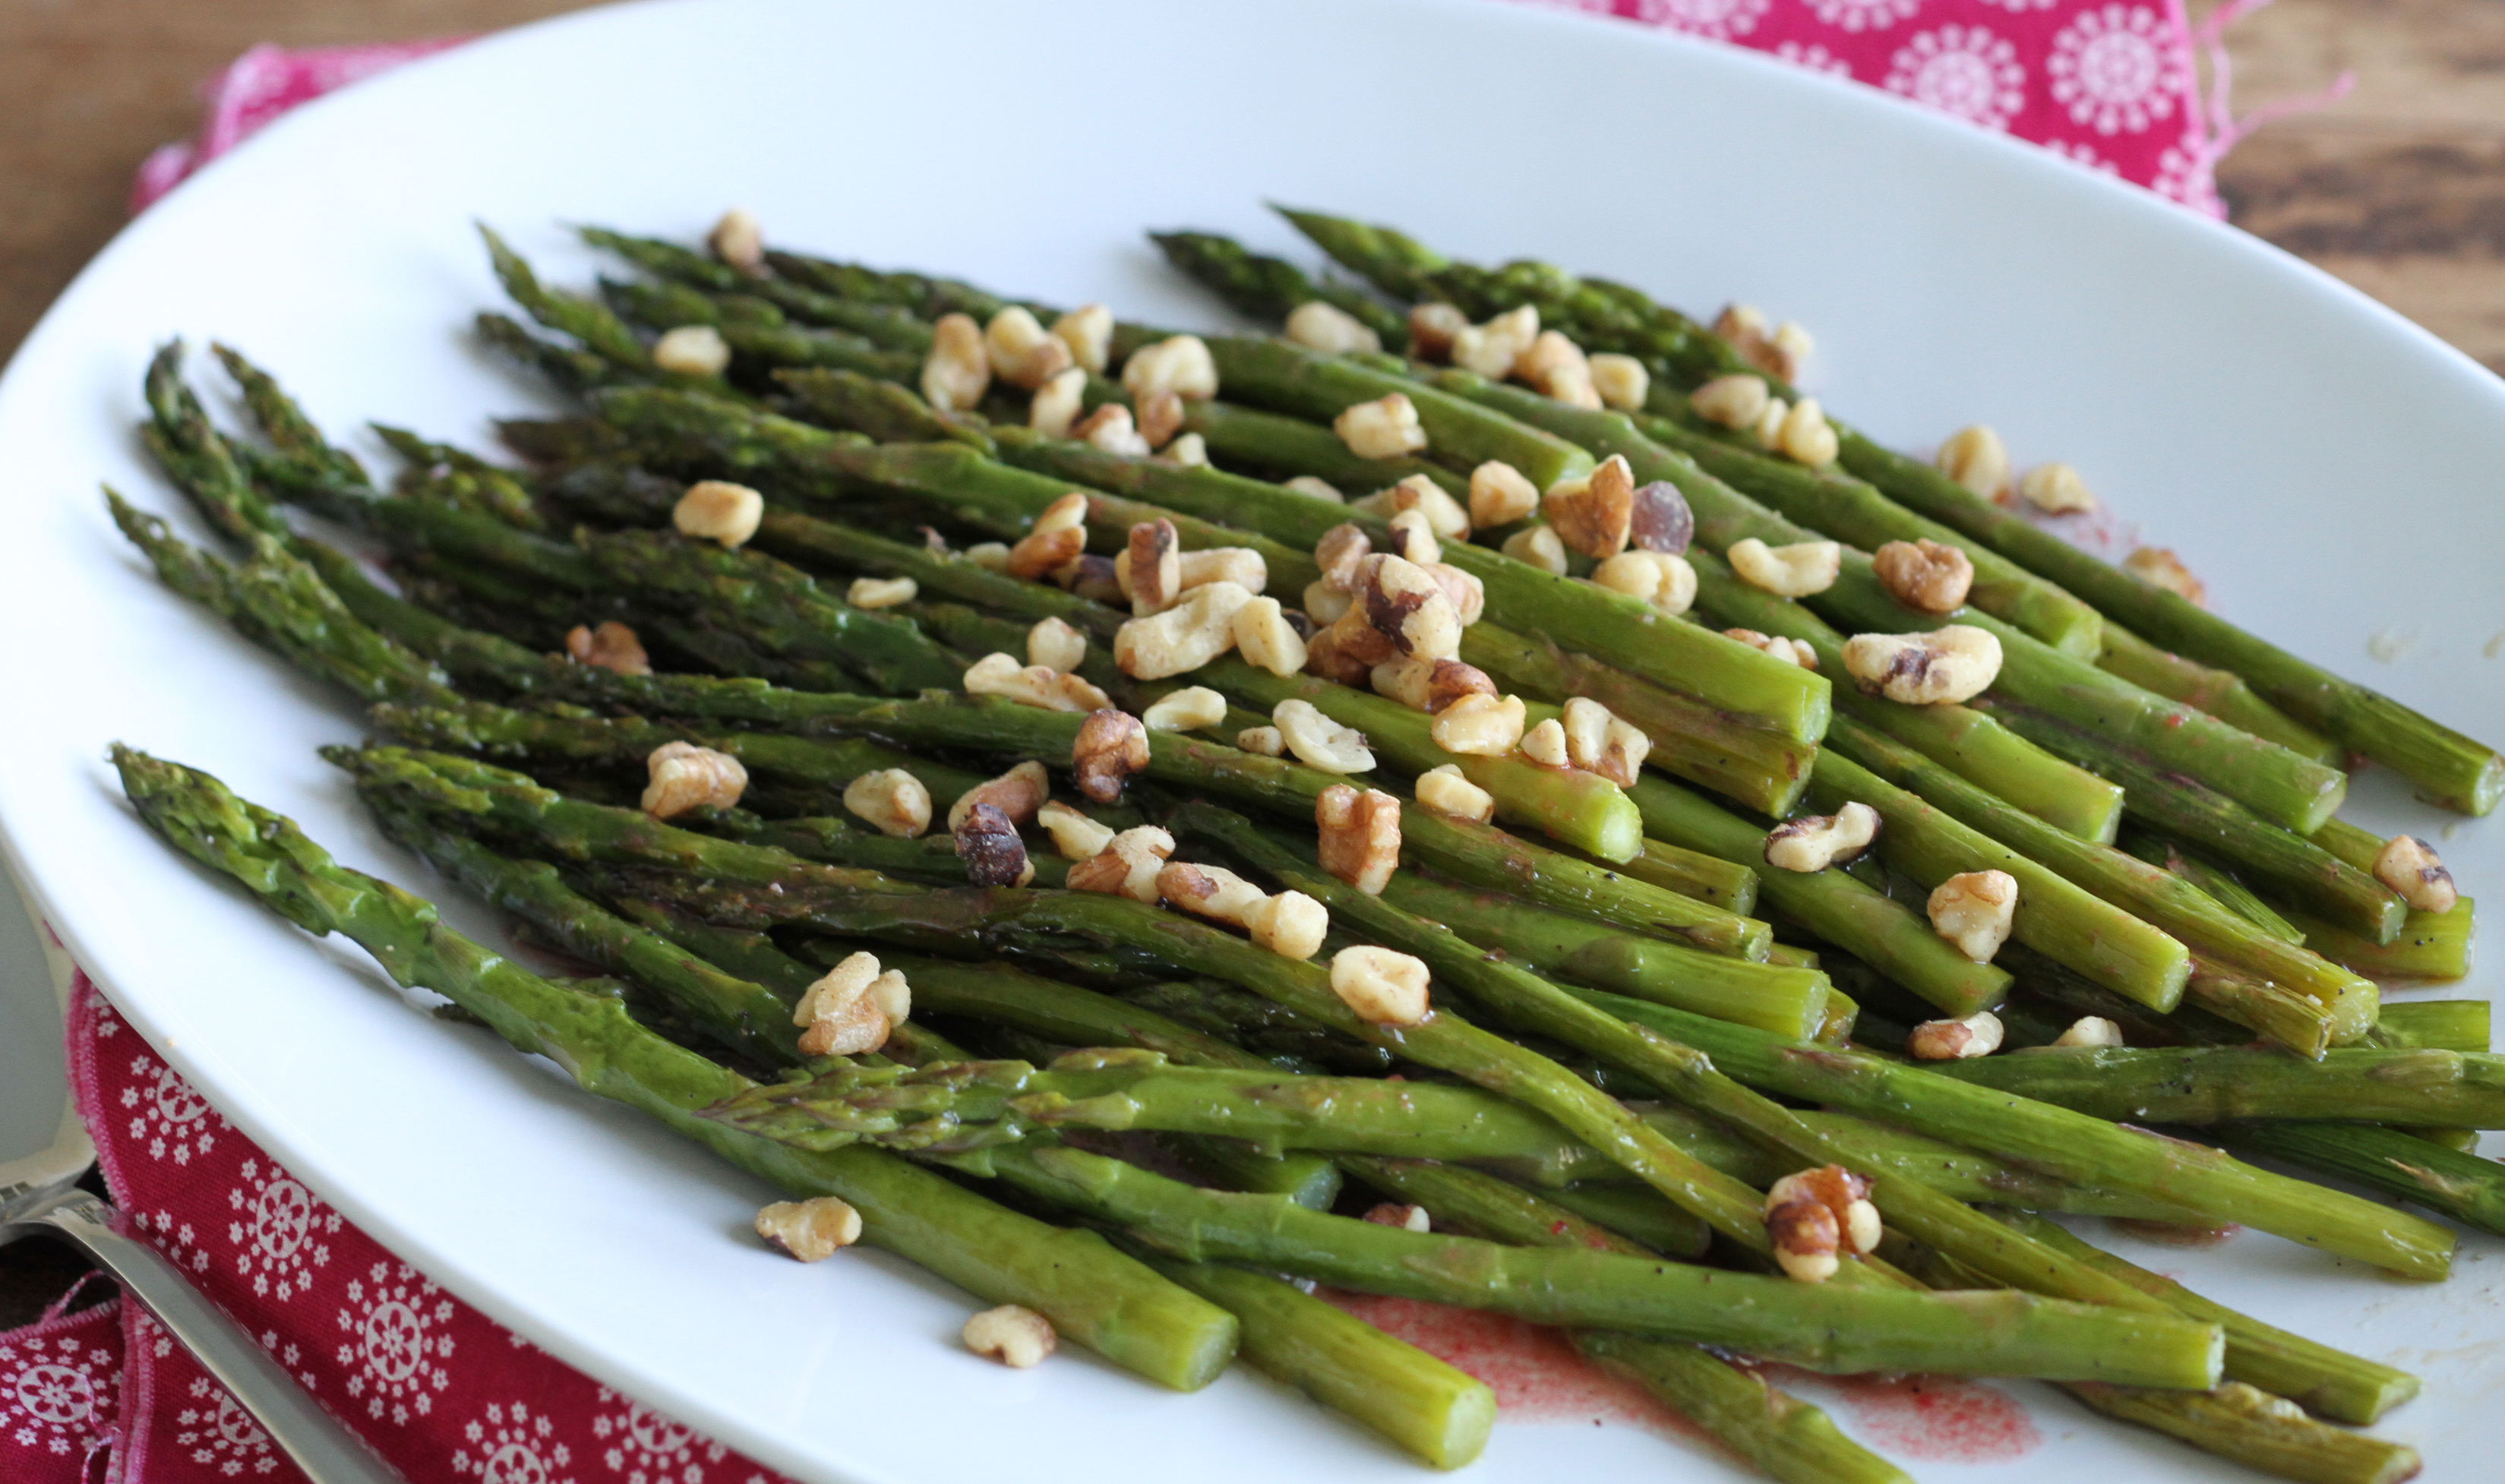
Of course, its abundance is the reason for this timely post! Years ago, my good friend used to cater with a dish similar to this. Served cold, it is the most lovely thing to nibble on while mingling in a crowd. As a matter of fact, this exact dish (but made with bottled dressing) converted my best friend to an asparagus eater! I had blanched and chilled a few pounds of it, intending to serve it later for dinner, and she grabbed a spear, dipped it in a raspberry walnut vinaigrette, and it changed her life forever. I am happy to report that she is now a die hard fan of asparagus, after having previously sworn off ever eating the stuff. I am telling you. This recipe has magical powers.
Just think of it as a kind of salad. Room temp or cold, the flavor of the fresh vegetables with the bright tang of the vinaigrette is a surprise that you wouldn’t think would be so amazing. Add some toasted walnuts on top, and you have a side dish-or even the base of a light lunch-that is worth celebrating.

One Year Ago: Fruit Dip
Two Years Ago: Breakfast Burritos
Spring Asparagus W/Raspberry Vinaigrette & Walnuts
I highly recommend throwing a fillet or two of grilled salmon on top of this for dinner.
2 lbs fresh asparagus, woody ends trimmed
1/2 c oil-canola, extra virgin olive oil, grapeseed, or a combo
6 raspberries-1/4 c raspberries, fresh or frozen
pinch of salt
black pepper
1 T honey
1 tsp dijon mustard
1/4 c chopped walnuts, toasted *see note*
Cook the asparagus until crisp tender. You can roast it, which is my preferred method, or blanch the spears in boiling water for a few minutes, shock them in a water bath, and then drain thoroughly. Be sure not to over cook them! Either way, arrange the asparagus warm, room temp, or cold, on a large platter. Meanwhile, place all the vinaigrette ingredients in a small food processor or blender. Use 6 raspberries if you want a very subtle, mild, fruit flavor. Use a full fourth of a cup if you want a stronger, more pronounced flavor. Both ways are fantastic. Blend until smooth. Taste for seasoning and don’t skimp on the black pepper! Pour the dressing through a fine mesh sieve, pressing to extract all juice and flavor from any solids. This step is optional, but I always do it because I really hate seeds in my food. Drizzle the asparagus lightly with the vinaigrette-you will use about 1/3 of the dressing. Top with walnuts. This can be made an hour or two ahead of time. Just wait to top with walnuts until the end so that they stay nice and crunchy! Enjoy!
*Note* The reason certain recipes call for toasting nuts before using them is to bring out their flavor. The heat makes the oils in them rise to the surface, thus leading to much tasty nut! The difference in taste between toasted and un-toasted nuts is huge. To toast walnuts, or really any kind of nut, place them in a dry sauté pan over low heat, tossing occasionally. When you can smell them, they are done! Alternatively, I like to just throw them in the oven on a dry sheet pan at around 350. It only takes a few minutes, so watch carefully! Let them cool a bit before you pop one in your mouth. They will be crazy hot!

How To: Basic Quinoa
Brittany wrote this on 20 April 2013![]() gluten-free, How To, quinoa
gluten-free, How To, quinoa
 Over time, there are some things that eventually become part of your life, even if they never made an appearance in it before.
My children, high heels, heirloom tomatoes and kale, my MacBook-all these things that were previously absent from my life, but now are permanent fixtures. I could easily add quinoa to that list. Though not a food that I have a long history with, it has become a staple in my kitchen. Quinoa just kind of showed up, said all the right things, did all the right things…wooed me a bit, and I let it stay. And believe you me, that is not always the case. Lentils for example. They came, I ate them, I cursed them, and they left. I don’t care what anyone says. Lentils taste like dirt.
But back to quinoa. Oh! wonderful quinoa. All that nutrition stuff they talk about is true, so just trust me: its good for you. Like, crazy good for you. While I tend to veer in the opposite direction of food trends, i.e. bloggers putting nutella on everything, the fact that quinoa has gotten so popular is just good sense! Finally! Something caught on that wasn’t ridiculous! Some of the reasons why I am so fond of quinoa are (and these are in no particular order) it cooks faster than brown rice, the flavor is mild and kind of nutty and nice, its fluffy like pasta but its gluten free, and it is really versatile. I add plain cooked quinoa to my Sloppy Joes and soon, I am going to try it in my granola. Yup. Quinoa for breakfast. It’s everywhere, man.
 This is what I make when I just need basic quinoa. Nothing fancy, nothing involved, just plain. Something I can serve with fish or seafood and have leftovers to do with as I please. My kids love it stirred into scrambled eggs where its chewiness gives fantastic texture. I have tried using the package directions, but it always comes out kind of wet. My version uses less liquid, but steams it for a bit at the end. It is much more fluffy than regular methods and is easier to add to other recipes, like the sloppy joes or scrambled eggs I mentioned above. So after some trial and error, this is now what I stick to. It has never failed me. Unlike lentils.
So lets get started.
One Year Ago: Freezer Fajitas
Two Years Ago: Banana Chocolate Chip Muffins, Mexican Rice W/Black Beans, Pasta W/Zesty Bolognese
Basic Quinoa (pronounced keen-wah)
I like the Bob’s Red Mill brand. It is organic and I get exactly two batches out of a bag. In turn, I sometimes get two or three different meals out of a batch. We eat it as a side dish, add some leftovers to eggs for breakfast, and maybe stir some into muffins or pancakes. Once cooled, it freezes great! Just make sure it is sealed well and it will last for a month or two.
2 c quinoa, white or red or a mix of both
3 c liquid (all water or all chicken or veggie broth or a 50/50 mix)
pinch of salt
Start by rinsing the quinoa. Some people say this isn’t necessary due to the fact that almost all varieties of quinoa come pre-rinsed now. But quinoa has a natural coating on it that makes it bitter-blegh-and since it is easily rinsed off, I err on the side of caution and just always rinse. Years ago, I made quinoa and didn’t rinse it and it was so ishy I had to throw it out. So, safety first. Rinse the quinoa. Just measure it into a fine mesh sieve and rinse well with cold water. No biggy.
 Dump it into a medium sauce pan that has a lid.
 Add your liquid and put over medium high heat.
 Bring it up to a low boil, stirring occasionally. Once it is boiling lower the heat and reduce it to a simmer. Cover with a lid, cracking it to vent just a bit. This keeps it from bubbling over.
 Set your timer for 10 minutes, stirring after five. This gives the quinoa about 15 total minutes of cooking. Once the 10 minutes are up, it should be almost dry. Remove it from the heat, snuggle the lid on tight, and let it steam until you are ready for it. At least five minutes, or as much as twenty.
 Beautiful! Stir and fluff and eat! Remember, this is just plain. A little salt and pepper and it is lovely with fish or roasted meats. Now is the time to toss it with roasted veggies, parmesan cheese, fresh herbs, whatever you like!
 Enjoy!
Parmesan Tilapia
Brittany wrote this on 15 April 2013![]() fish, gluten-free, lemon, mayo, parmesan cheese, seafood, tilapia
fish, gluten-free, lemon, mayo, parmesan cheese, seafood, tilapia

Yeah, tilapia!
You all know how much I love tilapia. Next to salmon and shrimp, it is one of my most favorite kinds of fish or seafood. It has a clean, mild flavor that is just…good. The whole family does a collective cheer if it shows up on the menu. In the spirit of doing something totally different, I started messing with this recipe, and it was a hit. After a few more times, it became a regular. It is so quick and so easy, I would consider it a crime if I didn’t share it here. It is exactly what Brittany’s Pantry is all about. Tried and tested recipes that work well, taste great, and that you are going to want to make again and again. Uh, yup! This checks every box! And did I mention it is fast?
I have a feeling that this is going to be one of those dishes that my kids end up serving when it is their turn to make dinner. Not yet, as they need a bit more practice before they get to use the hot oven, but I can see that day in the future! Just a few…more…years…
It is crazy quick and ridiculously simple, so pay attention to the cooking method. If you aren’t careful, you may miss it. But don’t be turned off by the ingredient list! Regardless of the butter and mayo, it comes out surprisingly light. Serve it along side some quick quinoa or brown rice and a stemmed green veggie and you have a healthy dinner in about 20 minutes. I’d say that earns another, yeah for tilapia!

Two Years Ago: Good For You Cranberry Chocolate Chip Cookies
Parmesan Tilapia
Recipe adapted from Allrecipes.com
1 1/2 lbs tilapia fillets, fresh or frozen (about 5 or 6)
1/4 c parmesan cheese
2 T soft butter
1 rounded T mayo
1 T lemon juice
1/4 tsp dried basil
1/8 tsp black pepper
1/8 tsp onion powder
1/8 tsp celery salt
Mix all ingredients together, except fish. Topping can be made one day ahead; just cover tightly and store in the fridge.
Preheat your ovens broiler and adjust the oven rack to be about 8 inches from the heat. Lay the tilapia fillets on a foil lined sheet pan, upside down. Broil about 2 minutes, or until the edges start to turn opaque. Carefully flip the fish and broil another 2-3 minutes, or until nearly cooked through. Remove from oven, and divide parmesan topping evenly among the fillets, spreading to cover thinly over the fish. Return to the oven and broil another 2 minutes, or until the topping is bubbly and just starting to brown.
Love a Good Recipe?

Then you’ve come to the right place! I’m Brittany, and I share tested, trusted recipes you’ll love. I prepare & photograph food, obsess over the perfect recipe, and enjoy grins of delight when I serve up something awesome. Enjoy!

