 Brittany's Pantry
 One of my great pleasures in life is when I turn to my husband and say, “What do you want for your Father’s Day dinner?” I love to make food for the people I love and making something that they have requested is even better. The satisfaction of preparing something for them that is what they really want and not just what is for dinner, well, it fills me with joy. It is part of the whole ‘taking care of the ones I love’ sort of mumbo jumbo. Hence, the whole reason for writing this blog for you. Providing food for your family is one of the most basic needs we have. Fulfilling that need with care, dedication, and creativity is one of the easiest ways for me to show that love. Not just to my husband and my kids but to my family and friends, our neighbors, and our co-workers. If this blog makes that party of your life easier or more fun, then it really makes me a happy camper!
Food shows you care. And Rum Raisin Rice Pudding shows you care A LOT! Psst! Be careful who you serve it to! They may instantly fall in love with you!
The first time I made this recipe, I was totally blow away. Every kind of rice pudding I had ever had was cold, sticky, tasteless and bland, and the rice was hard and chewy. Not good. But it was a cold winter night and I was sucked in by Ina’s promise that this rice pudding would turn out creamy and wonderful. The immediate sparkle that appeared in Mike’s eyes when I mentioned it-and my brother’s too, who happened to be visiting that night-was enough to make me sigh and make it up.
Oh. My. Goodness.
I knew at that moment that my life would never be the same. Pure decadence. So rich. So creamy. Soooo unhealthy. Its a good thing we have saved this for a special occasion dessert. It is way to tempting to have around on a regular basis. Trust me when I say that its force is too powerful to resist.
That first time we ate it warm, but I was excited to chill it and have it cold the next day; you know, test it to see which way I liked it better. The recipe, after all, serves 6-8. No chance. We ate it all-well, my brother ate at least half-and there were no leftovers. The second time I made it there was very little leftover, but alas, just enough to confirm its wonderfulness when cold.
And when Mike requested Rum Raisin Rice Pudding for his Father’s Day dessert, I jumped at the chance to show him how much I loved him. So…who will you share a bowl with?


 Rum Raisin Rice Pudding
Adapted from Ina Garten
3/4 c raisins
2 T dark rum
Combine in a small bowl and set aside, tossing occasionally.
3/4 c white basmati rice
1/2 tsp salt
5 c half & half, divided
1/2 c sugar
1 egg, beaten
1 1/2 tsp vanilla
In a large saucepan, stir together the rice, salt, and 1 1/2 c water. Bring to a boil and then simmer, covered, on very low heat for 7 or 8 minutes, until most of the water is absorbed. Stir in 4 cups of the half & half and the sugar and bring to a boil. Lower the heat and simmer, uncovered for 25 minutes, until the rice is very soft. Stir often so that it cooks evenly and doesn’t scorch, especially at the end when it starts to get thick. Slowly stir in the beaten egg and continue to cook for 1 minute. Turn off the heat and add the last cup of half & half, the vanilla, and the raisins with any remaining rum. Stir well. You can serve it right away, nice and warm, but if you intend to let it sit for any length of time (10 minutes or 10 hours) place a piece of plastic wrap directly on the surface of the pudding to prevent a skin from forming. This is excellent for breakfast. Serves 6-8, or 2 adults and my brother Travis.

Chocolate Chip Blonde Brownies: Memories
Brittany wrote this on 14 June 2011![]() chocolate
chocolate
 So..these are Chocolate Chip Blonde Brownies. Okay. Commence with drooling, yearning, longing, and dreaming about these wonderful bars.
Go ahead…I’ll wait…
Can we continue? Okay.
First of all, I have been absent the last few days due to a minor neck injury and sitting at a computer was, and is, sorta painful. I am suffering through the discomfort to post this recipe because everyone out there should have access to these and I can’t, in good conscience, keep them to myself any longer. Posting the recipe here for all of you seems like a better choice than shouting it from the rooftops! Ironically, the bars themselves have also kept me away from the computer (No-not because I was too busy eating them). I’ll try to explain.
There are certain foods that evoke memories in all of us. A favorite meal or food or smell that takes you to that time and place. In my experience, these ‘food memories’ have great power. One tiny whiff of Spiced Nuts and I am instantly transported to my parent’s kitchen, watching my Mother carefully turn the steaming glob of cinnamon spiced snacks in a pan on the stove. I can’t make Tator-Tot Casserole without smiling and thinking of my sister. And don’t even get me started about the ache in my heart when I eat Rose Lake walleye. These bars are part of that elite grouping of foods. Everything about them fills me with the sights, sounds, smells, and memories of dear friends. How can I possibly convey the emotions this simple dessert wells up in me?! *sigh* I won’t bore you with my ramblings as it would take way too long anyway. Suffice to say that these bars fill me with joy, and I hope you love them as much as I do.
Speaking of bars, anyone who has ever eaten in the 4-H building at the Minnesota State Fair may recall this fantastic dessert. The two very special ladies who introduced me to these made them for years, and to my knowledge, they are still served there today. While working there, I myself baked thousands of them (literally, not kidding) and probably snitched hundreds. Okay dozens, at least. I have no idea where the recipe comes from, but the creator was a genius. Just the smell of them baking will make your heart race with anticipation. They are gooey, chewy, and decadently rich. Unfortunately, they are also ridiculously easy, giving you no excuse not to indulge in them whenever the mood strikes. And it will strike often! So mix up a batch and make some memories! Because sharing them with those you love makes that a virtual certainty.


 Chocolate Chip Blonde Brownies
These bars are the perfect ‘mix and dump’ kind of recipe. They are fast, super easy, and my fall back recipe when I need to bring something to a pot luck at the last minute! Made a day ahead, they are a convenient dessert for a BBQ. They also freeze wonderfully, but we rarely have any left to save for later.
2 c brown sugar
2 eggs
2 T water
2/3 c oil
1 1/2 tsp vanilla
2 c flour
1 1/2 tsp baking powder
1/4 tsp baking soda
1/2 tsp salt
1- 1 1/4 c chocolate chips (I like 1 c, but add more if you prefer)
Using a hand mixer or stand mixer, blend the first five ingredients together until smooth. Add the dry ingredients (not the chocolate chips), and mix until combined. The batter will be thick, sticky and look like carmel! Spread into a sprayed 9X13 pan and sprinkle the chocolate chips evenly over the top. Bake at 350 degrees for 30-35 minutes or until evenly golden brown across the top. The edges will be higher than the rest of the pan and this is what you want! Cool completely in pan (I realize this may take an absurd amount of self control, but do the best you can!) and cut into squares. Twenty four bars (4X6) seems to be the perfect size bar.
Strawberry Sauce
Brittany wrote this on 10 June 2011![]() strawberries
strawberries
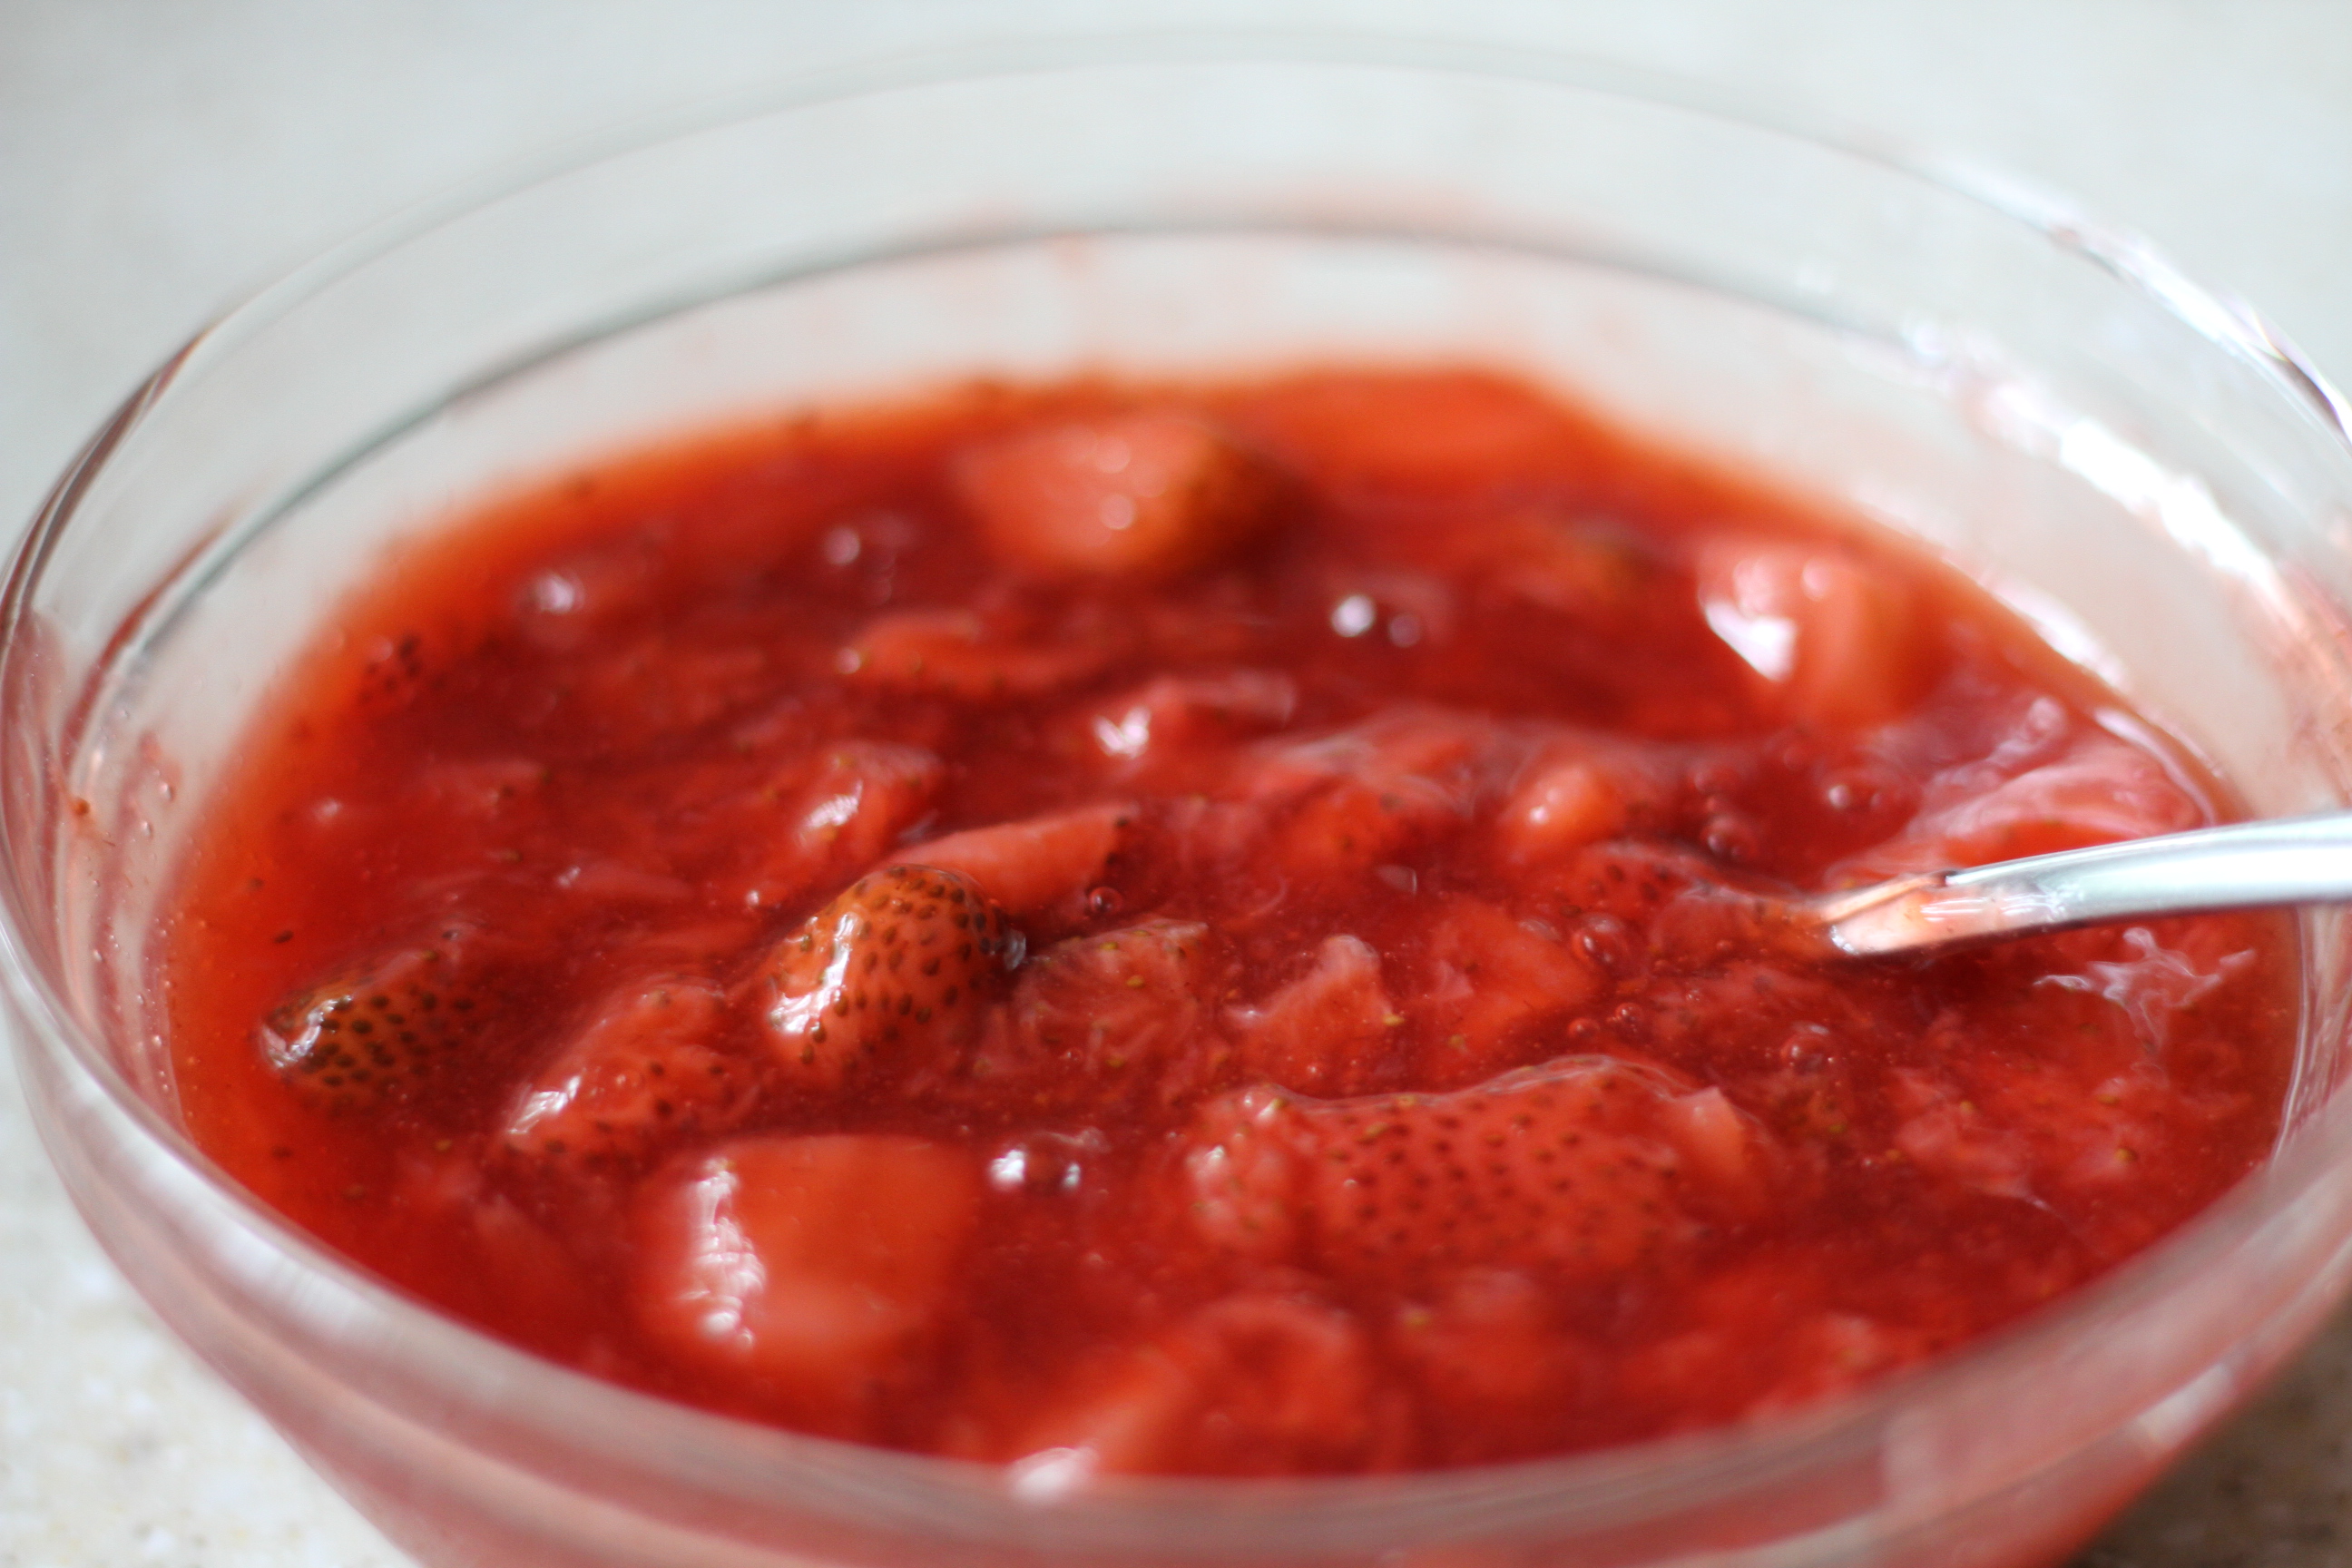 Summer is upon us! And while I have recently mentioned two different recipes containing strawberries(this one and this one), I am going to hit you with one more! I mean, honestly! Who doesn’t love strawberries?!
I made this to go over waffles, but the leftovers are sublime over vanilla ice cream! Seriously. One bite with the ice cream and my eyes rolled to the heavens and I indulged in an evil little laugh while possesively cradling the bowl in my hands. Thankfully, I was alone at the time.
This only takes a few minutes to make, but it feels like something extra special. And just in case you do pour it over waffles, I highly recommend whipped cream and a side of bacon to go with it. Sweet and salty gets me every time…
Strawberry Sauce
While this is wonderful over waffles, pancakes, or ice cream, there is no reason to stop there. Use it as a sauce over angel food cake or layer it with cream and biscuits and make strawberry shortcake. Or if you really want to get crazy you could whirl some in a blender with some frozen yogurt, kiwi, blueberries and a spoonful of wheat germ and make one outstanding smoothie!
1 lb of strawberries, rinsed, tops removed, and cut into chunks
1/4 c sugar
pinch of salt
tiny splash of vanilla
2 T water
1 rounded tsp cornstarch
In a medium sauce pan, combine fruit, sugar, and salt. In a seperate bowl or cup, mix together the cornstarch and water to make a slurry. Add this to the fruit mixture-before putting it on the stove!-and stir together. Cook over medium heat until strawberries start to break down and sauce thickens slightly, about 5 minutes. Remove from heat and add the vanilla. Sauce will keep in the fridge for several days.
Note: You may need to add more sugar depending on how ripe your fruit is. If your fruit isn’t very…umm…strawberry-ee, then add a bit more.
Homemade Vanilla Ice Cream
Brittany wrote this on 25 May 2011![]() cream, gluten-free, milk
cream, gluten-free, milk
 I know that this makes two dessert recipes in a row, but on the off chance that you aren’t going to just whip up a 6 layered birthday cake this weekend (although it would be an AWESOME pot-luck donation!) I wanted to post about the other half of the ‘cake and ice cream’ duo that we served at the party last weekend. And since it is Memorial Day weekend coming up-three days of BBQ’s, parades, giving thanks and hopefully some special treats and drinks-I wanted you to have this a few days before so you could gather the ingredients. But before we get to the recipe, lets chat a bit about ice cream makers, shall we?
The above picture was taken about ten seconds after I pulled the paddle out of the bowl and licked it clean whilst standing over the sink. Half melted ice cream was dribbling down my chin, and I may or may not have been making what I am sure were very unladylike grunts and groans of pure pleasure. The bowl in the picture is my ice cream maker and it is actually an attachment for my Kitchen Aid. I mentioned this briefly in a previous strawberry ice cream blog, also a winner to serve this weekend. The bowl is kept in the freezer so when you are ready to freeze your ice cream, you just take it out and it locks on to whatever model of Kitchen Aid that you happen to have. It comes with a special paddle attachment to churn the cream base and voila! Homemade ice cream! Quite spectacular if you ask me and not terribly expensive if you already own the mixer. But, obviously any kind of ice cream maker will work. There are the ones you toss around like a ball (I like the green ones) and they are inexpensive and fun, ice cream makers with a hand crank but are still electric, and then just your basic electric ‘plug-in and leave alone’ kind. So if you are looking for one, try this, or research and take your pick. You can find every kind imaginable.
And just in case you are thinking that they aren’t worth the investment, let me put your fears to rest. Unless you and your whole family are severely lactose intolerant, you secretly hate ice cream and would never make it for family and friends, or you have some kind of sickness that prevents you from ingesting food colder than 50 degrees (“Excuse me, but could you microwave my iced tea? Thanks.”) , you might want to consider it. There really is nothing like homemade ice cream. And you can’t use the excuse of time either! Yes, my last few recipes for ice cream include egg yolks and cooking and stirring over a stove and straining and cooling, but that is only because I prefer the rich custard-y taste of egg based creams. There are endless recipes out there that take no more effort than dumping a few ingredients together in a bowl. Sometime this summer I will post my recipe for cream cheese ice cream. No eggs, no fuss and it is Off. The. Hook.
So back to today’s recipe, my daughter refused to let me alter it. I actually had another recipe to test and then I was going to compare and adjust and tweak. But she put her foot down. This was the ice cream she wanted with her cake and she begged me to make it again, just how it was.
So here it is. Pretty darn tasty and I should mention that my favorite part is the fact that it doesn’t freeze completely firm. Usually with homemade ice cream you have to let it sit out for a bit before you serve it because it freezes so hard. This recipe is perfectly scoopable right from the freezer. Its a little thing, I know, but extremely handy when feeding a crowd. Or when you are desperate for a bowl of it covered in mini chocolate chips and you are in the middle of an Alias marathon and are frantic to find out if the Rimbaldi prophecy about Sydney Bristow is true and you just don’t want to take the time to fight with ice cream that is hard as a rock! You know. Hypothetically. Vanilla Ice Cream
Adapted from Martha Stewart
2 c milk
6 large egg yolks
3/4 c plus 2 T sugar
2 c heavy cream
2 tsp vanilla extract
In a medium saucepan over medium heat, warm the milk until steaming and hot, but not bubbling. Meanwhile, with an electric mixer fitted with the whisk attachment, beat egg yolks and sugar on medium-high speed until thick and pale. Slowly pour a small amount of milk into egg-yolk mixture, beating on low speed until blended. Continue adding milk, about 1/2 cup at a time, beating until incorporated after each addition. Return mixture to the saucepan and stir with a wooden spoon over low heat until mixture is thick enough to coat back of spoon, 3 to 5 minutes. Custard should retain a line drawn across the back of the spoon with your fingertip. Remove pan from heat and stir in cream. Pour custard through a fine mesh sieve into a medium bowl and chill in the fridge until cold, preferably overnight. Stir in vanilla. Freeze in an ice-cream maker according to manufacturer’s instructions.
White Chocolate Rainbow Cake & A Party
Brittany wrote this on 24 May 2011![]() buttermilk, white chocolate
buttermilk, white chocolate
 My daughter turns five this coming weekend and I am not only in serious denial, but so sad about the whole thing I just may get physically ill. You see, if she turns five, then that means kindergarten in the fall and I can’t even fathom the thought of what a wreck I will be then! If I inexplicably drop off the face of the earth somewhere around the end of August, it is because I am working on a secret formula that somehow allows children to grow-up without really growing up.
I let my daughter choose the menu for her party that was this past weekend and the first request was BBQ Pork-a girl after my own heart! I am so proud… I made coleslaw from this recipe and apparently (I don’t like coleslaw) it was outstanding, or so I was told! Grilled chicken, fried corn, panzanella salad, lemon-thyme orzo, and watermelon rounded out menu. And it was goooooood. Recipes this week will be from her menu so get ready for an influx of summer dishes that are perfect for the holiday weekend coming up! You will be all set for those Memorial Day bbq’s and potluck parties!
But in honor of this birthday (five is a big girl after all!) I made a very special cake for her. When I turned five I thought I was so old! I was convinced that people could tell just by looking at me I was a headed to school in the fall! So I wanted to do something special in honor of my big (sob sob sniff wail gasp sigh) girl. This is the cake pre-party when I had time to take its picture:
 This is the cake mid-celebration when I wasn’t manning the camera, children were everywhere underfoot and I was trying to cut the cake and make sure we didn’t run out of forks. As you can see, the birthday girl was excited to cut into the rainbow!


 While I am extremely sad to even acknowledge the fact that Evelyn is going to be five in a matter of days, I was thrilled to be able to make her the coolest cake she had ever seen. A white chocolate rainbow cake covered in fluffy stars of white chocolate buttercream. There wasn’t even one crumb left for me to photograph! Thank you to my devoted husband who snapped a few shots in between passing out plates so that I would have something to show for my hard work! Evelyn requested vanilla ice cream too but that will have to wait for another post! Thank you a million times over to my cousin who forwarded me this recipe. I can’t wait to make it again! Maybe in all ‘boy’ colors? Red, white and blue? Hmmmm…
White Chocolate Rainbow Cake
Cake:
4 oz white chocolate, chopped
1/4 c very hot water
1 c butter, softened
2 c sugar
4 egg yolks
1 tsp vanilla
2 1/2 c cake flour
1 c buttermilk
1 tsp baking soda
4 egg whites
Melt the white chocolate in the hot water and set it aside to cool. Cream butter and sugar until fluffy. Add egg yolks 1 at a time. Add vanilla. Add cooled, melted chocolate. Sift flour and baking soda together and add to creamed mixture in three installments, alternating with buttermilk, ending with buttermilk. Blend just enough to incorporate ingredients, stirring by hand in the end if you need to. In a separate bowl, beat egg whites on high until peaks form. By hand, fold gently into batter. Streaks are just fine because you will mix more when you add the food coloring. Divide the batter into 6 bowls evenly, about 1 1/2 c of batter for each color. Color batter with gel food coloring, mixing it VERY GENTLY so as not to deflate the egg whites! Grease and flour the pans well. Bake in 9-in round pans at 350 for about 15-17 min. Cool 10 minutes in pan and then cool completely on wire rack.
Note: If like me, you don’t have six cake pans to bake them all at once, chill the separate bowls of batter until ready to use and bake them in shifts.
White Chocolate Buttercream
1 c of butter, softened
2 1/2 c powder sugar
6 oz white chocolate, melted and cooled in microwave in 30 second intervals
1T heavy cream
Beat butter and sugar until fluffy. Add melted and cooled white chocolate and cream. Beat on high 3-4 minutes, scrapping sides of bowl. Add more powdered sugar or cream to achieve the desired consistency. 1 1/2 batches will do the filling and a thin crumb coat and 1additional full batch is perfect for a final coat using a star tip. Keep frosted cake cool, but not cold.
 The normal things kept me from blogging this week; internet was down, sites were down, house projects needed finishing, my husband and kids were in a race Saturday morning (in the rain no less) and life generally got in the way. Now, it is Sunday afternoon and I have a ton of stuff to do before we leave town on a mini stay-cation tomorrow. But you, dear readers, are on my priority list. Don’t you feel blessed? 🙂
I was reading this blog the other day and have been pondering the subject matter ever since. You should definitely read it (and all the comments, they are really fun) but the basic gist of it is that we all have something that is our ‘page turner’. A technique or ingredient that makes us-wait for it-turn the page whenever we see it in a recipe or cookbook. Some examples were puff pastry, saffron, any recipe that called for deep frying, that sorta thing. But what really surprised me was how many people said that cream of tartar scared the begeezus out of them. Seriously? Cream of Tarter? Like, the white stuff in the back of my baking cabinet that looks like baking soda or powdered sugar? It is so innocent! So unassuming! Are there more of you out there who are intimidated by this small container of powder that has the ability to make egg whites bend to your every will and desire?! Sheesh! I had no idea!
Let me put your fears to rest! Behold my new favorite recipe! Psst…it contains cream of tartar!! I had to make it several times just to be sure that it would be a good one to share with you. I know! I know! The things I do for you guys! And after much tasting and sharing of it with my friends and family-they too were very put out with taste testing- we have come to a decision: this is fantastic! It will make your skirt fly up and your hair blow back. It will knock your socks off and float your boat. It will…well you get the picture. There aren’t words for how wonderful it is. The first batch vanished several minutes after the first cut was made and while I would like to tell you that there were a dozen people here that night eating dessert, that would be misleading. Because there were really only a few of us and we at it all anyway. I turned to my husband and said, “I must make this again. Now.” And I did. And shared it with a different group of people (an even smaller gathering, if truth be known) and we at it all again. ALL OF IT. I think the chocolate ganache on top must have some sort of magical power…
 So here it is. I won’t keep it from you any longer. Dust off that jar of cream of tartar (check the expiration date please!) and conquer your fear. You can check out the basics of this magical ingredient here. For the present time though, just know that it will help stabilize your egg whites making this recipe a cinch to make. Please note that this recipe, like all angel food cakes, is baked in a tube pan. A tube pan looks like this:
 It has a hole in the middle and the sides are straight. Ignore a non-stick version; you actually want an angel food cake to stick. They are inexpensive and available almost anywhere. Also, this recipe calls for A LOT of egg whites. Use the real thing, not the pasteurized ones from the carton. What do you do with all the egg yolks, you ask? I recommend strawberry ice cream, but that’s just me…
And if, after eating this cake,you are still in any doubt about the stellar capabilities of cream of tartar , you can always use it to make your own baking powder. Yup. No joke. If you ever find yourself out of baking powder, as I did not too long ago whilst in the middle of making pancakes, just mix 1 tsp baking soda and 2 tsp cream of tartar together. Yield: 1 T of baking powder. But I’m warning you. It makes you feel a little like a mad scientist to mix your own leavening chemicals. *insert evil laugh*
I would love to know what your ‘page turner’ is! Comment below and if I can, I will try and feature a recipe just for you! Unless, like me, you don’t even want a recipe that calls for fresh vanilla bean because you like the flavor of pure vanilla extract better. Hmmm…what is my page turner…


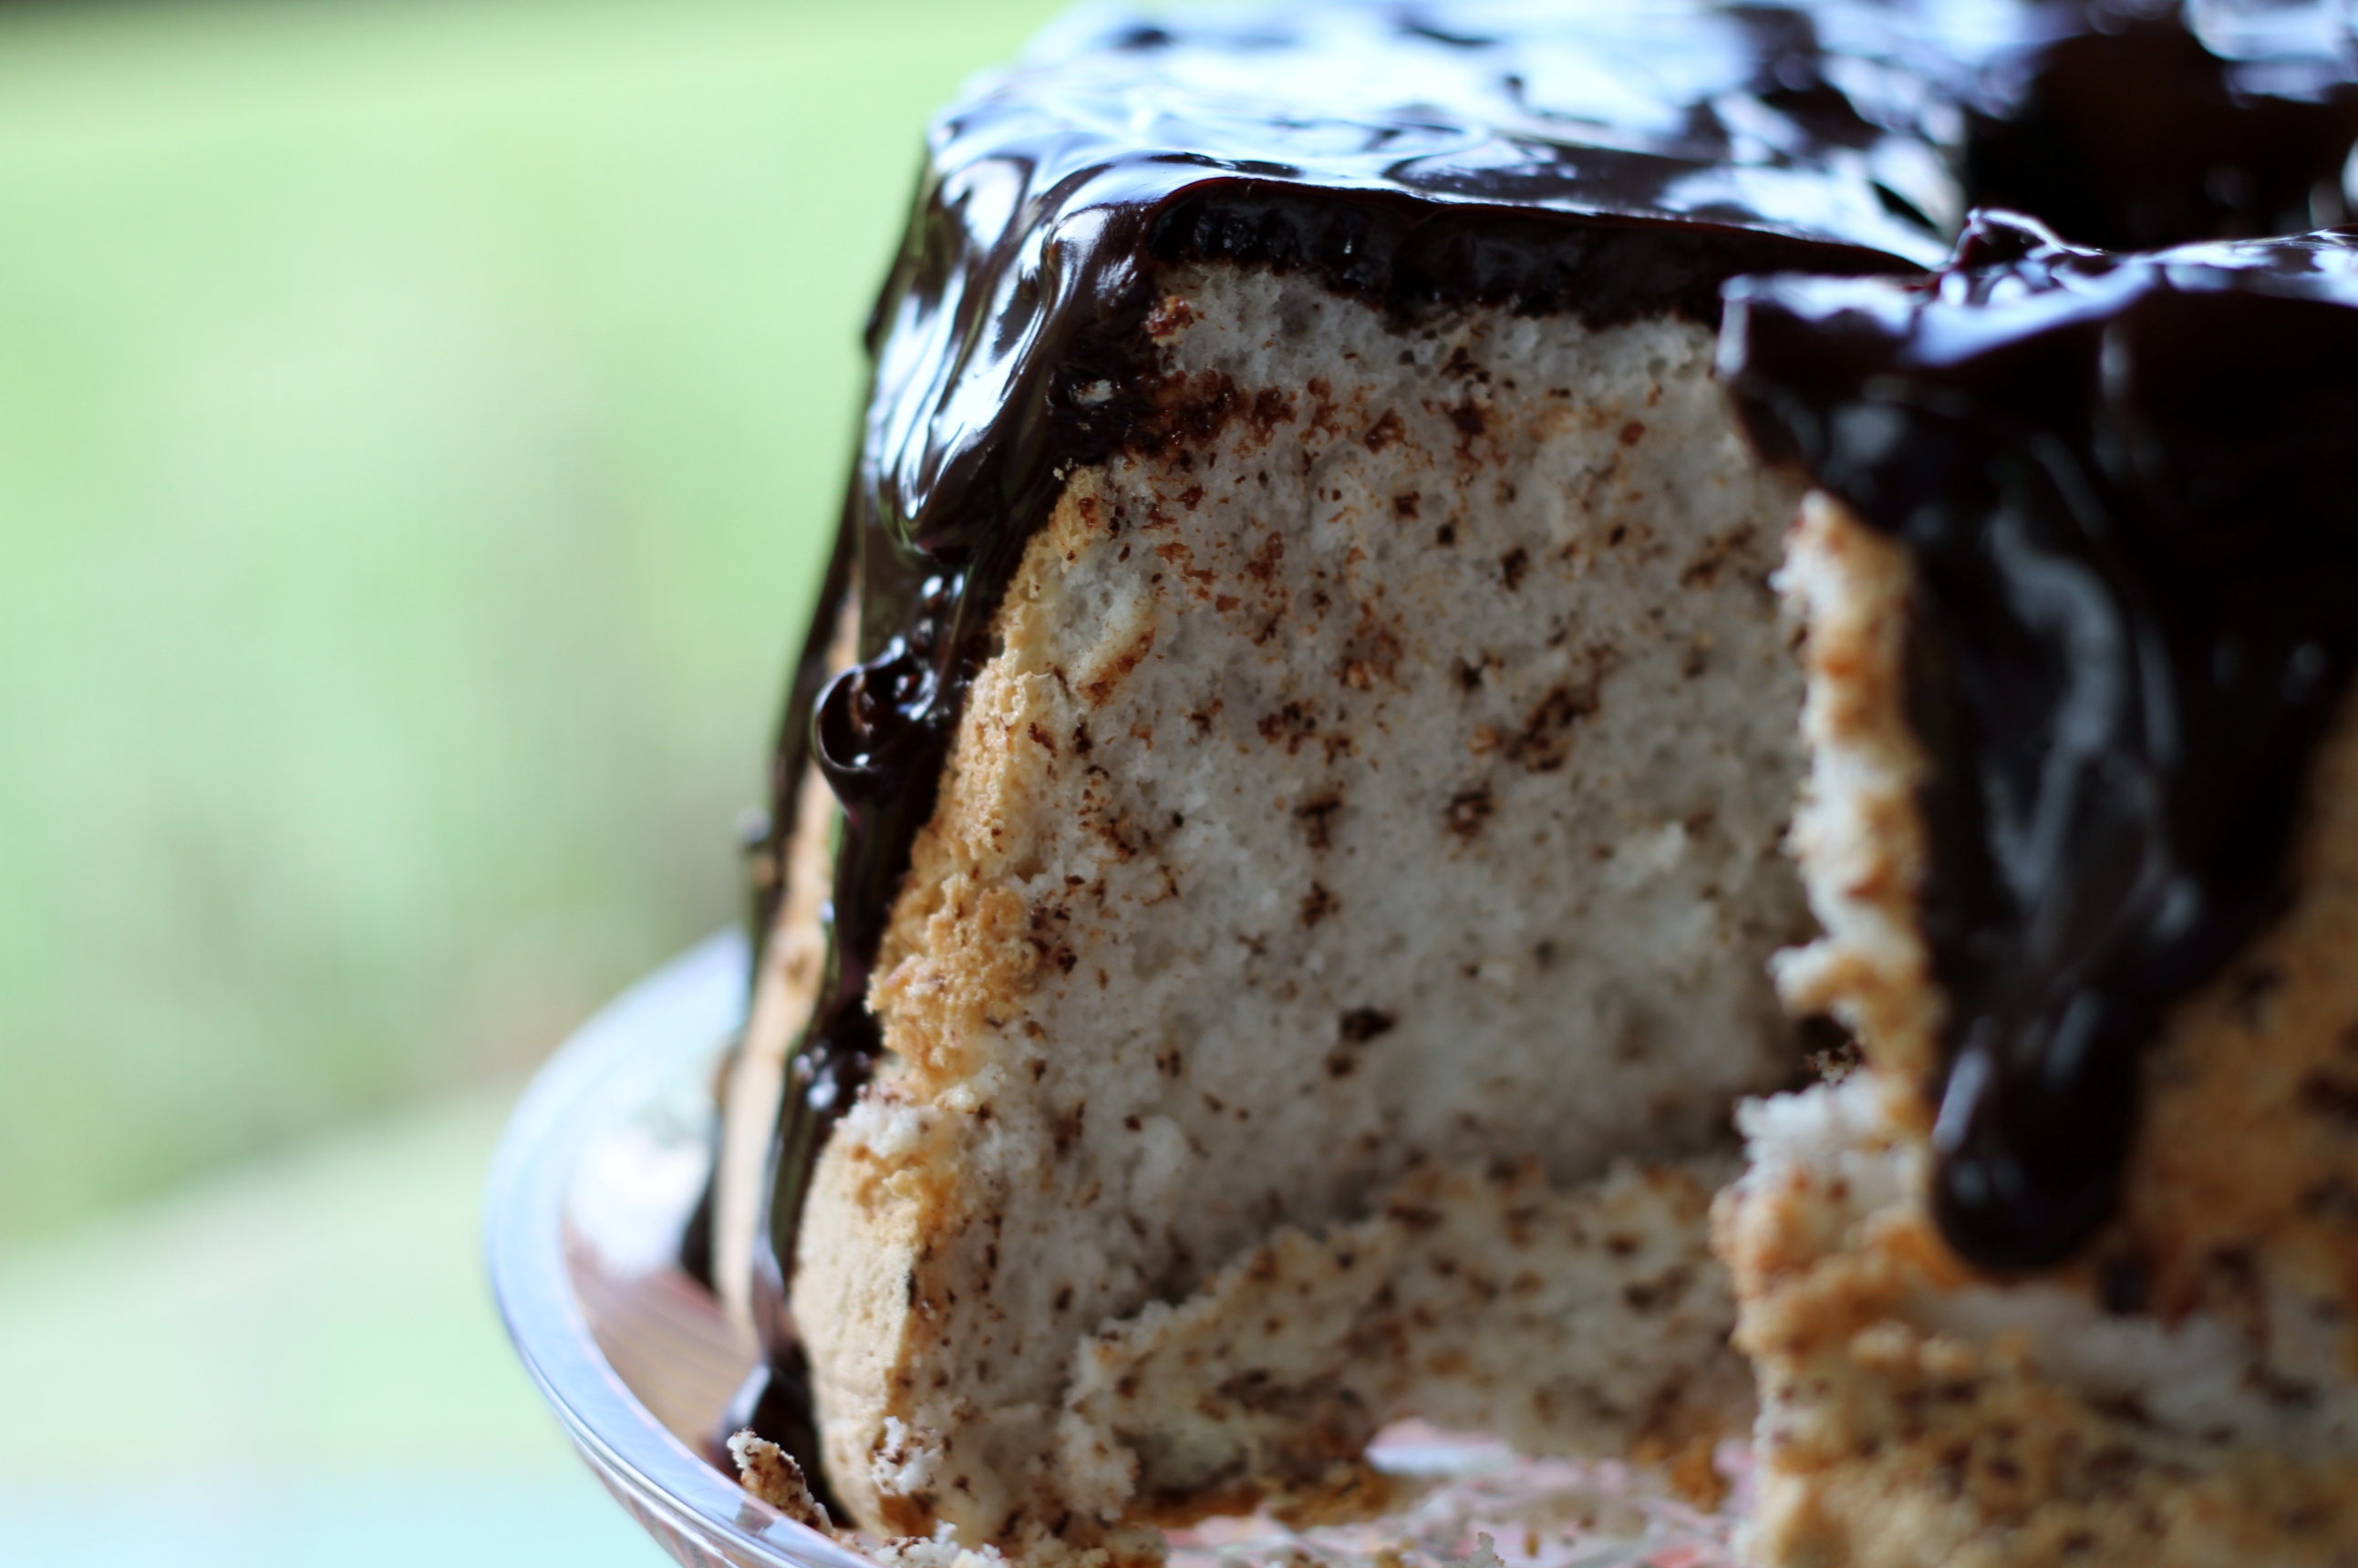 Black & White Angel Food CakeRecipe adapted from Ina Garten
2 c sifted superfine sugar (see note below)
1 1/3 c cake flour
1 1/2 c egg whites, preferably at room temperature (10 to 12 eggs)
3/4 tsp salt
1 1/2 tsp cream of tartar
1 tsp vanilla
1/2 c coarsely grated semisweet chocolate (This is easiest on the biggest side of your box grater. The same one I use to grate cheese.)
Ganache Topping:
1/2 lb semisweet chocolate chips
3/4 c heavy cream
Mix 1/2 c of the sugar with all of the flour and sift them together 4 times. Yes, this seems excessive, but it is needed to achieve a nice smooth batter. Set this aside. Place the egg whites, salt, and cream of tartar in the bowl of an electric mixer fitted with the whisk attachment and beat on high speed until the eggs form medium-firm peaks. They should just barely hold their shape. With the mixer on medium speed, add the remaining 1 1/2 cups of sugar by sprinkling it over the beaten egg whites. Beat on high speed for a few minutes until thick and shiny. Add the vanilla and continue to whisk until very thick, about 1 more minute. Sift 1/4 of the flour mixture over the egg whites and fold it very carefully into the batter with a rubber spatula. Keep adding the flour in 3 more additions, sifting and folding until it’s all incorporated. Fold in the grated chocolate (see above pics). Pour the batter into an ungreased 10-inch tube pan, smooth the top, and bake it for 35 to 45 minutes at 350 degrees until it springs back to the touch. Remove the cake from the oven and immediately invert the pan on a cooling rack or flat, heat proof surface (see pic). When cool, run a thin knife around the cake to remove it from the pan.
For the chocolate ganache, melt the chocolate chips and cream together in the microwave in 30 second intervals, stirring between each one, just until the chocolate is melted. Pour the ganache over the top of the cooled cake and cover the top completely, allowing it to drizzle down the sides.
Note: Superfine sugar is just what it says it is: sugar that is finer than regular granulated sugar. Usually it is called for in recipes when the sugar needs to melt fast without a lot of heat. The use of it here makes for a light cake with a smooth, fluffy texture. No graininess, like with some angel food cakes. But I hate to make an extra trip to the grocery store to buy it so I usually just make my own. For this recipe, add 2 1/4 sugar (this will yield the 2 c needed for this recipe when the texture is finer) to your food processor and blast away. Let it run for a few minutes and you are good to go.
Strawberry Ice Cream: Summer In A Bowl
Brittany wrote this on 6 May 2011![]() cream, gluten-free, milk, strawberries
cream, gluten-free, milk, strawberries
 Homemade ice cream. Better yet! Homemade strawberry ice cream!
When I recently found myself with an overabundance of very ripe strawberries, I decided to make ice cream. Is there anything better than homemade ice cream? I am continually thankful for my Mother-In-Law’s gift a few Christmases back: an ice cream maker attachment for my Kitchen Aid. Yes, they really make them! And nope! I didn’t know they did either! If you are looking for one or just want to see what the heck I am talking about, you can check it out here. The bowl is stored in the freezer and then it just twists into place like a regular mixing bowl. Quite wonderful. And I try and use it as much as I can. I came across a recipe for strawberry lemonade ice cream that I thought sounded genius. But I was in the mood for the classic. The original. But it had to be the ultimate too. Whose version did I settle on? *sigh* Martha Stewart. Yup. This is her recipe. Rich and custardy (is that a word?) with a ton of strawberries. I like my ice cream super creamy, but with a depth of flavor. A custard base is almost always a must for me; lots of egg yolks to clog the arteries really make it out of this world. Frozen sweet cream isn’t going to cut it!
So here it is. Straight up. No frills. Just the real thing. And it is good. Very good.

Classic Strawberry Ice Cream
Directly from Martha Stewart
8 egg yolks
1 1/4 c sugar
pinch of salt
2 c skim milk
4 c sliced strawberries
2 c heavy cream
In a medium saucepan whisk egg yolks, 1 c sugar, and salt until blended. Gradually whisk in skim milk. Cook over medium heat, stirring constantly with a wooden spoon, until custard thickens slightly and evenly coats the back of the spoon. If you draw your finger across the spoon it will hold the line. This will take about 10 minutes. Longer if you have a stove like mine. But don’t let it boil. Pour custard through a fine-mesh sieve into a bowl set over ice. Stir in cream. Let stand, stirring occasionally, until chilled and cold. Freeze in an ice cream maker according to manufacturer’s instructions. Mash 4 cups of sliced strawberries with 1/4 cup sugar and let stand 10 minutes. Add to ice cream as it churns in ice cream maker. Transfer ice cream to a resealable plastic container and freeze until firm, about 2 hours (or up to 3 months).
 As I type this I am aware of two things. First of all, yes, I realize that this makes it two lemony recipes in a row. I like lemon flavored things. You are just going to have to deal. Second, is that it has been about a week since I last blogged. My only excuse is that I have been really busy and had out of town company here for a long weekend. My husband and sister ran a half-marathon on Saturday and did such a great job! We celebrated with Black and White Angel Food Cake with Chocolate Ganache, but that is a different recipe for a different day.
The Lemon Chiffon Pie is the dessert I made for Easter and am just now getting around to telling you about it. There are a lot of steps, but none of them are hard, so it went together quite easy. The star of this recipe is the CRUST! When it comes to pie, the crust is usually my least favorite part, but wowzer. This was outstanding. The filling was good on its own, and the crust was good by itself too. But together? The ginger snaps make the crust kind of like a crunchy and chewy cookie that was absolutely outstanding with the lemon pie. One of my new favorite combinations. And we ate it all. Scrumptious!

 Lemon Chiffon Pie
Adapted From Bon Appetit
CRUST
1 1/4 c finely ground gingersnap cookie crumbs (about 25 cookies ground in processor)
2 T sugar
5 T butter, melted
FILLING
1/4 c water
1 envelope unflavored gelatin
3/4 c plus 2 T sugar
3/4 c fresh lemon juice (no substitutes people!)
4 egg yolks
zest of 1 lemon
pinch of salt
1 1/4 c chilled heavy cream
1/4 c powdered sugar
FOR CRUST:
Mix cookie crumbs and sugar in a medium bowl. Add melted butter and stir until mixture is evenly moistened. Dump mixture into a 9 inch diameter glass pie dish. Press crumbs firmly and evenly onto bottom and up sides to top of dish. I like to use a measuring cup to help shape it (see pic above). Bake at 350 until crust is firm and slightly darker in color, about 8 minutes. Cool crust completely.
FOR FILLING:
Pour enough cold water into medium bowl to come halfway up sides and add 2 cups ice cubes and set aside. Pour 1/4 c water into small bowl and sprinkle gelatin over. Let stand until gelatin softens, about 15 minutes.
Whisk remaining 3/4 c sugar, lemon juice, egg yolks, grated lemon peel, and salt in heavy medium saucepan to blend. Whisk constantly over medium heat until mixture thickens very slightly (mixture will coat spoon but will not be thick like curd) about 6 minutes (do not boil). Add gelatin mixture and whisk until gelatin dissolves and mixture is smooth, about 1 minute. Place saucepan in bowl with ice water until lemon filling is cool to touch, whisking occasionally. Transfer lemon filling to large bowl.
Using electric mixer, beat cream with powdered sugar in another medium bowl until peaks form. Fold 1/4 of whipped cream into lemon filling until incorporated. Fold in remaining whipped cream in 3 additions. Transfer filling to cool crust, mounding slightly in center. Refrigerate pie until filling is set, about 4 hours. DO AHEAD: Can be made 1 day ahead. Keep refrigerated.
Good For You Cranberry Chocolate Chip Cookies
Brittany wrote this on 15 April 2011![]() chocolate, cranberries, oatmeal, walnuts, wheat germ, whole wheat flour
chocolate, cranberries, oatmeal, walnuts, wheat germ, whole wheat flour
 These aren’t just any cookies. Oh no. Yes, they are chewy and crunchy and sweet. But they are also good for you.
Years ago, I came across a recipe for cookies made with canola oil. And while with certain recipes I am definitely a purest (Low fat alfredo? Uh..No.) there are as many cookie recipes out there as there are people. Variety is good. We should all have variety in our lives. And a cookie made with canola oil tells me two things. First of all, it means I don’t have to have softened butter on hand or take the time to cream it with sugar. Second, it means that I can cut out fat and calories, making the recipe better for my arteries. But none of those things is worth it if the food tastes terrible. Taste is the ultimate deciding factor in any recipe. So I started experimenting. And ultimately, this was the result.
You dump the ingredients in a bowl, mix it up, and bake them. They are fast, easy, and while they do have a wonderful amount of brown sugar in them-hence, the crispy and chewy texture we all crave in a cookie-they are as good for you as they can be and still taste like a treat. I make these all the time. Especially when we have company over. Its fun to pass them around and see the look on their face, which is inevitably followed by “These are good for you? Wow!”
So direct from my kitchen to yours. Give them a try. And maybe have two!
 Good For You Cranberry Chocolate Chip Cookies-Recipe modified 1/7/13
You can absolutely use any combination of dried fruit and chocolate and even nuts that you like!
In a large bowl, combine:
1 1/4 c brown sugar
1 c canola oil
2 eggs
1 tsp vanilla
Add: 3/4 c oatmeal
1/4 c wheat germ
1 c white whole wheat flour or whole wheat flour
1 c all purpose flour
1 tsp baking soda
1 tsp salt
Mix until well combined and add 1 c chocolate chips and 1 c dried cranberries. Drop by rounded teaspoonfuls onto a greased or parchment covered sheet pan, pressing to flatten just slightly. Bake at 350 for 10 to 12 minutes or until slightly golden brown on top.
One Bowl Chocolate Cake
Brittany wrote this on 5 April 2011![]() buttermilk, chocolate, cocoa, coffee, whole wheat flour
buttermilk, chocolate, cocoa, coffee, whole wheat flour
 Sooooo…the last few days in my kitchen have been very experimental. Meatball sliders, grilled chicken skewers, chocolate cake, white cake, punch, carrot salad…exhausting! My son turned 2 last week and his birthday party was on saturday. *sniff* I won’t go into the emotional details, but suffice to say that if somebody ever invented a special potion that allowed children to grow up and stay small at the same time, I would be first in line! I can’t belive he is 2! And my daughter will be 5 soon and…OK. I am getting tears on the keyboard. Moving on!
I was having a hard time narrowing down what exactly to blog about today. The homemade ketchup I made was quite good, but I think that may have to wait for another day. The rootbeer BBQ sauce still needs work, but the Lime Sherbet Punch was yummy and you can find the recipe here. The meatballs were AWESOME, but I forgot to photograph them. The white cake was just OK, the buttercream was outstanding, but the chocolate cake was wonderful! So chocolate cake recipe it is!
Are you dissapointed? Would you like me to post the recipe for carrot salad instead? I didn’t think so. That’s just crazy talk!
Although I do love me a great carrot salad…
I have no idea where either of these recipes (the cake or the frosting) came from. Like many of my recipes, they were skribbled on a sheet of paper and added to the pile of thousands of recipes I have collected for me to try. They have both been modified, but I just want to formally apologize to whoever dreamed them up first. Kudos.
There are several wonderful things about this recipe. First of all, its size. It makes just one round layer (or, I suppose one 9X9-although I haven’t baked it that way before) which is perfect when you are after something decadent and sweet, but don’t want to have to figure out what to do with a whole cake. Not that I am ever at a loss as to what to do with cake, but you know what I mean. The other great thing about this, is that it isn’t as bad for you as you would think. It tastes just like dessert should: rich, creamy, sweet and indulgent. But it has some very healthy ingredients. Yup! Not too shabby. Now if you will excuse me, I am going to eat another piece.
 One Bowl Chocolate Cake-Recipe Modified 4/17/13
You guessed it! A bowl and a whisk is all you need to mix this up. No mixer, no fuss. It couldn’t be easier.
1/4 c sugar
1/2 c brown sugar
1 egg
2 T canola oil
1/2 c low fat buttermilk
1 tsp vanilla
Mix all ingredients together in a large bowl. Add:
3/4 c + 2 T white whole wheat flour
1/3 c cocoa powder
1 tsp baking powder
1 tsp baking soda
pinch of salt
Mix gently, until all ingredients are nearly incorporated. Add:
1/2 c coffee, cooled to room temperature
Slowly and gently mix until you have a smooth batter. Pour into a buttered and floured 9 inch round cake pan and bake at 350 for 25 -30 minutes. Cool in pan for 10 minutes and then turn out onto a cooling rack until completely cool. Frost.
Chocolate Frosting
This makes just enough to frost the top and sides of the above cake. It is also perfect if you want something quick to eat out of the bowl frost a pan of brownies!
2 T soft butter
1/2 c cocoa powder, preferably sifted
1 1/2 c powdered sugar
1/4 c milk, or more
Mix the first three ingredients, adding a splash of the milk to help them go together. Keep adding tiny splashes of milk until it gets to the consitencey you are looking for. Beat with a spoon till smooth.
Peanut Butter & Jelly Bars
Brittany wrote this on 19 March 2011![]() peanut butter, peanuts
peanut butter, peanuts
 Yesterday, I was in desperate need of these bars.
I don’t know why, but in the middle of researching different counter stools to go in my new kitchen, I read something that triggered the memory of these bars, and I suddenly said to myself, “I must eat these now.” I jumped up and ran across the house and started to hunt through my basement for the the cookbook I knew contained the recipe. It took a half an hour to find it, but I emerged victorious! And even though I had to mix them in my living room and clean up the dishes in my bathtub, it is completely worth it.
The first time I made these was for The Great American Bake Sale. I tested the recipe and loved them so much, I turned around and made another batch right away. Don’t let the name fool you! These are not just a treat for children! Although children do seem to like them… These are rich and sweet and a wonderfully nostalgic dessert to have in your recipe box. The flavor is classic but far from boring. Outrageous! Peanut Butter and Jelly Bars
Adapted from Ina Garten
Obviously you can use any kind of jam or jelly to make these. Even though I am not a huge raspberry fan, the tartness of the jam balances perfectly with the richness of the bar. We found that blueberry and strawberry tasted fantastic, but the overall flavor was too sweet.
2 sticks (1/2 pound) unsalted butter, softened
1 1/4 c sugar
1 tsp vanilla
2 eggs
2 c creamy peanut butter (we like JIF)
1 1/2 c all-purpose flour
1 1/2 c white whole wheat flour
1 tsp baking powder
1 tsp salt
1 1/2 c raspberry jam (1-18 oz jar)
1 c salted peanuts
Cream together sugar and butter until light and fluffy. Add the eggs, vanilla, peanut butter, and mix until well combined. Add the dry ingredients and mix just until combined. Press 2/3 of the peanut butter mixture into a sprayed, 9X13 pan. Spread the jam evenly over the dough. Drop the remaining batter in small globs evenly over the jam and sprinkle with peanuts. Bake at 350 for 40-45 minutes or until golden brown. Cool completely! Cut into 24 bars.
Crockpot Chocolate Mess
Brittany wrote this on 15 March 2011![]() chocolate, cocoa, sour cream
chocolate, cocoa, sour cream
 My crock pot has again become my favorite appliance in the kitchen. Not because it is perfectly convenient during construction. Not because it happened to be one of the only kitchen items accessible in the piles of belongings temporarily stored in our basement. But because it has been the key element in providing me large amounts of chocolate for the last two weeks.
A sweet comment from a friend reminded me that I needed to dig out my tried and true crock pot recipes. Several years ago (actually 2 states, 2 houses, 2 babies, 2 jobs, and about 20 lbs ago) I experimented with this quite lovely recipe for a chocolate dessert that you make in the slow cooker. I only vaguely remembered the ingredients, but the richness stuck with me vividly. Well, the recipe is MIA so I started researching different versions of it. And let me tell you. It is tough testing chocolate dessert recipes. A special thanks to my small group at church for shouldering this burden with me.
It took several tries (I mean really! What I won’t go through for my readers!) but I think I have it down pat. The texture might vary a little bit depending on what mixes you use, but it will without a doubt taste wonderful. This will easily feed ten people for dessert. It is very rich so you may need to accessorize with vanilla ice cream. I am just saying… Crock Pot Chocolate Mess
This dessert is like a really really moist chocolate spoon cake. Very little effort and a yummy result. Be careful not to over cook it or the edges will get a dry and tough. If that happens (it will still taste good) just leave the edges and eat the middle.
1 box chocolate cake mix
1 small box instant chocolate pudding mix
1 c water
1/2 c canola oil
1 1/2 c sour cream
4 eggs
1 1/2 c chocolate chips
Spray the insert for your slow cooker with non-stick spray. Combine all ingredients except the chocolate chips. Mix until smooth and stir in the chocolate chips. Spoon into slow cooker and spread evenly. Cook on low for 5-6 hours, or until dessert is evenly puffed and set. Store leftovers in the fridge for up to 2 days.
Note: If the dessert starts to pull away from the sides of the slow cooker, it has been in too long. If you think it might be done, turn it off and put a paper towel under the lid to catch the steam. It will cook a little longer with the residual heat and stay very warm for several hours.
Crispy Bars
Brittany wrote this on 25 January 2011![]() cereal, marshmallows, peanut butter
cereal, marshmallows, peanut butter
 In between ripping down walls, removing sofits, cutting holes in our kitchen ceiling, rewiring said kitchen, and cleaning up the mess that all of that creates, I made rice crispy bars. An opened bag of mini-marshmallows used to top the previously mentioned hot chocolate and an overabundance of rice crispy cereal (sale+coupon=4 boxes) led me to whip up a batch. I had to make them on the stove because our microwave has been retired to the ‘discard’ heap in our screen porch, right next to the drawer that falls out of the wall, the cabinet that gives me splinters every time I reach for a glass, and the wallpaper that was painted red, but underneath is country blue hearts and chickens. So what if my toes were dusty from drywall! Who cares that my kitchen sink is now filled with old nails and splintered wood! No matter that I have to lift a sheet of plastic and duck to my knees just to pass through my doorways! “I am making rice crispy bars!” I shouted to my unfinished home. “And they make me happy!”
So I vacuumed off the top of the stove and got to it. Now, I know what you are thinking. Rice crispy bars? Everyone knows how to make them. True. But one day this summer my desperation for rice crispy bars, particularly extra chewy rice crispy bars, led to a particular combination of marshmallow goodness. My husband yelling across the house that he likes peanut butter in his prompted the second version of this recipe. I must have made a half dozen batches in a few weeks time and we shared very few of them. At some point in time, I stopped adjusting the amount of marshmallows and peanut butter and I realized that I was just making them the same every time. Our family had found our ultimate rice crispy bar. Simple. Classic. The perfect childhood dessert. Hmmm. Maybe its time to ‘test’ cheesecake recipes…


Crispy Bars
1-16 oz bag marshmallows(note: this is the big bag, not the regular size)
4 T (half stick) of butter
1/3 c peanut butter
1-12 oz box crispy rice cereal
Melt the first three ingredients in a large microwave safe bowl. Alternatively, use a large pot over med low heat on the stove. Once the mixture is smooth, add the cereal and stir quickly but carefully until all ingredients are evenly distributed. Press into a sprayed, 9X13 pan. Cut into bars.

Midnight Crunchies
Brittany wrote this on 21 January 2011![]() cereal, cherries, chocolate, cranberries
cereal, cherries, chocolate, cranberries
 What do you do with leftover cornflakes? Make dessert! No, I didn’t make haystacks (sorry Megan) but went in a different direction. Remember haystacks? Cornflakes, butterscotch chips, and peanut butter all spooned into little blobs? Quite yummy. But when you have a pile of various kinds of chocolate, all opened, you either need to make a big batch of brownies, or these cornflake things I made up. I am sure there are about a dozen different versions of this recipe using all different variations of cereals. Cornflakes, rice crispies, and I have even seen a version with pretzels. But this is what I had to use up in the pantry so this is how I made it. Just about the tastiest use of leftovers ever!

 Midnight Crunchies
Feel free to change the name. I just made it up about 5 seconds ago.
12 oz of dark chocolate, finely chopped, or 1 bag of dark or semisweet chocolate chips
3 c cornflakes
1 c dried cherries or cranberries (I used 1/2 c of each)
In a medium sized, heat safe bowl, melt the chocolate in the microwave in 30 sec intervals, stirring between each. Stop before the chocolate is completely melted and stir it vigorously until smooth. Add in the rest of the ingredients and gently fold together until combined and evenly coated. Drop by tablespoonfuls onto wax paper or parchment paper. Let set for 30 minutes until cool and firm.
 At the present time, I am dealing with some strange things from my cupboards. I may have mentioned once or twice (or a dozen) times that we are renovating our house right now, and the kitchen is the next room on the chopping-er, demolition-block. No pun intended…
So from the depths of my pantry I am pulling forth some strange ingredients. I am at the point where everything that I don’t absolutely need, gets boxed up, hauled to the basement, and the remaining items get condensed down to my pantry shelves. The theory is that if we close the doors and drape it with plastic, that everything inside will stay relatively clean when the sledge hammers start to fly. That remains to be seen, but in the mean time, I need to make room for all of the dishes, pots and pans, utensils, and of course, food staples that we can’t live without. I want to be able to have access to a few things from my kitchen, even if it won’t really exist at the time. What is wrong with take-out, you ask? Well, nothing really. But we live in a fairly small town and our options are limited. We are a good half hour from anything beyond your basic fast food, something we really don’t eat anyway. And no matter how much I might crave a double cheeseburger, it would get old pretty quickly. Remember that whole conversation we had about me needing variety in my food? I have a feeling I will be tested in the weeks to come!
Now, I do have to clarify one thing. I confess that when I saw the Rubbermaid of ground oatmeal, my heart started to go pitty-pat. Sure, my husband happened to walk past me at the time, but it was also because I knew I could make these!
The only reason I have ground oatmeal (rolled oats ground fine in a food processor) in my pantry is to make these cookies. No joke! I wanted to make sure that I would always have the resources to whip them up whenever I wanted. And I had just enough left in my pantry to make one more batch. Now, I am going to go out on a limb here and say that as a family, we pretty much think these are the best chocolate chip cookies, ever! Just the right balance of sugar and butter. They aren’t cakey, but crisp and chewy. When we want just a basic, classic, chocolate chip cookie, this is the only one we make. Now what to do with all that coconut milk…
Giada’s Chocolate Chip Cookies
Adapted from Giada DeLaurentiis
This recipe is from her cookbook Giada’s Family Dinners, and she loves it so much, she made hundreds of them for her wedding. Once you make a batch, you will see why. Better yet, make a double and freeze some for a snack later.
1/2 c old-fashioned (not quick cooking) oats
2 1/4 c all-purpose flour
1 tsp baking powder
1 tsp baking soda
1/2 tsp salt
1 c unsalted butter (2 sticks), at room temperature
1 c brown sugar
1 c sugar
2 eggs
1 tsp vanilla
1 (12-ounce) bag semisweet chocolate chips
Pulse oats in a food processor until finely ground. Set aside. Using an electric mixer, beat the butter and sugars in a large bowl until fluffy. Beat in eggs and vanilla. Add the dry ingredients, including the ground oats and mix just until combined. Stir in the chocolate chips. Drop by tablespoonful onto a sprayed or parchment covered sheet pan. Bake at 325 or until cookies are golden (cookies will flatten slightly), about 14 minutes.
Love a Good Recipe?

Then you’ve come to the right place! I’m Brittany, and I share tested, trusted recipes you’ll love. I prepare & photograph food, obsess over the perfect recipe, and enjoy grins of delight when I serve up something awesome. Enjoy!


